
zip压缩算法分析(2)
zip压缩算法分析(2)
前言
在zip压缩算法分析(1)中已经分析了利用文本中短语重复的特性来进行压缩的lz77算法部分,接下来分析利用信息熵进行压缩的huffman编码算法,zip作者在这里对霍夫曼树的处理十分精彩,huffman树本身就已经很cool了,简直无法想象还能有这么流弊的改进。
gzip源码下载地址 参考资料 1 参考资料 2
huffman编码是很有名的一种压缩编码方式,网上,书上都有很多描述;其主要思想如下:
给出文本中所有字符c与各个字符出现频率f组成的字符表S[2, n],比起定长编码,一个比较明智的编码方法是将频率大的赋予较短的编码,频率小的则赋予较长的编码。那么究竟该如何分配呢?
1.编码树的概念。
为了便于解码,这里只使用前缀码(从实际含义上来讲,应该是无前缀码,但是由于权威文献中都使用这种坑爹翻译就只好随大流了),原因如图:
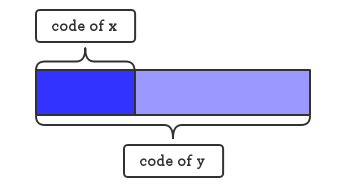
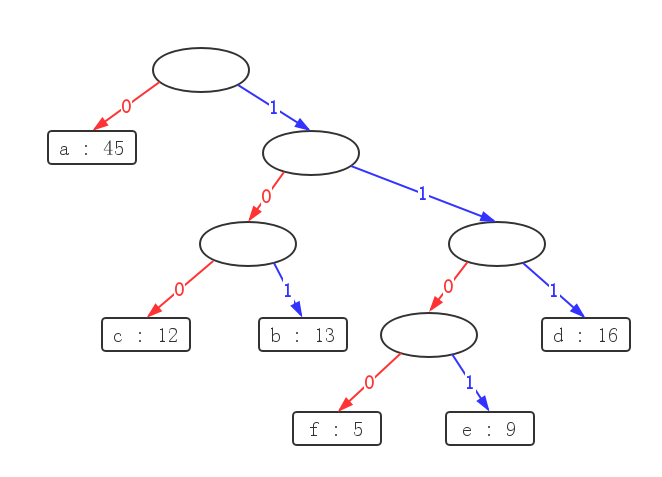
如果字符x的编码成为了字符y编码的一个前缀,那么很明显地,在解码时可能无法分辨是x还是y。考虑如图的一棵树:
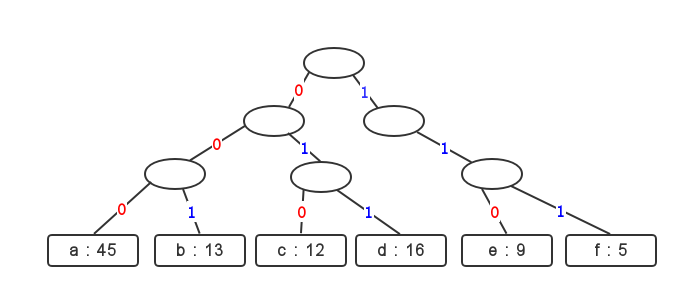
所有字符与其在文本中出现的频率构成这棵树的所有叶节点,由叶节点到根节点的路径决定了该字符的编码,因此编码树就成为了表示前缀编码方案的一个极好的模型:对于2个不同叶节点,不可能存在一个编码为另一个编码前缀的情形。
2.Huffman编码算法
Huffman给出了一个构造最优编码树的贪心算法,其正确性证明见《算法导论》(第三版)16章第三节。算法如下:
Huffman(C) //C 为带频率的字母表
n = |C|; // n = C 字符数目
Q = C; //用C初始化一个最小优先队列Q
for i = 1 to n - 1
    allocate a new node z
    z.left = x = EXTRACT-MIN(Q) //取出最小节点
    z.right = y = EXTRACT-MIN(Q)
    z.freq = x.freq + y.freq
    INSERT(Q, z)
return EXTRACT-MIN(Q)
主要思想是用最小优先队列装载字母表,每次循环将频率最小的2个节点取出,合并为一个新节点,
再插入队列,直到队列只剩一个节点为止。
霍夫曼编码的原理讲解到此打住,接下来说一说zip压缩算法为何使用 以及如何实现霍夫曼树的。
zip压缩算法分析(1)中分析的lz77压缩算法部分已经利用重复出现的短语进行了压缩,短语式重复的倾向已被破坏,无再次进行lz77的条件。但此时压缩后输出的几种形式的压缩数据:(distance, length), literal仍然在信息熵方面上有压缩的可能,就是说,不同的distance,length, literal在lz77输出流中的频率可能存在较大差距,这样就可以用huffman编码继续对其进行压缩。
huffman编码的主要部分位于tree.c文件中,既然是源码分析,接下来就上码吧:
头部注释
/* trees.c -- output deflated data using Huffman coding
 * trees.c -- 对deflate()处理过后的数据使用霍夫曼编码
 * Copyright (C) 1992-1993 Jean-loup Gailly
 * This is free software; you can redistribute it and/or modify it under the
 * terms of the GNU General Public License, see the file COPYING.
 */

/*
 *  PURPOSE
 *
 *      Encode various sets of source values using variable-length
 *      binary code trees.
 *      使用二进制变长编码树来编码各种值。
 *
 *  DISCUSSION
 *
 *      The PKZIP "deflation" process uses several Huffman trees. The more
 *      common source values are represented by shorter bit sequences.
 *      PKZIP的"deflation"算法使用了一些霍夫曼树,出现频率越高的值用越短的bit序列编码。
 *
 *      Each code tree is stored in the ZIP file in a compressed form
 *      which is itself a Huffman encoding of the lengths of
 *      all the code strings (in ascending order by source values).
 *      (此处更倾向于意译而非直译,因为我觉得理解这几句话比看懂这个句子更重要)
 *      编码树的实现方式是:按照源数据(即lz77压缩后输出的length, distance, literal)
 *      所有可能值从小到大顺序,将它们的霍夫曼码长(只记录长度!很神奇吧)记录在数组里。
 *      The actual code strings are reconstructed from the lengths in
 *      the UNZIP process, as described in the "application note"
 *      (APPNOTE.TXT) distributed as part of PKWARE"s PKZIP program.
 *
 *  REFERENCES
 *  一些相关算法知识的参考书籍
 *      Lynch, Thomas J.
 *          Data Compression:  Techniques and Applications, pp. 53-55.
 *          Lifetime Learning Publications, 1985.  ISBN 0-534-03418-7.
 *
 *      Storer, James A.
 *          Data Compression:  Methods and Theory, pp. 49-50.
 *          Computer Science Press, 1988.  ISBN 0-7167-8156-5.
 *
 *      Sedgewick, R.
 *          Algorithms, p290.
 *          Addison-Wesley, 1983. ISBN 0-201-06672-6.
 *
 *  INTERFACE
 *      3个接口
 *      1.初始化函数
 *      void ct_init (ush *attr, int *methodp)
 *          Allocate the match buffer, initialize the various tables and save
 *          the location of the internal file attribute (ascii/binary) and
 *          method (DEFLATE/STORE)
 *      2.计数器函数
 *      void ct_tally (int dist, int lc);
 *          Save the match info and tally the frequency counts.
 *      3.
 *      long flush_block (char *buf, ulg stored_len, int eof)
 *          Determine the best encoding for the current block: dynamic trees,
 *          static trees or store, and output the encoded block to the zip
 *          file. Returns the total compressed length for the file so far.
 *
 */
和上篇文章一样,分析是以3个interface函数为主要对象的,在分析源码的同时补充相关信息。
之所以这么安排是因为前面的常量和宏太尼玛多了,全部列出来,谁记得住啊?只有从对函数
的解读中才比较方便认识理解这些常量,宏。毕竟这些量说到底还是为了函数而存在的。
函数ct_init
代码:
/* ===========================================================================
 * Allocate the match buffer, initialize the various tables and save the
 * location of the internal file attribute (ascii/binary) and method
 * (DEFLATE/STORE).
 * 为匹配块收集空间,初始化变量表并存储文件属性(ASCII编码/二进制编码)与压缩方案
 * (压缩/仅存储)
 */
void ct_init(attr, methodp)
    ush  *attr;   /* pointer to internal file attribute */
    int  *methodp; /* pointer to compression method */
{
    int n;        /* iterates over tree elements */
    int bits;     /* bit counter */
    int length;   /* length value */
    int code;     /* code value */
    int dist;     /* distance index */

    file_type = attr;
    file_method = methodp;
    compressed_len = input_len = 0L;

    if (static_dtree[0].Len != 0) return; /* ct_init already called */

    /* Initialize the mapping length (0..255) -> length code (0..28)
    *  初始化映射 0到255的length值 -> 30个length区间码
    *  这个区间压缩方案实在太厉害了,详情见该函数源码下方注1。
    */
    length = 0;
    for (code = 0; code < LENGTH_CODES-1; code++) {
        base_length[code] = length;
        for (n = 0; n < (1<<extra_lbits[code]); n++) {
            length_code[length++] = (uch)code;
        }
    }
    Assert (length == 256, "ct_init: length != 256");
    /* Note that the length 255 (match length 258) can be represented
     * in two different ways: code 284 + 5 bits or code 285, so we
     * overwrite length_code[255] to use the best encoding:
     * 刚好有一个剩下的code,分配给length 255(+ 3 = 258)
     */
    length_code[length-1] = (uch)code;

    /* Initialize the mapping dist (0..32K) -> dist code (0..29)
    *  初始化映射 所有0 ~ 32k(16bit)distance值 -> 30个区间码,
    *  详情见该函数源码下方注2。
    */
    dist = 0;
    //此处的循环与前面length数据处理方法类似。
    for (code = 0 ; code < 16; code++) {
        base_dist[code] = dist;
        for (n = 0; n < (1<<extra_dbits[code]); n++) {
            dist_code[dist++] = (uch)code;
        }
    }
    Assert (dist == 256, "ct_init: dist != 256");
    //此处的处理很微妙,见下方注2。
    dist >>= 7; /* from now on, all distances are divided by 128 */
    for ( ; code < D_CODES; code++) {
        base_dist[code] = dist << 7;
        for (n = 0; n < (1<<(extra_dbits[code]-7)); n++) {
            dist_code[256 + dist++] = (uch)code;
        }
    }
    Assert (dist == 256, "ct_init: 256+dist != 512");

    //初始化静态literal树中各值对应编码的长度,
    //静态意为所有literal字符值都给出默认的编码
    /* Construct the codes of the static literal tree */
    for (bits = 0; bits <= MAX_BITS; bits++) bl_count[bits] = 0;
    n = 0;
    while (n <= 143) static_ltree[n++].Len = 8, bl_count[8]++;
    while (n <= 255) static_ltree[n++].Len = 9, bl_count[9]++;
    while (n <= 279) static_ltree[n++].Len = 7, bl_count[7]++;
    while (n <= 287) static_ltree[n++].Len = 8, bl_count[8]++;
    /* Codes 286 and 287 do not exist, but we must include them in the
     * tree construction to get a canonical Huffman tree (longest code
     * all ones)
     */
    //调用gen_codes为已经分配好长度的静态literal树生成编码,
    //gen_codes是一个重要函数,看懂就能理解为什么这里只需记录编码长度的分布
    //而不需记录所有的编码值了。详情见后面对gen_codes的专门分析。
    gen_codes((ct_data near *)static_ltree, L_CODES+1);

    /* The static distance tree is trivial:
    *  静态distance树的初始化较为简单,就不用gen_codes了,
    * 注意要用bi_reverse将编码方向,这是为了便于输出,详情见注3。
    */
    for (n = 0; n < D_CODES; n++) {
        static_dtree[n].Len = 5;
        static_dtree[n].Code = bi_reverse(n, 5);
    }

    /* Initialize the first block of the first file:
    *  初始化第一个文件的第一个压缩数据块,函数 init_block 详情见该函数源码下方注4。
    */
    init_block();
}
注1 length与literal 数据的组织方式
lz77输出的3种数据类型:
length, literal, distance
length: 匹配串的长度,限制在 [MIN_MATCH = 3, MAX_MATCH = 258]区间范围内;
literal: 未匹配的字符或匹配串的首字符,按ASCII表来说取值在0~256之间
distance: 一对匹配串之间的距离
先介绍几个常量和数据块:
#define LENGTH_CODES 29
/* number of length codes, not counting the special END_BLOCK code
*  length 区间码的个数,还有一个特殊的结束符END_BLOCK没有算上
*/

#define LITERALS  256
/* number of literal bytes 0..255
*  literal 字符的个数(ASCII表 256个值对应256个字符)
*/

#define L_CODES (LITERALS+1+LENGTH_CODES)
/* number of Literal or Length codes, including the END_BLOCK code
*  literal 和 length 编码的总个数,包括结束符END_BLOCK在内。
*/

#define HEAP_SIZE (2*L_CODES+1)
/* maximum heap size
*  为霍夫曼编码提供足够的空间,装有字符信息的叶节点L_CODES个,但还需要额外的
*  内部节点,最多L_CODES + 1个,详细情况后面的几个造树函数会解释。
*/

typedef static local
local ct_data near dyn_ltree[HEAP_SIZE];
/* literal and length tree
*  length & literal动态编码树,literal 和 length 数据被存在同一个树中
*/
local ct_data near static_ltree[L_CODES+2];
/* The static literal tree. Since the bit lengths are imposed, there is no
 * need for the L_CODES extra codes used during heap construction. However
 * The codes 286 and 287 are needed to build a canonical tree (see ct_init
 * below).
 * length & literal静态编码树,由于编码方案已经钦定了,所以不用再特意多出L_CODES空间来
 * 构建最小堆进行多余的霍夫曼编码。
 */
literal的值范围有ASCII编码表决定,[0, 255];
而length值范围则为MIN_MATCH = 3 ~ MAX_MATCH = 258;恰好都是256个值;
literal 与 length共存在同一棵静态编码树或动态编码树中,
以动态编码树为例,
local ct_data near dyn_ltree[HEAP_SIZE]该树包含了所有的length与literal数据
每一个length或literal或distance数据都装在
结构体 ct_data
/* Data structure describing a single value and its code string. */
typedef struct ct_data {
    union {
        ush  freq;       /* 出现的频率 */
        ush  code;       /* huffman编码 */
    } fc;
    union {
        ush  dad;        /* huffman树中该数据的父节点 */
        ush  len;        /* huffman编码的长度 */
    } dl;
} ct_data;
literal直接用原本的值表示,0 ~ 255;256表示结束符END_BLOCK
那么,既然length有256种不同取值,为何只有LENGTH_CODES = 29个编码呢?
这里就要说到一个重要的概念了:
区间码
将length 分为29个区间,257 ~ 285这29个值作为区间的编号,我们只统计落在
各区间内的length数目,在把每个区间看做节点,进行霍夫曼编码。真他妈聪明。
具体的分法如下图,
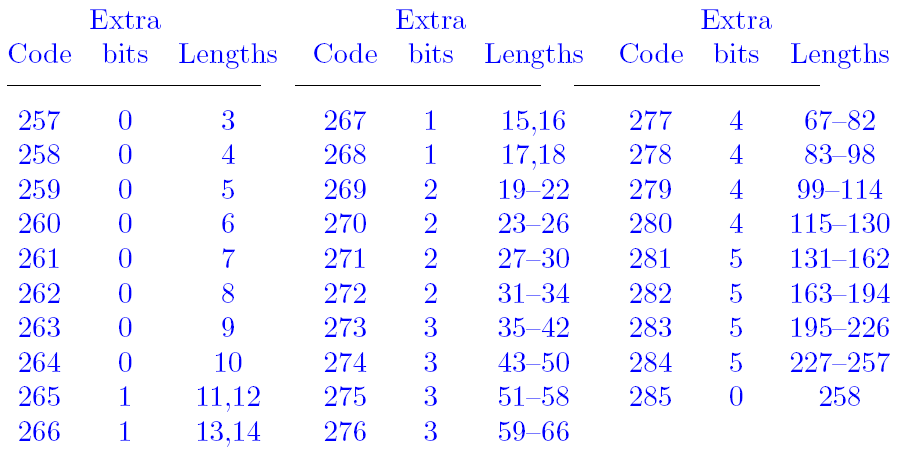
图源:《Data Compression The Complete Reference》
code为各区间的标号,bits则表示区间内可以自由取值的bit位数,
例如
区间[35, 42] 或 [43 , 50]之间的值有8 = 2 ^ (bit位= 3) 个。这些多出的bit位的信息
存放在数组extra_lbits[LENGH_CODES]中。
local int near extra_lbits[LENGTH_CODES] /* extra bits for each length code */
   = {0,0,0,0,0,0,0,0,1,1,1,1,2,2,2,2,3,3,3,3,4,4,4,4,5,5,5,5,0};
好,说完这些原理后再回过头来看建立length实际值到length区间映射的代码
length = 0;
    for (code = 0; code < LENGTH_CODES-1; code++) {
        base_length[code] = length;
        for (n = 0; n < (1<<extra_lbits[code]); n++) {
            length_code[length++] = (uch)code;
        }
    }
明显地,code为区间的编号,length为实际的length值,
base_length[code]为code编号区间的起始值,
extra_lbit记录该区间的bit长度
而length_code[length]记载了length值所位于的区间,
程序员前辈应该不难看懂,
1 << extra_lbits[code]表示2 ^ (extra_lbits[code]),即该区间的长度。
@注2 distance数据的组织形式**
distance 与前面length类似,也分成一个个区间来编号,
先介绍几个相关的量:
#define D_CODES   30
/* number of distance codes
*  30个distance区间
*/
local uch dist_code[512];
/* distance codes. The first 256 values correspond to the distances
 * 3 .. 258, the last 256 values correspond to the top 8 bits of
 * the 15 bit distances.
 * distance码,distance_code[distance]为distance所在区间的编号,
 * 前256个下标值对应distance值3,...,258,后256个值对应大于256的
 * distance值的前8bit位(二进制位)。
 */
 local int near base_dist[D_CODES];
/* First normalized distance for each code (0 = distance of 1)
 * 装载各区间最左端的值,作为其“基数”
 */
distance的存储方式与length类似,一共划分为30个区间,
取值范围是 3 ~ MAX_DIST,其中MAX_DIST定义在前一篇文章中有描述:
#define MAX_DIST  (WSIZE-MIN_LOOKAHEAD)
/* In order to simplify the code, particularly on 16 bit machines, match
 * distances are limited to MAX_DIST instead of WSIZE.
 */
由于MAX_DIST十分接近lz77窗口长度W_SIZE = 32k, 于是不妨将取值范围扩大到 0 ~ 32k;
具体的划分方案如下:
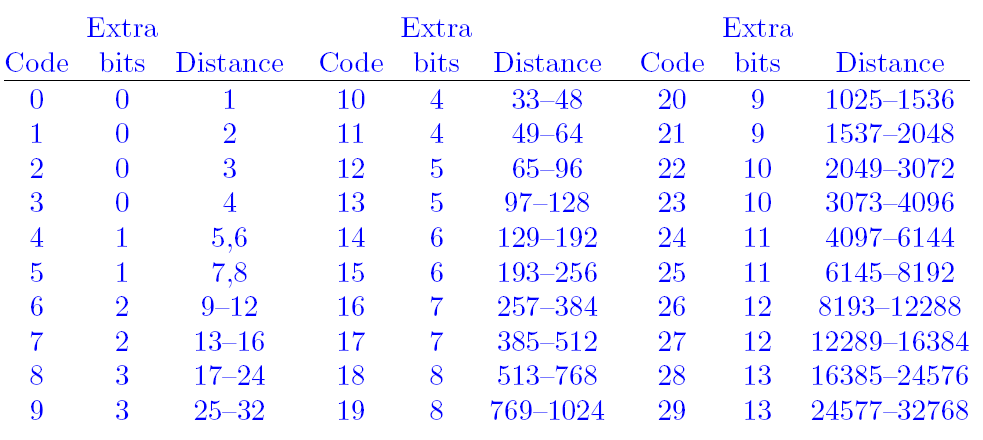
图源:《Data Compression The Complete Reference》
前一段代码还比较好理解,和length一样处理:
dist = 0;
    //此处的循环与前面length数据处理方法类似。
    for (code = 0 ; code < 16; code++) {
        base_dist[code] = dist;
        for (n = 0; n < (1<<extra_dbits[code]); n++) {
            dist_code[dist++] = (uch)code;
        }
    }
而后半段就不一样了:
dist >>= 7; /* from now on, all distances are divided by 128 */
    for ( ; code < D_CODES; code++) {
        base_dist[code] = dist << 7;
        for (n = 0; n < (1<<(extra_dbits[code]-7)); n++) {
            dist_code[256 + dist++] = (uch)code;
        }
    }
为什么要从dist = 267开始将dist右移7位呢?
考察记录每个区间bit长度的数组extra_dbits[D_CODES]:
{0,0,0,0,1,1,2,2,3,3,4,4,5,5,6,6,7,7,8,8,9,9,10,10,11,11,12,12,13,13}
257是16号区间的开头,可以发现从该区间开始,bit长度都不低于7,进一步说,
每个区间长度都是2 ^ 7 = 128的整数倍,用二进制表示从第16号开始各区间范围:
16 [000000010 0000001, 000000011 0000000],
17 [000000011 0000001, 000000100 0000000],
18 [000000100 0000001, 000000110 0000000],
… … … … … … … … … … …
… … … … … … … … … … …
29 [011000000 0000001, 100000000 0000000]
由此可看出,只要前9位相同,就一定在同一区间内,而不用去管后7位。
注3 函数bi_reverse
该函数实现位于文件 bits.c中
/* ===========================================================================
 * Reverse the first len bits of a code, using straightforward code (a faster
 * method would use a table)将码的前len位反转,使用的是直观易懂的代码,用表实现的话会更快。
 * IN assertion: 1 <= len <= 15 输入要求:1 <= len <= 15
 */
unsigned bi_reverse(code, len)
    unsigned code; /* the value to invert */
    int len;       /* its bit length */
{
    register unsigned res = 0;
    do {
        res |= code & 1;
        code >>= 1, res <<= 1;
    } while (--len > 0);
    return res >> 1;
}
用掩码反转位,这个算法算是烂大街了,就不多说了。
注4 函数init_block
一个工具函数。
/* ===========================================================================
 * Initialize a new block.
 * 初始化一个新的数据块。
 */
local void init_block()
{
    int n; /* iterates over tree elements */

    /*初始化树 */
    for (n = 0; n < L_CODES;  n++) dyn_ltree[n].Freq = 0;
    for (n = 0; n < D_CODES;  n++) dyn_dtree[n].Freq = 0;
    for (n = 0; n < BL_CODES; n++) bl_tree[n].Freq = 0;

    dyn_ltree[END_BLOCK].Freq = 1;
    opt_len = static_len = 0L;
    last_lit = last_dist = last_flags = 0;
    flags = 0; flag_bit = 1;
}
建立huffman树
高度特化的huffman树—deflate树
不妨来思考一下huffman树的形式:
对于一组给定的输入,一共有多少颗结构不同的huffman树?
事实上,huffman算法所给出的解并非唯一的,如图:
第二层的2棵子树交换位置,得
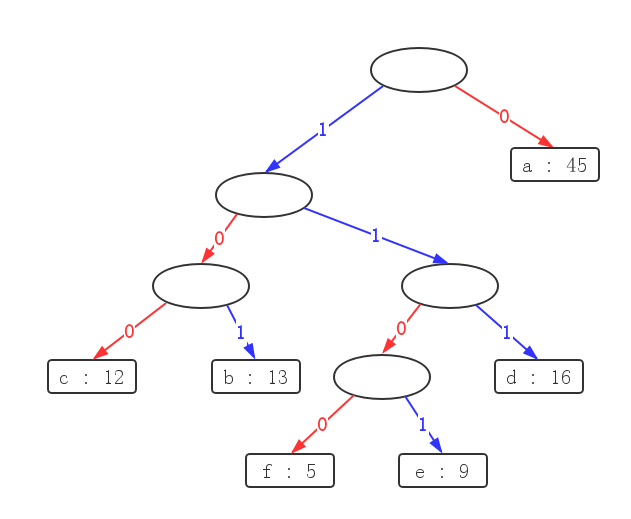
第三层的2棵子树交换位置,得
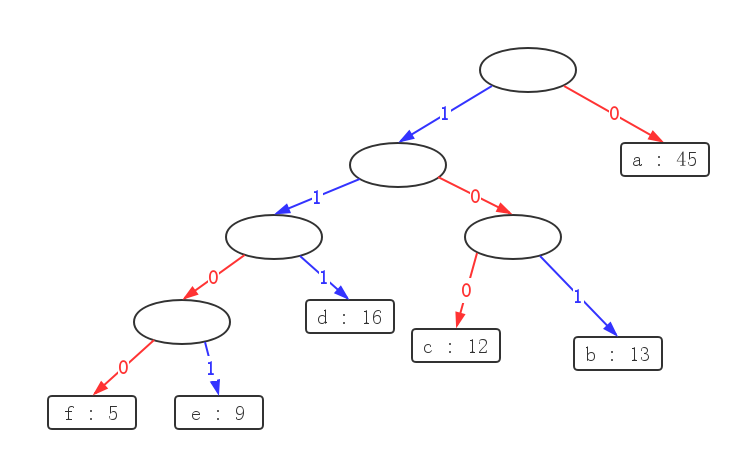
毋庸置疑,这三棵树代表的压缩后文本总长度(即各字符频率 * 深度之和)都是一样的,
第一棵树是《算法导论》这三棵树中作为例子算出来的一棵最优树,那么按照如上所示的
交换操作,可以生成许多的最优编码方案。
但是 无论如何交换,每一层的叶节点数始终不变!,
于是,zip作者提出了一种特化编码的方法,只要知道每种长度,即每层的叶节点个数,便可以
得到一颗独特的编码树,称为deflate树。建立deflate树的过程包含在函数build_tree() 中。
建树前的准备统计频率函数ct_tally
当然,在建树之前,还必须获取length, literal, distance各种值在数据流中出现的的频率,
该过程在函数 ct_tally 内,lz77部分的函数deflate()就使用了该函数来不断地更新统计数据。ct_tally将统计数据暂时放在2个buffer中 :
//表示2个buff大小的宏,
//LIT_BUFSIZE: l_buf 的大小
#ifndef LIT_BUFSIZE
#  ifdef SMALL_MEM
#    define LIT_BUFSIZE  0x2000
#  else
#  ifdef MEDIUM_MEM
#    define LIT_BUFSIZE  0x4000
#  else
#    define LIT_BUFSIZE  0x8000
#  endif
#  endif
#endif
//DIST_BUFSIZE: d_buff的大小
#ifndef DIST_BUFSIZE
#  define DIST_BUFSIZE  LIT_BUFSIZE
#endif
//l_buf 用于临时装载literal 和 length的信息,
//由于literal取值范围都是 (0, 255),所以用8bit的char
unsigned char l_buf[LIT_BUFSIZE];
//d_buff 用于临时装载distance的信息,
//由于distance区间码取值范围是 (0, 511),所以用16bit的short
unsigned short d_buff[DIST_BUFSIZE];
这2个buffer用2个counter跟踪记录运行时的数组index
static unsigned last_lit;    /* running index in l_buf */
static unsigned last_dist;   /* running index in d_buf */
l_buf内一个值究竟表示length还是literal,使用flag_buf数组来区分,flag_buf为unsigned char *类型数组,
里面每个char值相当于8个bool值,可以记录8次。
static uch flags;            /* 当前待存入flag_buf的flag */
static uch flag_bit;         /* flags目前正在用的bit位 */
/* bits are filled in flags starting at bit 0 (least significant).
 * Note: these flags are overkill in the current code since we don"t
 * take advantage of DIST_BUFSIZE == LIT_BUFSIZE.
 */

 local uch near flag_buf[(LIT_BUFSIZE/8)];//由于每个flags可以记录8次所以除以8
/* flag_buf is a bit array distinguishing literals from lengths in
 * l_buf, thus indicating the presence or absence of a distance.
 */
这里就有一个有趣的问题了:
既然literal取值在0~255, length区间码取值在257到285,那么只要依据是否大于256就可以分出
literal和length了,那么为何又要特意用一个flag_buf呢?
—注意l_buf的类型: unsigned char *,也就是说,length存入的值事实上不是区间码,而是真实
的length值,只要你仔细观察deflate() 的这一段代码:
flush = ct_tally(strstart-1-prev_match, prev_length - MIN_MATCH);就可得知。因此,length的取值范围为0~255, 这样做也是为了满足char 8bit的大小限制,那么这时
length就和literal在取值上无区别了。
另外还要讲一下flag的运行机制:ct_tally接受2个参数:
 int dist;  /* 匹配串的距离 */
 int lc;    /* 如果dist!=0, 为匹配串的长度,lc = match length-MIN_MATCH
             * 否则dist==0, 为匹配失败后输出的单个字符literal*/
假设初始化后,一组连续输入的参数值从早到晚为
{ (0, literal), (0, literal) , (dist, length), (0, literal), (dist, length), ……… };
init_block函数初始化
flags = 0000 0000, flag_bit = 0000 0001;
第一次:判断为literal, 标记为true, flag_bit左移一位
flags = flags | flag_bit = 0000 000 1 , flag_bit = 0000 00 1 0;
第二次:判断为literal, 标记为true, flag_bit左移一位
flags = flags | flag_bit = 0000 00 11, flag_bit = 0000 0 1 00;
第三次:判断为匹配串, 标记为false, flag_bit左移一位
flags = flags = 0000 00 11, flag_bit = 0000 1 000;
第四次:判断为literal, 标记为true, flag_bit左移一位
flags = flags | flag_bit = 0000 1 0 11, flag_bit = 000**1** 0000;
第五次:判断为匹配串, 标记为false, flag_bit左移一位
flags = flags = 0000 1 0 11, flag_bit = 00**1** 0 0000;
………
一直到第八次操作完,算作一个周期,将flags存入flag_buf;
接下来就可以贴上ct_tally的源代码了:
/* ===========================================================================
 * Save the match info and tally the frequency counts. Return true if
 * the current block must be flushed.
 * 存储本次匹配的信息并更新频率统计数据,如果目前的数据块必须要刷新的话,返回true。
 */
int ct_tally (dist, lc)
    int dist;  /* 匹配串的距离 */
    int lc;    /* 如果dist!=0, 为匹配串的长度,lc = match length-MIN_MATCH
                * 否则dist==0, 为匹配失败后输出的单个字符literal*/
{
    //l_buf 记录下lc的值
    l_buf[last_lit++] = (uch)lc;

    if (dist == 0) {
        /* 是literal,只更新动态树dyn_ltree */
        dyn_ltree[lc].Freq++;
    } else {
        /* 是匹配串, lc == match length - MIN_MATCH */
        dist--;             /* dist = match distance - 1 */
        Assert((ush)dist < (ush)MAX_DIST &&
               (ush)lc <= (ush)(MAX_MATCH-MIN_MATCH) &&
               (ush)d_code(dist) < (ush)D_CODES,  "ct_tally: bad match");
        //更新两棵动态树
        //LITERALS == 256
        dyn_ltree[length_code[lc]+LITERALS+1].Freq++;
        //宏d_code用于从distance值获取其区间码,比较trivial所以就不细究了。
        dyn_dtree[d_code(dist)].Freq++;
        //更新d_buf
        d_buf[last_dist++] = (ush)dist;
        //记录为true
        flags |= flag_bit;
    }
    //左移一位
    flag_bit <<= 1;

    /* 如果flags整个byte都记录满了,即过了8次操作 */
    if ((last_lit & 7) == 0) {
        flag_buf[last_flags++] = flags;
        flags = 0, flag_bit = 1;
    }
    /* Try to guess if it is profitable to stop the current block here
    *  判断是不是该输出这个数据块的压缩结果
    */
    if (level > 2 && (last_lit & 0xfff) == 0) {
        /* Compute an upper bound for the compressed length
        *  计算压缩长度的上界
        */
        //输出长度,按bit算
        ulg out_length = (ulg)last_lit*8L;
        //输入长度,按byte(8 bit)算
        ulg in_length = (ulg)strstart-block_start;
        int dcode;
        for (dcode = 0; dcode < D_CODES; dcode++) {
            //加上distance的长度:5 + extra bits
            //因为distance区间码为 0~29, 2^4 < 29 < 2^5,所以取基本长度5,再加上额外的bit位
            out_length += (ulg)dyn_dtree[dcode].Freq*(5L+extra_dbits[dcode]);
        }
        //除以8,化为以byte为单位
        out_length >>= 3;
        Trace((stderr,"
last_lit %u, last_dist %u, in %ld, out ~%ld(%ld%%) ",
               last_lit, last_dist, in_length, out_length,
               100L - out_length*100L/in_length));
        //判断条件
        if (last_dist < last_lit/2 && out_length < in_length/2) return 1;
    }
    return (last_lit == LIT_BUFSIZE-1 || last_dist == DIST_BUFSIZE);
    /* We avoid equality with LIT_BUFSIZE because of wraparound at 64K
     * on 16 bit machines and because stored blocks are restricted to
     * 64K-1 bytes.
     */
}
build_tree开始建deflate树
deflate树相关数据的组织形式
如前面所述,树是以ct_data结构体数组来表示的,例如2棵动态树:
#define HEAP_SIZE (2*L_CODES+1)
local ct_data near dyn_ltree[HEAP_SIZE]; /* literal and length tree */
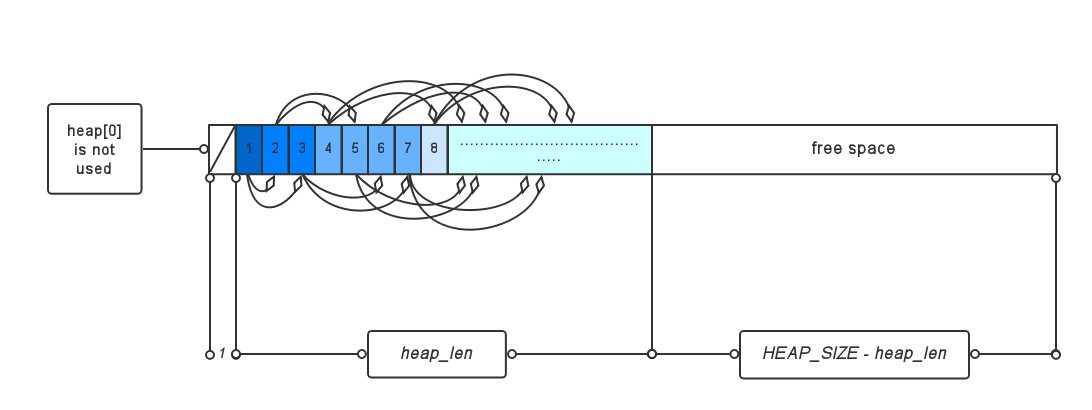
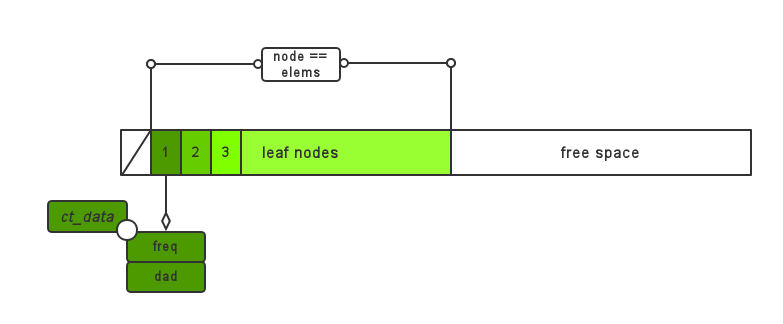
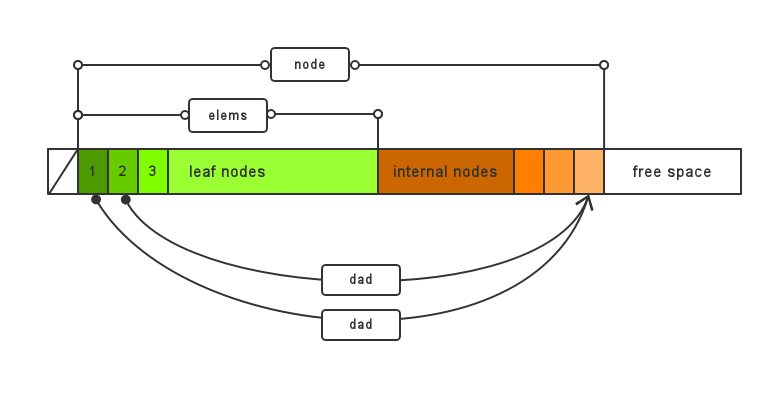
local ct_data near dyn_dtree[2*D_CODES+1]; /* distance tree */之所以数组大小比要编码的元素个数要大一倍再多一个,是因为建树时内部节点需要额外空间,这一点前面已经讲过,现在再在这里重复一遍。如果还是不能理解,可以参考下图:
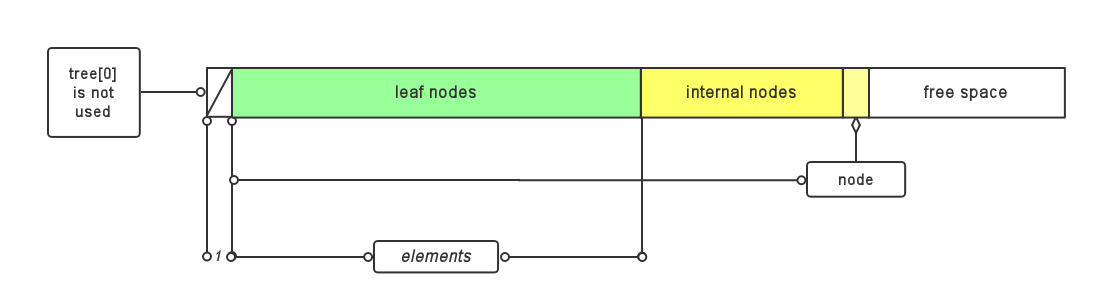
其中node是build_tree函数中要用到的一个迭代器,作为树和free space 的分界线。
对于每种数据(literal & length 或 distance),都有一棵静态树(static_ltree或static_dtree)和一棵动态树(dyn_ltree或dyn_dtree),其中静态树的编码方案是预先给定的,而动态树的编码方案动态生成;从而有了这样一个聚合了所有树相关信息的结构体 tree_desc:
typedef struct tree_desc {
    ct_data near *dyn_tree;      /* 动态树 */
    ct_data near *static_tree;   /* 静态树 or NULL */
    int     near *extra_bits;    /* extra bits数组 or NULL */
    int     extra_base;          /* base index for extra_bits */
    int     elems;               /* 树内叶节点个数上限 */
    int     max_length;          /* 树内元素的最长编码长度 */
    int     max_code;            /* 最大的频率非零元素位置,也就是说右边的元素频率都为零 */
} tree_desc;

#define LITERALS  256
/* number of literal bytes 0..255 */
#define L_CODES (LITERALS+1+LENGTH_CODES)
/* number of Literal or Length codes, including the END_BLOCK code */
#define D_CODES   30
/* number of distance codes */
#define MAX_BITS 15
/* All codes must not exceed MAX_BITS bits */

local tree_desc near l_desc =
{dyn_ltree, static_ltree, extra_lbits, LITERALS+1, L_CODES, MAX_BITS, 0};

local tree_desc near d_desc =
{dyn_dtree, static_dtree, extra_dbits, 0,          D_CODES, MAX_BITS, 0};
huffman树的建造过程
build_tree 使用比较常规的方法建造haffman树,最小优先队列使用基于数组的最小堆实现,数组中节点heap[i]的左子节点为heap[2*i], 右子节点为heap[2*i + 1];
有一点是要提醒的:事实上,堆装载的是int值而不是ct_data结构体, 例如,若heap[i] = j,则表示堆的第i个节点对应的数据是ct_data 结构体tree[j]。也就是说,heap中只保留指向树中数据结构体的句柄,或者说序号。
static int near heap[2*L_CODES+1]堆的结构如图:
堆的相关代码如下:
/* ===========================================================================
 * Remove the smallest element from the heap and recreate the heap with
 * one less element. Updates heap and heap_len.
 * 弹出最小堆的根节点,也就是目前的最小元素,将根节点换为尾节点的值,
 * 并调用pqdownheap及时维护堆的结构。
 */
#define pqremove(tree, top)
{
    top = heap[SMALLEST];
    heap[SMALLEST] = heap[heap_len--];
    pqdownheap(tree, SMALLEST);
}

/* ===========================================================================
 * Compares to subtrees, using the tree depth as tie breaker when
 * the subtrees have equal frequency. This minimizes the worst case length.
 * 比较2个节点的频率:若频率相等,则比较以2个节点为根节点的2棵子树的深度。
 */
#define smaller(tree, n, m)
   (tree[n].Freq < tree[m].Freq ||
   (tree[n].Freq == tree[m].Freq && depth[n] <= depth[m]))

/* ===========================================================================
 * Restore the heap property by moving down the tree starting at node k,
 * exchanging a node with the smallest of its two sons if necessary, stopping
 * when the heap property is re-established (each father smaller than its
 * two sons).将heap[k]向下移动到适当的地方。
 */
local void pqdownheap(tree, k)
    ct_data near *tree;  /* the tree to restore */
    int k;               /* node to move down */
{
    int v = heap[k];
    int j = k << 1;  /* left son of k */
    while (j <= heap_len) {
        /* Set j to the smallest of the two sons: */
        if (j < heap_len && smaller(tree, heap[j+1], heap[j])) j++;

        /* Exit if v is smaller than both sons */
        if (smaller(tree, v, heap[j])) break;

        /* Exchange v with the smallest son */
        heap[k] = heap[j];  k = j;

        /* And continue down the tree, setting j to the left son of k */
        j <<= 1;
    }
    heap[k] = v;
}
这几个操作也算是很经典的啦,我就不多说了。
接下来就是函数build_tree的代码
/* ===========================================================================
* Construct one Huffman tree and assigns the code bit strings and lengths.
* 构造一颗huffman树并生成编码串,记录其长度
* Update the total bit length for the current block.
* IN assertion: the field freq is set for all tree elements.
* 输入前:要保证属性freq(即各值对应的频率)已经统计完备
* OUT assertions: the fields len and code are set to the optimal bit length
* and corresponding code. The length opt_len is updated; static_len is
* also updated if stree is not null. The field max_code is set.
* 输出后:树中所有节点赋得属性len(huffman编码长度)与属性code(编码比特串)。
* 最优树的总长
*/
local void build_tree(desc)
tree_desc near *desc; /* the tree descriptor */
{
ct_data near *tree = desc->dyn_tree;
ct_data near *stree = desc->static_tree;
int elems = desc->elems;
//迭代器
int n, m; /* iterate over heap elements */
//最大的频率非零节点位置
int max_code = -1; /* largest code with non zero frequency */
//下一个可以构造内部节点的位置
int node = elems; /* next internal node of the tree */
/* Construct the initial heap, with least frequent element in
* heap[SMALLEST]. The sons of heap[n] are heap[2*n] and heap[2*n+1].
* heap[0] is not used.
* 初始化堆,heap[n]子节点为heap[2*n]和heap[2*n+1],heap[0]闲置。
*/
//2个全局变量:heap_len: 堆长度 | heap_max:
heap_len = 0, heap_max = HEAP_SIZE;
for (n = 0; n < elems; n++) {
if (tree[n].Freq != 0) {
heap[++heap_len] = max_code = n;
depth[n] = 0;
} else {
tree[n].Len = 0;
}
}
/* The pkzip format requires that at least one distance code exists,
* and that at least one bit should be sent even if there is only one
* possible code. So to avoid special checks later on we force at least
* two codes of non zero frequency.
*/
while (heap_len < 2) {
int new = heap[++heap_len] = (max_code < 2 ? ++max_code : 0);
tree[new].Freq = 1;
depth[new] = 0;
opt_len--; if (stree) static_len -= stree[new].Len;
/* new is 0 or 1 so it does not have extra bits */
}
desc->max_code = max_code;
/* The elements heap[heap_len/2+1 .. heap_len] are leaves of the tree,
* establish sub-heaps of increasing lengths:
*/
for (n = heap_len/2; n >= 1; n--) pqdownheap(tree, n);
/* Construct the Huffman tree by repeatedly combining the least two
* frequent nodes.
*/
do {
//弹出2个最小节点
pqremove(tree, n); /* n = node of least frequency */
m = heap[SMALLEST]; /* m = node of next least frequency */
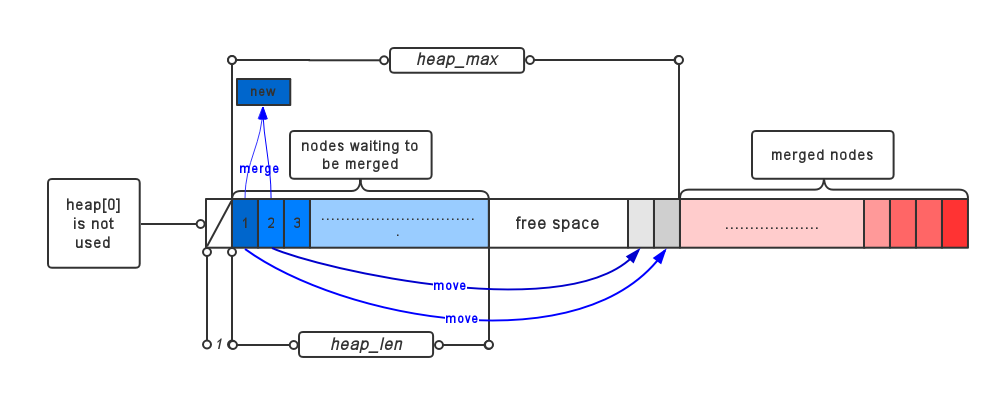
heap[--heap_max] = n; /* keep the nodes sorted by frequency */
heap[--heap_max] = m;
/* Create a new node father of n and m
* 合并n和m,在tree中生成新节点*/
tree[node].Freq = tree[n].Freq + tree[m].Freq;
depth[node] = (uch) (MAX(depth[n], depth[m]) + 1);
tree[n].Dad = tree[m].Dad = (ush)node;
#ifdef DUMP_BL_TREE
if (tree == bl_tree) {
fprintf(stderr,"
node %d(%d), sons %d(%d) %d(%d)",
node, tree[node].Freq, n, tree[n].Freq, m, tree[m].Freq);
}
#endif
/* and insert the new node in the heap
* 将tree中新节点(的位置)塞到堆里面*/
heap[SMALLEST] = node++;
pqdownheap(tree, SMALLEST);
} while (heap_len >= 2);
heap[--heap_max] = heap[SMALLEST];
//huffman树结构已生成,开始特化成deflate树
/* At this point, the fields freq and dad are set. We can now
* generate the bit lengths.
* 生成编码长度记录
*/
gen_bitlen((tree_desc near *)desc);
/* The field len is now set, we can generate the bit codes *
* 生成bit编码串
*/
gen_codes ((ct_data near *)tree, max_code);
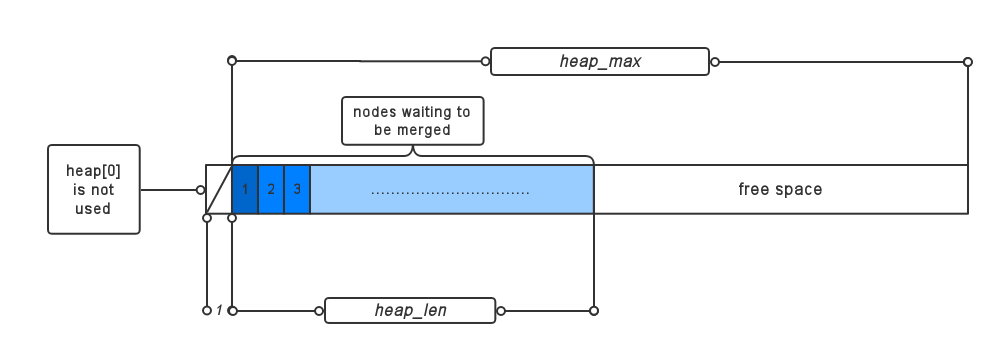
}在函数中heap的结构变化如图所示:
初始堆
huffman编码中
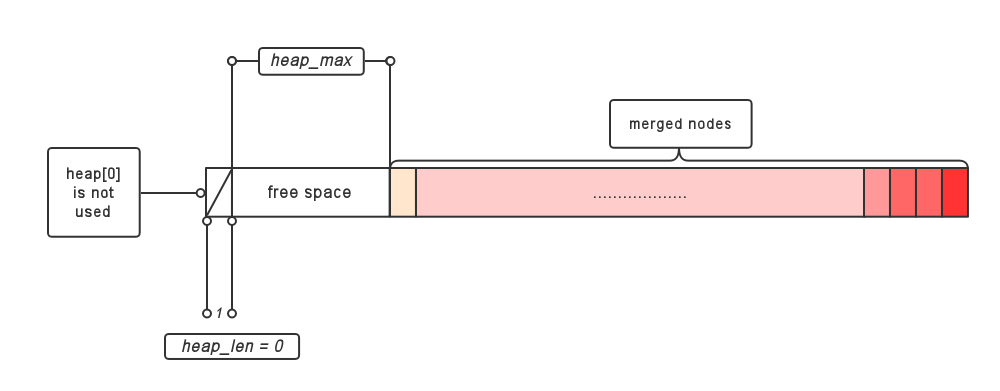
处理完毕
在函数中tree的结构变化如图所示:
初始树
huffman编码中
记录长度gen_bitlen
gen_bitlen函数用于记录长度
编码长度存储数组bl_count
这里要先介绍一个数组,用于存储各长度节点的数目:
//bl_count[i]表示长度为i的编码个数
local ush near bl_count[MAX_BITS+1];
/* number of codes at each bit length for an optimal tree */
长度限制下的长度统计
如前面所讲到的,tree_desc 内含有属性max_length, 表示huffman编码的最大长度,对于length&literal tree descripter或distance tree descripter为MAX_BITS = 15;然而在实际的编码过程中可能由于元素之间频率差距过大,导致有些节点深度大于15,这样就很尴尬了;
gen_bitlen函数使用了合并节点的策略:
将 超长节点中层数最浅且频率最大的叶节点A与 目前正常节点中层数最深且频率最小的叶节点B合并,如图:
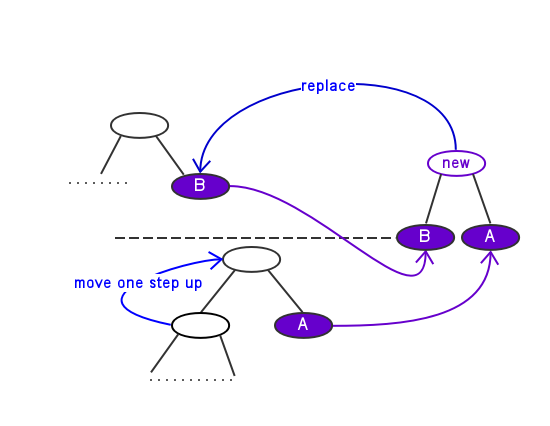
虚线表示max_length,2个紫色叶节点分别为A, B;可见合并之后A, B的父节点占据了B原来的位置,而A的一个超长兄弟节点向上移了一位,而A原来的那个超长(或刚好深度为max_length)父节点就可以扔掉无视了。
/* ===========================================================================
 * Compute the optimal bit lengths for a tree and update the total bit length
 * for the current block.
 * 计算最优的bit串长度,并更新整个数据块的压缩后长度。
 * IN assertion: the fields freq and dad are set, heap[heap_max] and
 *    above are the tree nodes sorted by increasing frequency.
 * OUT assertions: the field len is set to the optimal bit length, the
 *     array bl_count contains the frequencies for each bit length.
 *     The length opt_len is updated; static_len is also updated if stree is
 *     not null.
 */
local void gen_bitlen(desc)
    tree_desc near *desc; /* the tree descriptor */
{
    ct_data near *tree  = desc->dyn_tree;
    int near *extra     = desc->extra_bits;
    int base            = desc->extra_base;
    int max_code        = desc->max_code;
    int max_length      = desc->max_length;
    ct_data near *stree = desc->static_tree;
    int h;              /* 用于遍历堆 */
    int n, m;           /* 用于遍历树 */
    int bits;           /* bit长度 */
    int xbits;          /* extra bits */
    ush f;              /* 频率 */
    int overflow = 0;   /* 超长的节点数 */

    for (bits = 0; bits <= MAX_BITS; bits++) bl_count[bits] = 0;

    /* In a first pass, compute the optimal bit lengths (which may
     * overflow in the case of the bit length tree).
     * 第一次遍历,计算出最优bit长度,并记录超长节点的数量,
     * 如果节点超长,把它长度记为max_length。
     */
    tree[heap[heap_max]].Len = 0; /* root of the heap */

    for (h = heap_max+1; h < HEAP_SIZE; h++) {
        n = heap[h];
        bits = tree[tree[n].Dad].Len + 1;
        //统计overflow节点数目,注意:此处超长的内节点也算在内
        if (bits > max_length) bits = max_length, overflow++;
        //如果节点超长,把它长度记为max_length。
        tree[n].Len = (ush)bits;
        /* We overwrite tree[n].Dad which is no longer needed
        *  这里体现了在ct_data结构体中使用union{dad, len}的好处:当用父节点dad
        *  求出len后,数据成员dad就没有意义了,可以替换为len,节约空间
        */

        if (n > max_code) continue; /* 如果不是叶节点,不进行计数 */
        //计数数组bl_count
        bl_count[bits]++;
        //由于区间码的原因,额外的扩展bit位要另外加上来。
        xbits = 0;
        if (n >= base) xbits = extra[n-base];
        f = tree[n].Freq;
        opt_len += (ulg)f * (bits + xbits);
        //静态树(静态树老兄似乎没什么存在感。。。)
        if (stree) static_len += (ulg)f * (stree[n].Len + xbits);
    }
    if (overflow == 0) return;

    Trace((stderr,"
bit length overflow
"));
    /* This happens for example on obj2 and pic of the Calgary corpus */

    /* Find the first bit length which could increase:
    *  开始合并超长节点
    */
    do {
        bits = max_length-1;
        while (bl_count[bits] == 0) bits--;
        bl_count[bits]--;      /* 将一个叶节点下移一位 */
        bl_count[bits+1] += 2; /* 将一个 overflow 叶节点上移作为其兄弟节点 */
        bl_count[max_length]--;
        /* 注意:此处max_length长度编码的计数器只减1,
         * 却认为超长的节点消掉了2个,原因见上方图示。
         */
        overflow -= 2;
    } while (overflow > 0);

    /* Now recompute all bit lengths, scanning in increasing frequency.
     * h is still equal to HEAP_SIZE. (It is simpler to reconstruct all
     * lengths instead of fixing only the wrong ones. This idea is taken
     * from "ar" written by Haruhiko Okumura.)
     * 按照频率从小到大扫描,调整所有bit长度,h由于之前的循环递增,现在等于HEAP_SIZE。
     */
    for (bits = max_length; bits != 0; bits--) {
        n = bl_count[bits];
        while (n != 0) {
            m = heap[--h];
            if (m > max_code) continue;
            if (tree[m].Len != (unsigned) bits) {
                Trace((stderr,"code %d bits %d->%d
", m, tree[m].Len, bits));
                opt_len += ((long)bits-(long)tree[m].Len)*(long)tree[m].Freq;
                tree[m].Len = (ush)bits;
            }
            n--;
        }
    }
}
这里的映射可能有些让人头晕;就来解释一下:
映射 i -> heap[i] 中的 i 表示最大堆中的位置,而heap[i]则表示位于堆中该位置的节点在树中的位置,
因此,heap[i] = j 意味着 树节点tree[j] 在最小堆中的位置为i;
映射 j -> tree[j] 中的 j 表示length & literal 或 distace 的某个取值,
而tree[j]则是 包含着这个取值在文本中出现的频率 / huffma编码串,在堆中的父节点 / huffman编码长度的ct_data结构体;
因此,tree[j] 表示着值 j 的所有编码信息。
deflate树的特化规则gen_len
接下来分析最有意思的一段:根据长度自动生成huffman编码的过程,
1.首先将huffman树中每层节点按值(不是编码长度,是它实际的取值)从小到大排列,
比如distance = 2, 30, 5, 8, 7, 1拥有同一编码长度,就排成1, 2, 5, 7, 8, 30;
2.排列好之后,同一层从左到右(从小到大)逐个编码加一,跨层时就把当前编码左移一位;
由于之前已经记录了每层叶节点的数目,存储在bl_count中,我们可以预先算出每层最左边的那个编码;
比如,bl_count[16] =
{ 0(第零项不用), 0, 1, 1, 0, 1, 3, 1, 5, 6 ……… }
第一层:0000000 00000000(无叶节点);
加0,左移
第二层:0000000 00000000;
加1,左移
第三层:0000000 00000010;
加1,左移
第四层:0000000 00000110;
加0,左移
第五层:0000000 00001100;
加1,左移
第六层:0000000 00011010;
加3,左移
第七层:0000000 00111010;
从而可以由最左边的值衍生出同一层右边的编码。
贴代码:
/* ===========================================================================
 * Generate the codes for a given tree and bit counts (which need not be
 * optimal).为作为参数传入的树生成编码
 * IN assertion: the array bl_count contains the bit length statistics for
 * the given tree and the field len is set for all tree elements.
 * 输入前: 数组 bl_count 包含了所给树的所有叶节点霍夫曼编码长度的统计信息,
 *        并且树中所有节点都已拥有其编码串长度记录。
 * OUT assertion: the field code is set for all tree elements of non
 *     zero code length.
 * 输出后:根据编码串长度自动分配好编码值。
 */
local void gen_codes (tree, max_code)
    ct_data near *tree;        /* the tree to decorate */
    int max_code;              /* largest code with non zero frequency */
{
    ush next_code[MAX_BITS+1]; /* next code value for each bit length */
    ush code = 0;              /* running code value */
    int bits;                  /* bit index */
    int n;                     /* code index */

    /* The distribution counts are first used to generate the code values
     * without bit reversal.
     */
    for (bits = 1; bits <= MAX_BITS; bits++) {
        next_code[bits] = code = (code + bl_count[bits-1]) << 1;
    }
    /* Check that the bit counts in bl_count are consistent. The last code
     * must be all ones.
     */
    Assert (code + bl_count[MAX_BITS]-1 == (1<<MAX_BITS)-1,
            "inconsistent bit counts");
    Tracev((stderr,"
gen_codes: max_code %d ", max_code));

    for (n = 0;  n <= max_code; n++) {
        int len = tree[n].Len;
        if (len == 0) continue;
        /* Now reverse the bits */
        tree[n].Code = bi_reverse(next_code[len]++, len);

        Tracec(tree != static_ltree, (stderr,"
n %3d %c l %2d c %4x (%x) ",
             n, (isgraph(n) ? n : " "), len, tree[n].Code, next_code[len]-1));
    }
}
小结
到此为止,huffman压缩的部分已经基本分析完毕了,然而zip压缩算法还将huffman压缩的结果进行了再次压缩并封装输出,
这些过程将在下一篇文章中分析。如果你耐着性子看到了这里,真的很感谢了。
- 上一篇: 几种压缩算法原理介绍
- 下一篇: 几种压缩算法
