
Struts2源码分析(三) 绘制Struts2执行的核心流程时序图并分析
前一篇博客中根据Struts2的官方架构图简单的描绘了Struts2运行流程,并解释了一下Struts2中一些核心类的用途。现在我们从源码的角度分析Struts2的核心流程。
首先根据一个Struts2的HelloWorld绘制出Struts2的启动时的时序图:
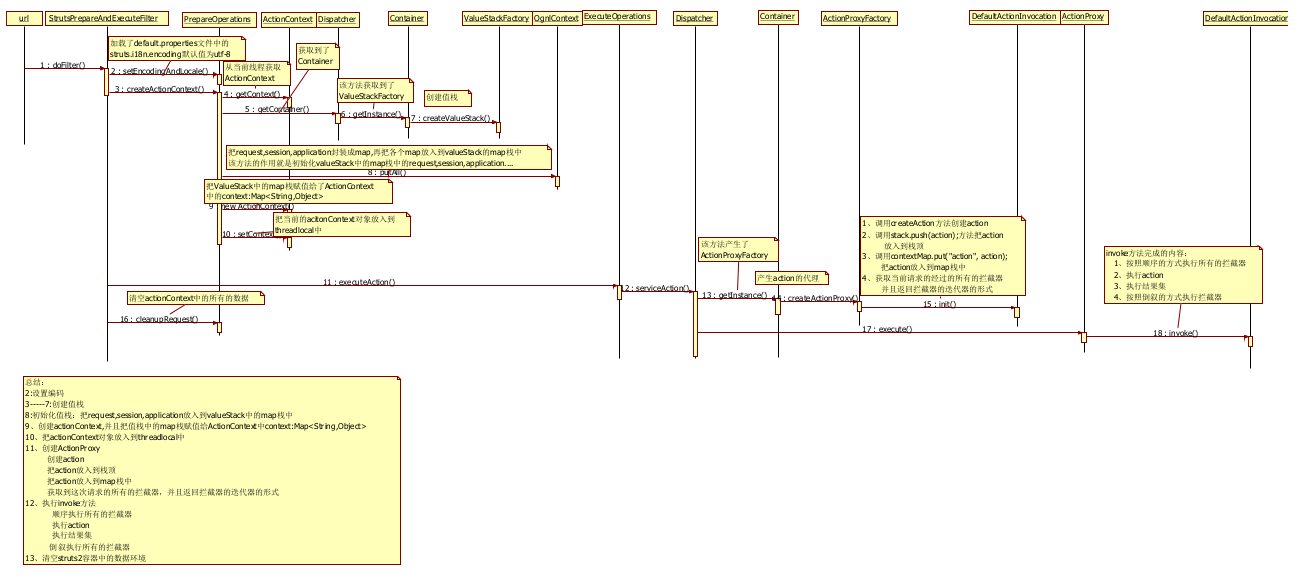
备注:由于这个图非常大,所以这里放置了一个缩图。文章的最后我会给出这个时序图的下载地址。
把核心流程分为16步。接下来一步步的分析:
一.请求URL时执行StrutsPrepareAndExecuteFilter的doFilter()
public void doFilter(ServletRequest req, ServletResponse res, FilterChain chain) throws IOException, ServletException {

        HttpServletRequest request = (HttpServletRequest) req;
        HttpServletResponse response = (HttpServletResponse) res;

        try {
            if (excludedPatterns != null && prepare.isUrlExcluded(request, excludedPatterns)) {
                chain.doFilter(request, response);
            } else {
                prepare.setEncodingAndLocale(request, response);
                prepare.createActionContext(request, response);
                prepare.assignDispatcherToThread();
                request = prepare.wrapRequest(request);
                ActionMapping mapping = prepare.findActionMapping(request, response, true);
                if (mapping == null) {
                    boolean handled = execute.executeStaticResourceRequest(request, response);
                    if (!handled) {
                        chain.doFilter(request, response);
                    }
                } else {
                    execute.executeAction(request, response, mapping);
                }
            }
        } finally {
            prepare.cleanupRequest(request);
        }
    }
二.执行PrepareOperations的setEncodingAndLocale设置编码
prepare.setEncodingAndLocale(request, response);PrepareOperations中调用Dispatcher中的prepare()方法
    public void setEncodingAndLocale(HttpServletRequest request, HttpServletResponse response) {
        dispatcher.prepare(request, response);
    }
在Dispatcher中的prepare中则通过依赖注入在default.properties中的定义的STRUTS_I18N_ENCODING
 public void prepare(HttpServletRequest request, HttpServletResponse response) {
        String encoding = null;
        if (defaultEncoding != null) {
            encoding = defaultEncoding;
        }
        // check for Ajax request to use UTF-8 encoding strictly http://www.w3.org/TR/XMLHttpRequest/#the-send-method
        if ("XMLHttpRequest".equals(request.getHeader("X-Requested-With"))) {
            encoding = "UTF-8";
        }

        Locale locale = null;
        if (defaultLocale != null) {
            locale = LocalizedTextUtil.localeFromString(defaultLocale, request.getLocale());
        }

        if (encoding != null) {
            applyEncoding(request, encoding);
        }

        if (locale != null) {
            response.setLocale(locale);
        }

        if (paramsWorkaroundEnabled) {
            request.getParameter("foo"); // simply read any parameter (existing or not) to "prime" the request
        }
    }
三.通过执行PrepareOperations的createActionContext设置一个ActionContext (Action上下文)
prepare.createActionContext(request, response);四.在PrepareOperations的createActionContext中从当前线程中获取ActionContext
 public ActionContext createActionContext(HttpServletRequest request, HttpServletResponse response) {
        ActionContext ctx;
        Integer counter = 1;
        Integer oldCounter = (Integer) request.getAttribute(CLEANUP_RECURSION_COUNTER);
        if (oldCounter != null) {
            counter = oldCounter + 1;
        }

        ActionContext oldContext = ActionContext.getContext();
        if (oldContext != null) {
            // detected existing context, so we are probably in a forward
            ctx = new ActionContext(new HashMap<String, Object>(oldContext.getContextMap()));
        } else {
            ValueStack stack = dispatcher.getContainer().getInstance(ValueStackFactory.class).createValueStack();
            stack.getContext().putAll(dispatcher.createContextMap(request, response, null));
            ctx = new ActionContext(stack.getContext());
        }
        request.setAttribute(CLEANUP_RECURSION_COUNTER, counter);
        ActionContext.setContext(ctx);
        return ctx;
    }
Struts先调用ActionContext类的静态方法getContext()中其实是从ThreadLocal中获取一个ActionContext实例。ThreadLoacl是从当前线程中获取ActionContext的
五,六,七 当从ThreadLoacl中获取到的ActionContext为null创建ValueStack
先通过dispatcher获取到Container。然后获取到ValueStackFactory并创建ValueStack
ValueStack stack = dispatcher.getContainer().getInstance(ValueStackFactory.class).createValueStack();八.在OgnlContext给ValueStack的Map栈赋值
ValueStack stack = dispatcher.getContainer().getInstance(ValueStackFactory.class).createValueStack();

stack.getContext().putAll(dispatcher.createContextMap(request, response, null));
把request,session,application等域对象封装成map,再把各个map放入到valueStack的map栈中。该方法的作用就是初始化valueStack中的map栈中的request,session,application….
九.把ValueStack中的map栈赋值给了ActionContext中的context:Map
 ActionContext oldContext = ActionContext.getContext();
        if (oldContext != null) {
            // detected existing context, so we are probably in a forward
            ctx = new ActionContext(new HashMap<String, Object>(oldContext.getContextMap()));
        } else {
            ValueStack stack = dispatcher.getContainer().getInstance(ValueStackFactory.class).createValueStack();
            stack.getContext().putAll(dispatcher.createContextMap(request, response, null));
            ctx = new ActionContext(stack.getContext());
  }
注意观察如上代码:
现在我们可以总结一下:Struts先从当前线程中获取一个ActionContext:
如果该ActionContext为null。则创建一个新的ValueStack并将域对象设置给ValueStack的Map栈中,接着创建一个ActionContext,然后把ValueStack的Map栈赋值给ActionContext中的context:Map<String,Object>。
如果该ActionContext不为null。则依然创建一个新的ActionContext。并把旧的ActionContext中的中的context:Map<String,Object>赋值给新的
十.将当前的acitonContext对象设置到ThreadLoacl(当前线程)中
ActionContext.setContext(ctx);该方法调用的ThreadLoacl的set方法来设置ActionContext到当前线程中。
十一.执行ExecuteOperations的executeAction
 protected ExecuteOperations execute;
ActionMapping mapping = prepare.findActionMapping(request, response, true);
if(mapping!=null){
   ....
}else{
   execute.executeAction(request, response, mapping);
}
观察如上代码:
StrutsPrepareAndExecuteFilter通过ActionMapper来获取一个ActionMapping对象,当ActionMapping对象不为Null。则调用executeAction
十二.执行Dispatcher的serviceAction
  public void executeAction(HttpServletRequest request, HttpServletResponse response, ActionMapping mapping) throws ServletException {
        dispatcher.serviceAction(request, response, mapping);
    }
十三,十四.在Dispatcher的serviceAction方法中获取ValueStack创建ActionProxy
    public void serviceAction(HttpServletRequest request, HttpServletResponse response, ActionMapping mapping)
            throws ServletException {

        Map<String, Object> extraContext = createContextMap(request, response, mapping);

        // If there was a previous value stack, then create a new copy and pass it in to be used by the new Action
        ValueStack stack = (ValueStack) request.getAttribute(ServletActionContext.STRUTS_VALUESTACK_KEY);
        boolean nullStack = stack == null;
        if (nullStack) {
            ActionContext ctx = ActionContext.getContext();
            if (ctx != null) {
                stack = ctx.getValueStack();
            }
        }
        if (stack != null) {
            extraContext.put(ActionContext.VALUE_STACK, valueStackFactory.createValueStack(stack));
        }

        String timerKey = "Handling request from Dispatcher";
        try {
            UtilTimerStack.push(timerKey);
            String namespace = mapping.getNamespace();
            String name = mapping.getName();
            String method = mapping.getMethod();

            ActionProxy proxy = getContainer().getInstance(ActionProxyFactory.class).createActionProxy(
                    namespace, name, method, extraContext, true, false);

            request.setAttribute(ServletActionContext.STRUTS_VALUESTACK_KEY, proxy.getInvocation().getStack());

            // if the ActionMapping says to go straight to a result, do it!
            if (mapping.getResult() != null) {
                Result result = mapping.getResult();
                result.execute(proxy.getInvocation());
            } else {
                proxy.execute();
            }

            // If there was a previous value stack then set it back onto the request
            if (!nullStack) {
                request.setAttribute(ServletActionContext.STRUTS_VALUESTACK_KEY, stack);
            }
        } catch (ConfigurationException e) {
            logConfigurationException(request, e);
            sendError(request, response, HttpServletResponse.SC_NOT_FOUND, e);
        } catch (Exception e) {
            if (handleException || devMode) {
                sendError(request, response, HttpServletResponse.SC_INTERNAL_SERVER_ERROR, e);
            } else {
                throw new ServletException(e);
            }
        } finally {
            UtilTimerStack.pop(timerKey);
        }
    }
十五.通过DefaultActionInvocation的init()方法将Action压入值栈栈定
  ActionProxy proxy = getContainer().getInstance(ActionProxyFactory.class).createActionProxy(
                    namespace, name, method, extraContext, true, false);
在ActionProxyFactory的createActionProxy方法中:
 public ActionProxy createActionProxy(String namespace, String actionName, String methodName, Map<String, Object> extraContext, boolean executeResult, boolean cleanupContext) {
         ActionInvocation inv = new DefaultActionInvocation(extraContext, true);
        container.inject(inv);
        return createActionProxy(inv, namespace, actionName, methodName, executeResult, cleanupContext);
    }
createActionProxy有很多个重载方法,最终会调用:
public ActionProxy createActionProxy(ActionInvocation inv, String namespace, String actionName, String methodName, boolean executeResult, boolean cleanupContext) {

        DefaultActionProxy proxy = new DefaultActionProxy(inv, namespace, actionName, methodName, executeResult, cleanupContext);
        container.inject(proxy);
        proxy.prepare();
        return proxy;
    }
而在DefaultActionProxy的prepare方法中:
invocation.init(this);DefaultActionInvocation的init()方法
  public void init(ActionProxy proxy) {
        this.proxy = proxy;
        Map<String, Object> contextMap = createContextMap();

        // Setting this so that other classes, like object factories, can use the ActionProxy and other
        // contextual information to operate
        ActionContext actionContext = ActionContext.getContext();

        if (actionContext != null) {
            actionContext.setActionInvocation(this);
        }

        createAction(contextMap);

        if (pushAction) {
            stack.push(action);
            contextMap.put("action", action);
        }

        invocationContext = new ActionContext(contextMap);
        invocationContext.setName(proxy.getActionName());

        // get a new List so we don"t get problems with the iterator if someone changes the list
        List<InterceptorMapping> interceptorList = new ArrayList<InterceptorMapping>(proxy.getConfig().getInterceptors());
        interceptors = interceptorList.iterator();
    }
可以看到,通过当前的ActionProxy获取到Action对象后,Action对象就被压入Struts值栈栈顶。此时同时获取了拦截器的迭代器
这块比较复杂,简单总结一下:
1、调用createAction方法创建action
2、调用stack.push(action);方法把action
放入到栈顶
3、调用contextMap.put(“action”, action);
把action放入到map栈中
4、获取当前请求的经过的所有的拦截器
并且返回拦截器的迭代器的形式
十六.执行ActionProxy的execute()方法
DefaultActionProxy的execute()方法源码:
 public String execute() throws Exception {
        ActionContext nestedContext = ActionContext.getContext();
        ActionContext.setContext(invocation.getInvocationContext());

        String retCode = null;

        String profileKey = "execute: ";
        try {
            UtilTimerStack.push(profileKey);

            retCode = invocation.invoke();
        } finally {
            if (cleanupContext) {
                ActionContext.setContext(nestedContext);
            }
            UtilTimerStack.pop(profileKey);
        }
十七.执行DefaultActionInvocation的invoke方法
invoke方法是整个Struts框架最精华的地方.主要分为如下几步:
1、按照顺序的方式执行所有的拦截器
2、执行action方法获取返回值
3、执行结果集
4、按照倒叙的方式执行拦截器
观察源代码:
 public String invoke() throws Exception {
        String profileKey = "invoke: ";
        try {
            UtilTimerStack.push(profileKey);

            if (executed) {
                throw new IllegalStateException("Action has already executed");
            }

            if (interceptors.hasNext()) {
                final InterceptorMapping interceptor = interceptors.next();
                String interceptorMsg = "interceptor: " + interceptor.getName();
                UtilTimerStack.push(interceptorMsg);
                try {
                                resultCode = interceptor.getInterceptor().intercept(DefaultActionInvocation.this);
                            }
                finally {
                    UtilTimerStack.pop(interceptorMsg);
                }
            } else {
                resultCode = invokeActionOnly();
            }

            // this is needed because the result will be executed, then control will return to the Interceptor, which will
            // return above and flow through again
            if (!executed) {
                if (preResultListeners != null) {
                    for (Object preResultListener : preResultListeners) {
                        PreResultListener listener = (PreResultListener) preResultListener;

                        String _profileKey = "preResultListener: ";
                        try {
                            UtilTimerStack.push(_profileKey);
                            listener.beforeResult(this, resultCode);
                        }
                        finally {
                            UtilTimerStack.pop(_profileKey);
                        }
                    }
                }

                // now execute the result, if we"re supposed to
                if (proxy.getExecuteResult()) {
                    executeResult();
                }

                executed = true;
            }

            return resultCode;
        }
        finally {
            UtilTimerStack.pop(profileKey);
        }
    }
十八.最后执行PrepareOperations的cleanupRequest方法
清空actionContext中的所有的数据
public void cleanupDispatcher() {
        if (dispatcher == null) {
            throw new StrutsException("Something is seriously wrong, Dispatcher is not initialized (null) ");
        } else {
            try {
                dispatcher.cleanup();
            } finally {
                ActionContext.setContext(null);
            }
        }
    }
时序图下载:
http://download.csdn.net/detail/canot/9486379
