android Context 理解
Context对于android开发人员来说并不陌生,但是Context具体是什么,相信不同的开发人员有不同的理解。本文只是读者自己对于Context的理解,并不代表广大的开发人员。
Context 在android api文档中被翻译为 上下文,而本人的理解是Context其实就是一个场景,一个场景就是用户于操作系统交互的的过程。比如,当你打电话时,场景(Context)就是你打电话的界面以及隐藏在界面后的数据,发短信时,场景(Context)就是你发送短信的界面以及隐藏在界面后的数据。
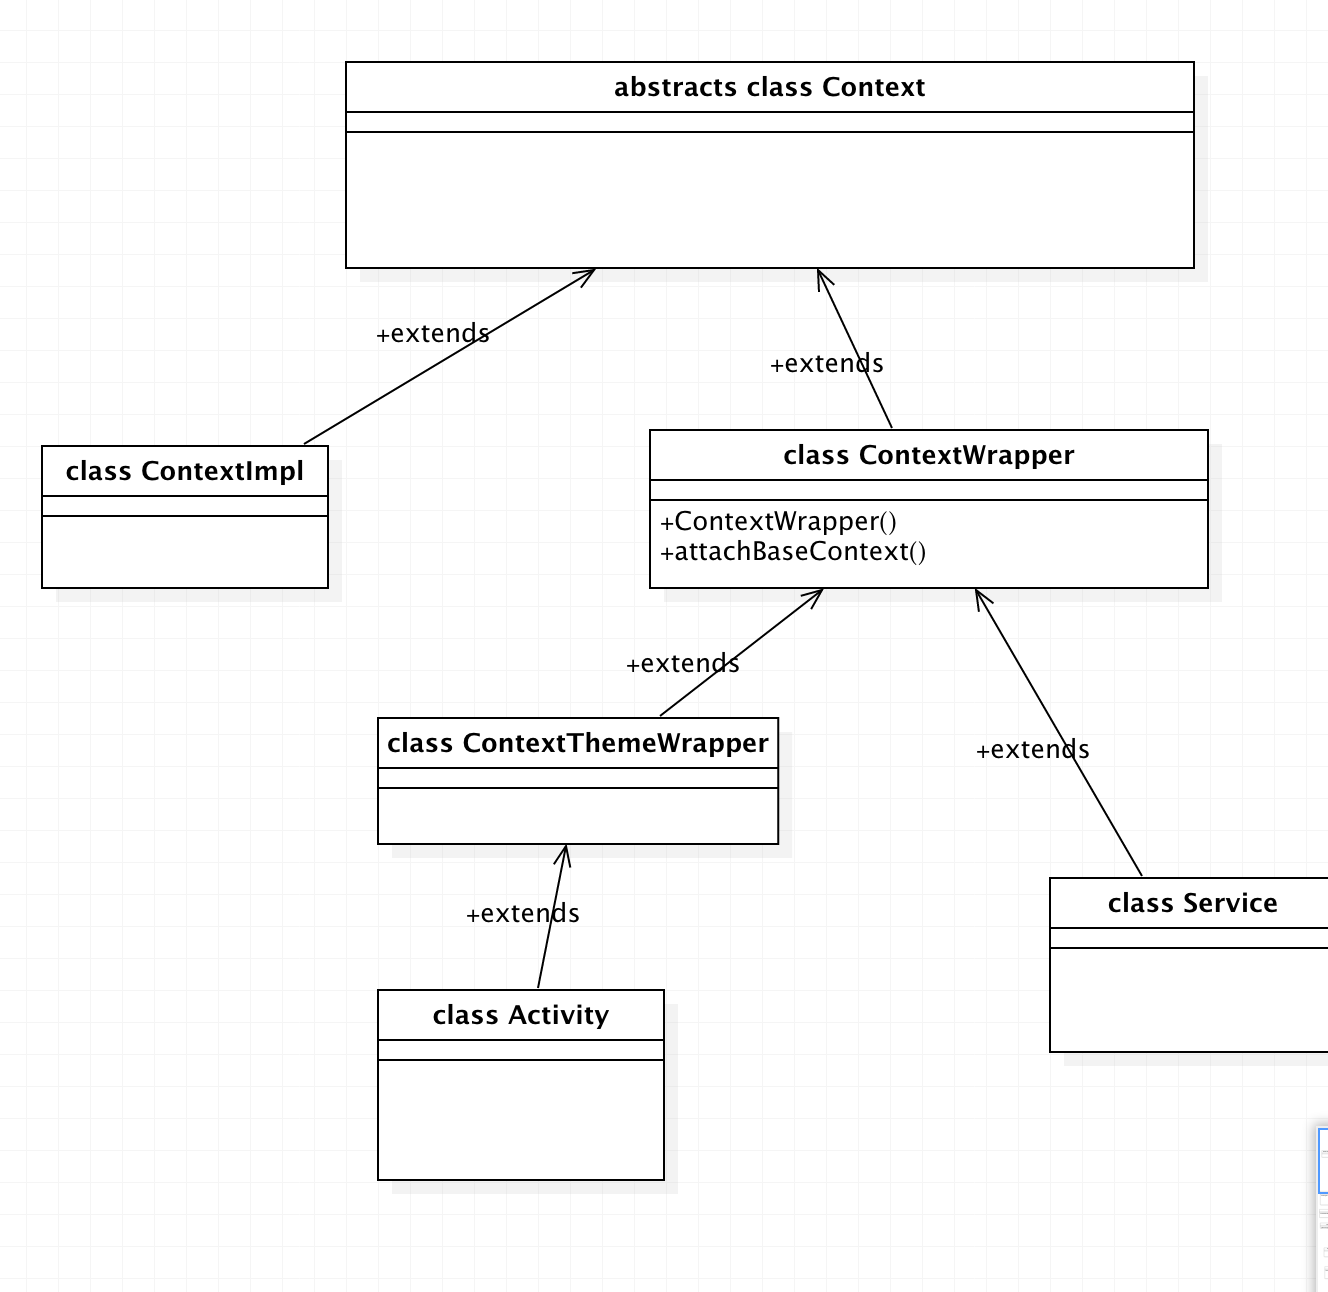
根据Android api 源码我们可以得出以下示例图,该图介绍类Context、ContextImpl、ContextWrapper、ContextThemeWrapper、Activity、Service之间的关系。

通过该图我们可以看出Context其实是一个抽象类,而Context的具体实现类是ContextImpl,而对于ContextWrapper、ContextThemeWrapper 这两个类,其内部包含了一个Context的引用,同时内部提供了一个方法 attachBaseContext 用于给ContextWrapper 对象中指定真正的Context对象。因此,当调用这两个类内部的方法时,实质上是去运行ContextImpl中的方法
具体源码如下:
public class ContextWrapper extends Context {
    Context mBase;

    public ContextWrapper(Context base) {
        mBase = base;
    }
     /**
     * Set the base context for this ContextWrapper.  All calls will then be
     * delegated to the base context.  Throws
     * IllegalStateException if a base context has already been set.
     *
     * @param base The new base context for this wrapper.
     */
    protected void attachBaseContext(Context base) {
        if (mBase != null) {
            throw new IllegalStateException("Base context already set");
        }
        mBase = base;
    }
}
对于 Activity、Service本质上来说就是一个Context(场景),换句话说,我们可以理解为在Context抽象类的基础上通过添加了一些其他接口,进而扩充了本身的功能,扩充后形成的类被称为Activity或者Service。
接下来我们来看android app中真正的Context(ContextImpl)是如何创建的。
众所周知,每一个应用程序在客户端(无论是Application、Activity、Service)的启动都是从ActivityThread类开始的。所以Context的创建也是在该类中完成的。
下面我们从Application的Context、Activity的Context、Service的Context 的源码层面对Context进行详细分析
1:Application 的Context
我们都知道每一个App在启动时都会创建一个Application对象,AmS通过远程调用到ActivityThread中的bindApplication;
在bindApplication中我们可以看到;
public final void bindApplication(String processName, ApplicationInfo appInfo,
                List<ProviderInfo> providers, ComponentName instrumentationName,
                ProfilerInfo profilerInfo, Bundle instrumentationArgs,
                IInstrumentationWatcher instrumentationWatcher,
                IUiAutomationConnection instrumentationUiConnection, int debugMode,
                boolean enableBinderTracking, boolean trackAllocation,
                boolean isRestrictedBackupMode, boolean persistent, Configuration config,
                CompatibilityInfo compatInfo, Map<String, IBinder> services, Bundle coreSettings) {
            ...
            AppBindData data = new AppBindData();
            ...
            data.initProfilerInfo = profilerInfo;
            sendMessage(H.BIND_APPLICATION, data);
        }
内部会创建一个 AppBindData 对象,同时对AppBindData 内对各个属性进行赋值,(注:LoadedApk info)该属性没有进行辅助,后续会讲到。
在bindApplication 方法内 我们可以看到内部发送了消息,之后会调用到 ActivityThread的 handleBindApplication()方法
在改方法内会创建ContextImpl对象,具体看内部源码:
 private void handleBindApplication(AppBindData data) {
       ...
        data.info = getPackageInfoNoCheck(data.appInfo, data.compatInfo);
        ...
        final ContextImpl appContext = ContextImpl.createAppContext(this, data.info);
        updateLocaleListFromAppContext(appContext,
                mResourcesManager.getConfiguration().getLocales());
        ...
    }
在源码中我们只关注上述代码即可,getPackageInfoNoCheck()方法中 我们可以看到实质上是调用到了
 private LoadedApk getPackageInfo(ApplicationInfo aInfo, CompatibilityInfo compatInfo,
            ClassLoader baseLoader, boolean securityViolation, boolean includeCode,
            boolean registerPackage) {
        final boolean differentUser = (UserHandle.myUserId() != UserHandle.getUserId(aInfo.uid));
        synchronized (mResourcesManager) {
            if (packageInfo == null || (packageInfo.mResources != null
                    && !packageInfo.mResources.getAssets().isUpToDate())) {
                   ...
                packageInfo =
                    new LoadedApk(this, aInfo, compatInfo, baseLoader,
                            securityViolation, includeCode &&
                            (aInfo.flags&ApplicationInfo.FLAG_HAS_CODE) != 0, registerPackage);

               ...
            }
            return packageInfo;
        }
    }
在上述源码中我们可以看到 如果packageInfo为null 内部就会new 出一个新的 packageInfo对象,如果不为null,则直接返回。
然后根据返回到packageInfo 通过createAppContext ()方法创建一个ContextImpl对象。
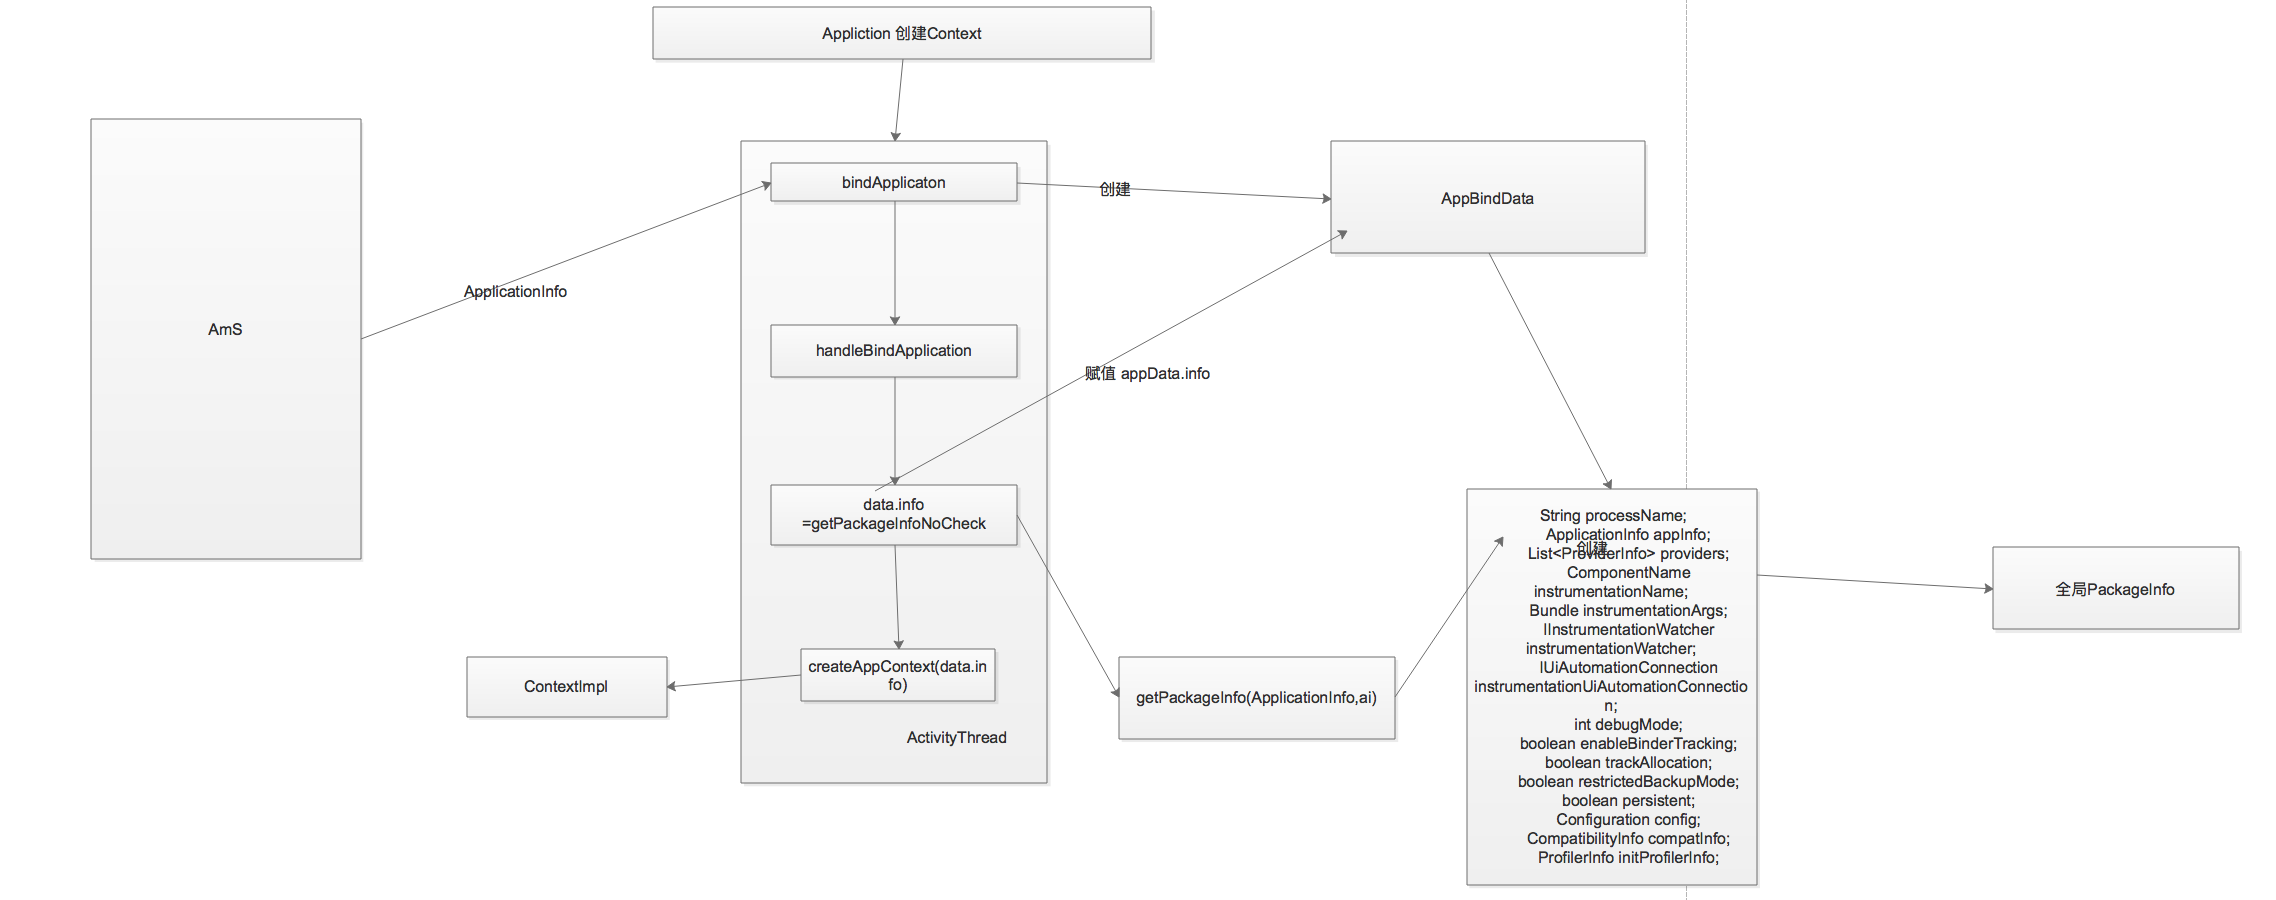
以下是Application中创建ContextImpl示例图:
2:Activity的Context
我们知道Activity在启动时AmS会通过远程调用到ActivityThread类中的 scheduleLaunchActivity ()方法 ,在该方法内我们可以看到:
 public final void scheduleLaunchActivity(Intent intent, IBinder token, int ident,
                ActivityInfo info, Configuration curConfig, Configuration overrideConfig,
                CompatibilityInfo compatInfo, String referrer, IVoiceInteractor voiceInteractor,
                int procState, Bundle state, PersistableBundle persistentState,
                List<ResultInfo> pendingResults, List<ReferrerIntent> pendingNewIntents,
                boolean notResumed, boolean isForward, ProfilerInfo profilerInfo) {
            ActivityClientRecord r = new ActivityClientRecord();
            ...
            r.token = token;
            ...
            sendMessage(H.LAUNCH_ACTIVITY, r);
        }
实质上是首先创建了一个ActivityClientRecord对象,并对该对象内不属性进行赋值,(注:ActivityClientRecord内的 LoadedApk packageInfo; 这个属性在创建该对象时并没有赋值,后续会讲到);
通过sendMessage方法之后,会调用到handleLaunchActivity()方法
  private void handleLaunchActivity(ActivityClientRecord r, Intent customIntent, String reason) {
        ..
        Activity a = performLaunchActivity(r, customIntent);
        ..

    }
可以看到内部直接调用到了 performLaunchActivity方法中,在该方法内:
 private Activity performLaunchActivity(ActivityClientRecord r, Intent customIntent) {
        // System.out.println("##### [" + System.currentTimeMillis() + "] ActivityThread.performLaunchActivity(" + r + ")");

        ActivityInfo aInfo = r.activityInfo;
        if (r.packageInfo == null) {
            r.packageInfo = getPackageInfo(aInfo.applicationInfo, r.compatInfo,
                    Context.CONTEXT_INCLUDE_CODE);
        }
        try {
            ...
            if (activity != null) {
                Context appContext = createBaseContextForActivity(r, activity);
             ...
            }

        return activity;
    }
可以看出 内部在Activity不为null的情况下,执行了 createBaseContextForActivity()该方法,在该方法内部我们可以看到
  private Context createBaseContextForActivity(ActivityClientRecord r, final Activity activity) {
        ...
        ContextImpl appContext = ContextImpl.createActivityContext(
                this, r.packageInfo, r.token, displayId, r.overrideConfig);
        appContext.setOuterContext(activity);
        ...
    }
这样关于Activity的Context(场景)创建了出来;
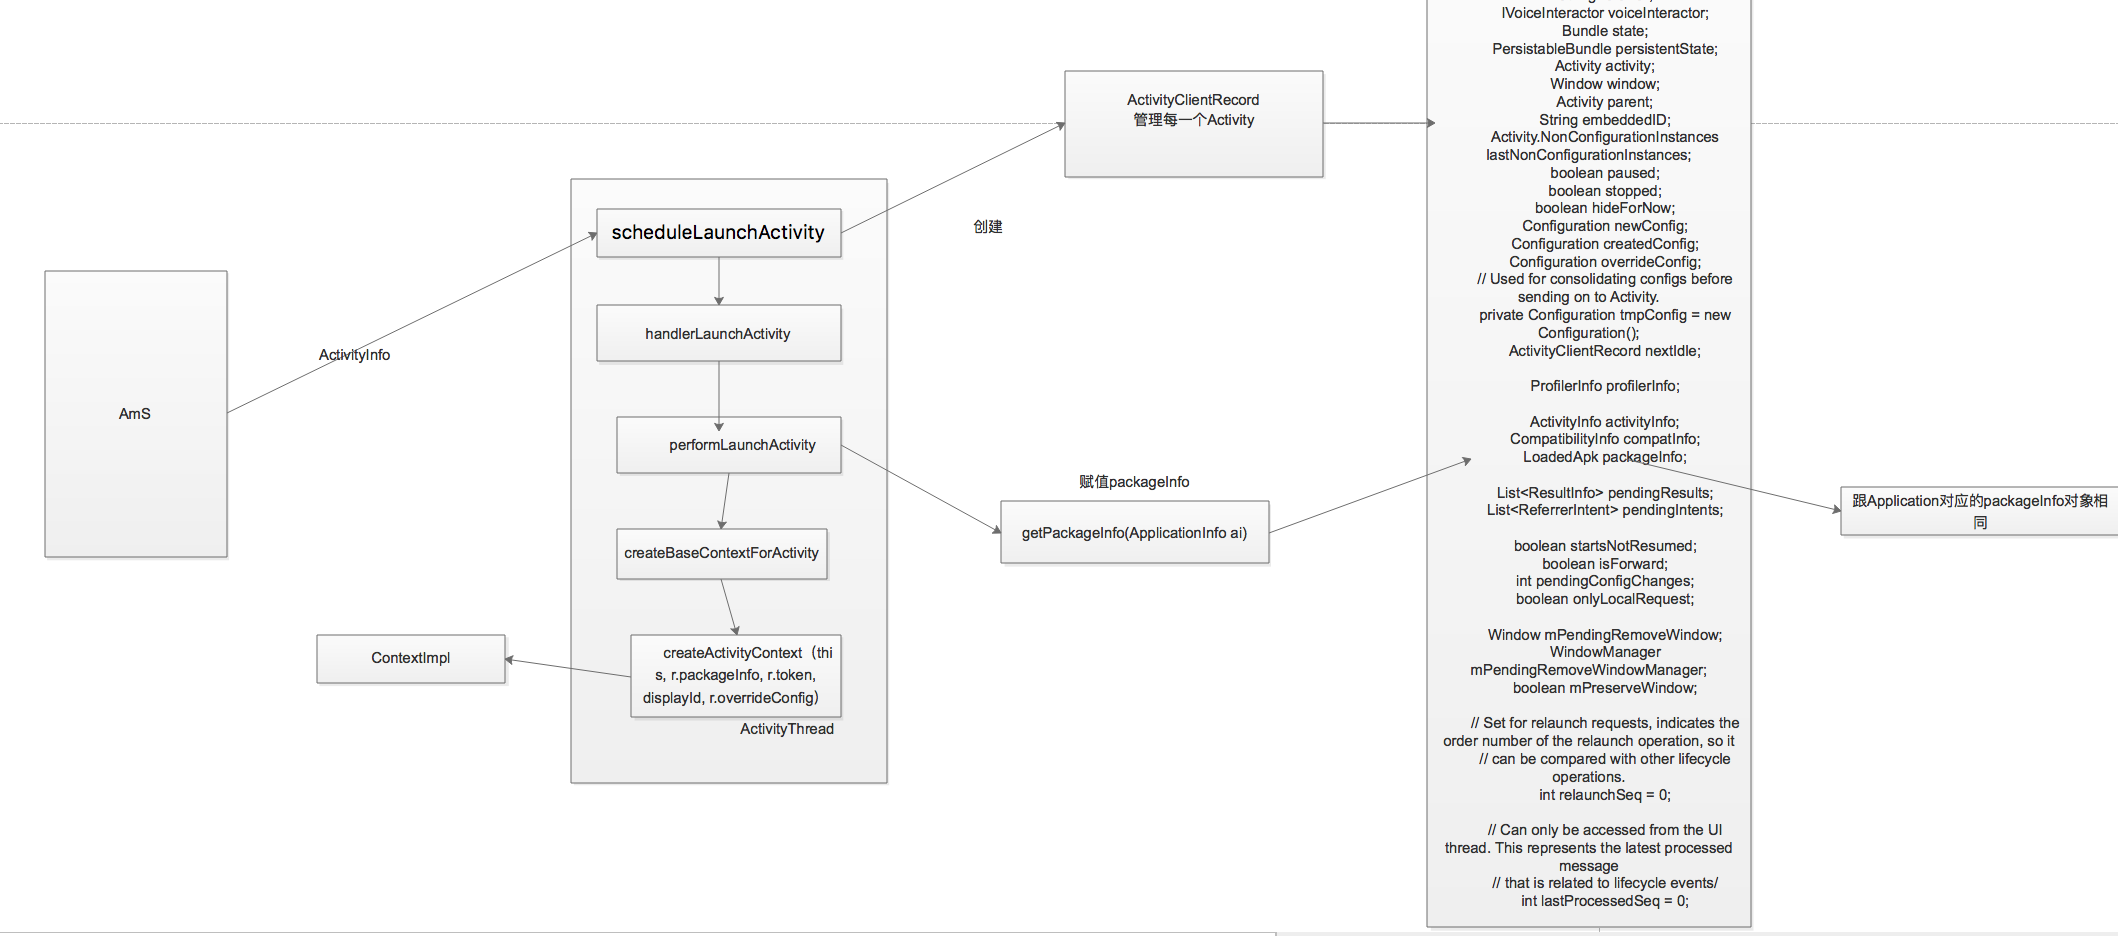
以下是Activity的Context创建示例图:
3:Service的Context;
当Service启动时其实跟Activity差不多,AmS通过远程调用到ActivityThread内部的的 scheduleCreateService()方法 在该方法内部我们可以看出
public final void scheduleCreateService(IBinder token,
                ServiceInfo info, CompatibilityInfo compatInfo, int processState) {
            updateProcessState(processState, false);
            CreateServiceData s = new CreateServiceData();
            s.token = token;
            s.info = info;
            s.compatInfo = compatInfo;

            sendMessage(H.CREATE_SERVICE, s);
        }
内部会首先创建一个CreateServiceData 对象,并对该对象内对属性进行复制。
然后通过Handler 执行到 handleCreateService()方法
   private void handleCreateService(CreateServiceData data) {
       ...
        LoadedApk packageInfo = getPackageInfoNoCheck(
                data.info.applicationInfo, data.compatInfo);
         .....
            ContextImpl context = ContextImpl.createAppContext(this, packageInfo);
            context.setOuterContext(service);
          ....
    }
在该源码中我们可以看到首先是通过getPackageInfoNoCheck方法去获取到 packageInfo属性,然后通过createAppContext 方法去创建了一个Service对象的Context(场景);
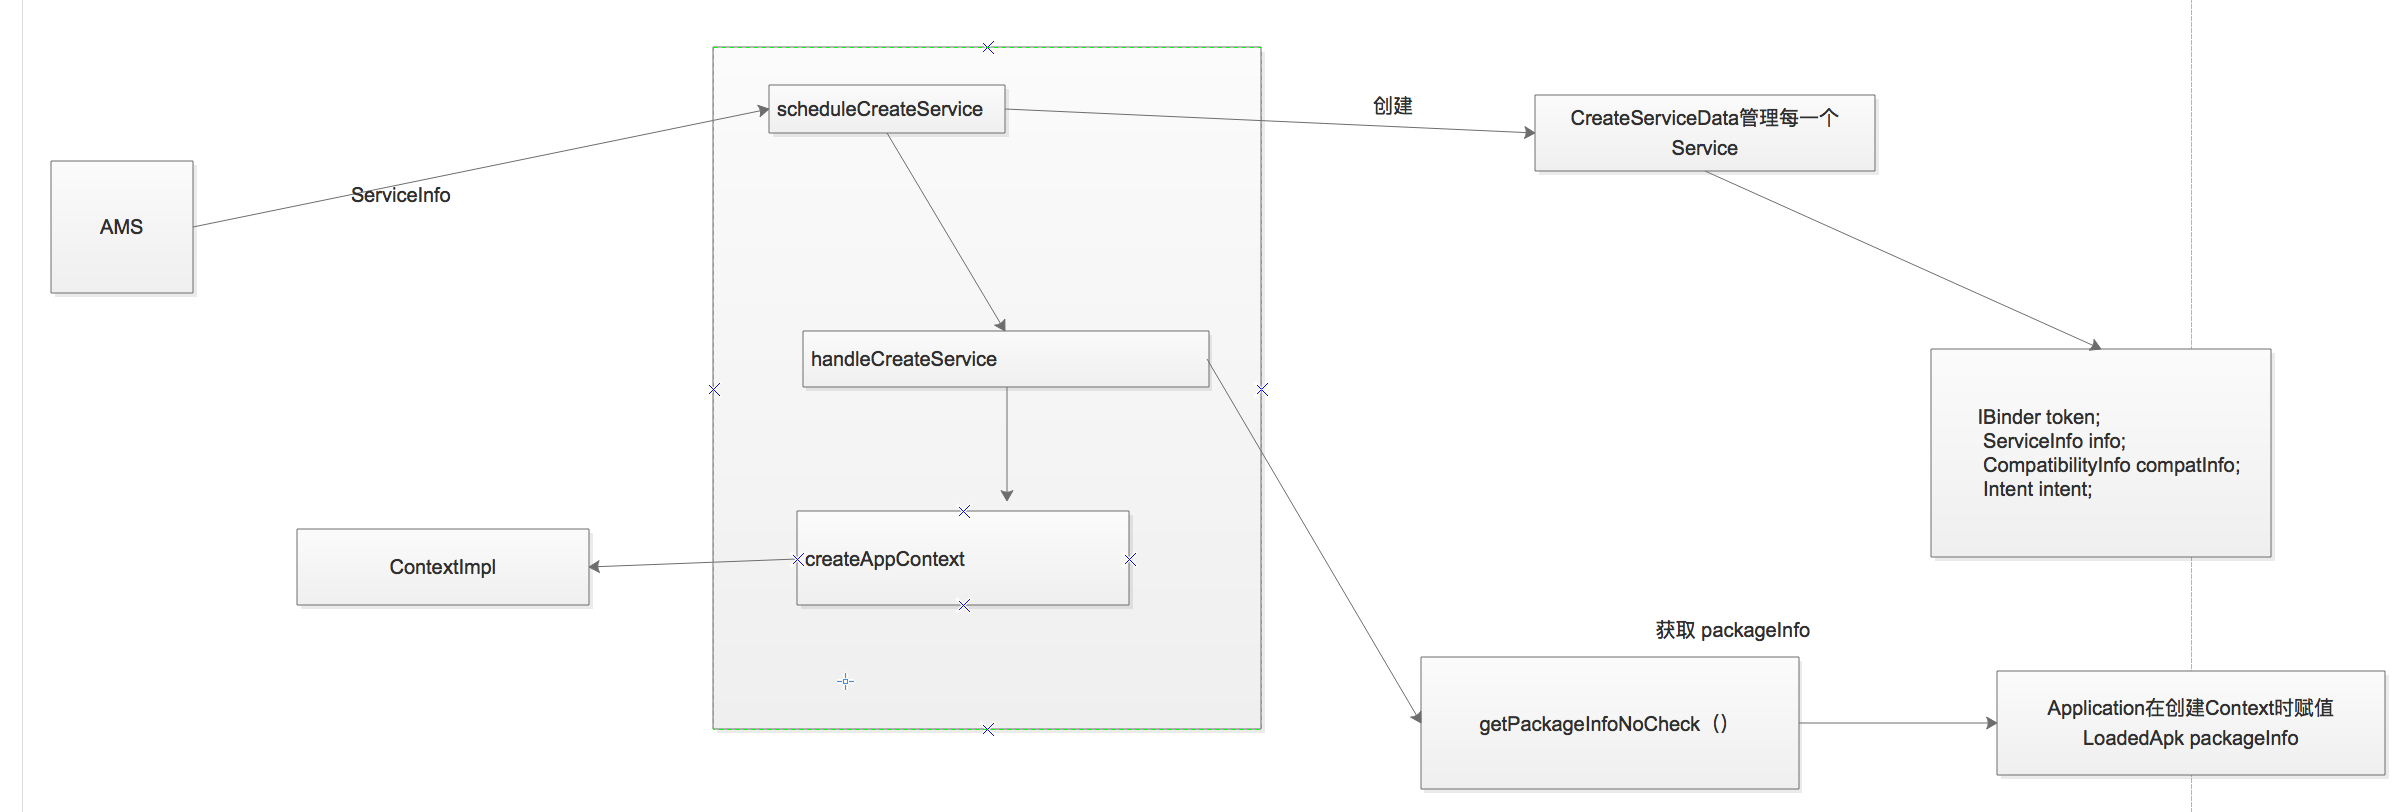
以下是Service中创建Context的示例图:
通过以上对Application、Activity、Service如何创建ContextImpl分析,我们可以看出创建过程基本上是相同的,包括代码结构也很相似,所不同的是针对Application、Activity、Servie使用了不同的数据对象。
| 类名 | 远程数据 | 本地数据 | 赋值方式 |
|---|---|---|---|
| Application | AppApplicationInfo | AppAppBindData | getPackageInfoNoCheck |
| Activity | ActivityInfo | ActivityClientRecord | getPackageInfo |
| Service | ServiceInfo | CreateServiceData | getPackageInfoNoCheck |
最后我们可以看出 app中Context的个数:
Context 个数 = Activity 个数+ Service 个数+ 1;
总结:应用程序中包含多个ContextImpl对象,而每一个ContextImpl对象内部的mPackageInfo都是指向同一个PackageInfo对象,这样ContextImpl中的大多数进行包操作的函数实际上转向了mPackageInfo对象对应的方法,而事实上是调用了同一个PackageInfo对象。
- 上一篇: 【Tensorflow】tf.placeholder函数
- 下一篇: 批处理


