
Android Material Design之CoordinatorLayout+AppBarLayout实现上滑隐藏ToolBar
http://blog.csdn.net/u010687392/article/details/46852565
版权声明:本文为博主原创文章,未经博主允许不得转载。转载注明出处:Sunzxyong
ok,今天继续更新Material Design系列!!!
废话不说,先看看效果图吧:
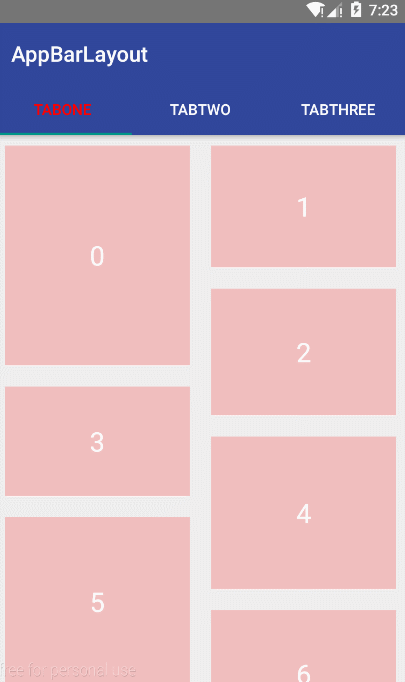
好了,现在来讲讲上图是怎么实现的吧!讲之前先讲讲几个控件:
- CoordinatorLayout
- <android.support.design.widget.CoordinatorLayout
- xmlns:android="http://schemas.android.com/apk/res/android"
- xmlns:app="http://schemas.android.com/apk/res-auto"
- android:id="@+id/coordinator_layout"
- android:layout_width="match_parent"
- android:layout_height="match_parent">
- <android.support.design.widget.AppBarLayout
- android:id="@+id/appbar_layout"
- android:layout_width="match_parent"
- android:layout_height="wrap_content"
- android:fitsSystemWindows="true">
- <android.support.v7.widget.Toolbar
- android:id="@+id/toolBar"
- android:layout_width="match_parent"
- android:layout_height="?attr/actionBarSize"
- android:background="#30469b"
- app:layout_scrollFlags="scroll|enterAlways" />
- <android.support.design.widget.TabLayout
- ......
- />
- </android.support.design.widget.AppBarLayout>
- <LinearLayout
- android:layout_width="match_parent"
- android:layout_height="match_parent"
- android:orientation="vertical"
- android:scrollbars="none"
- app:layout_behavior="@string/appbar_scrolling_view_behavior">
- <!-- content view .....-->
- </LinearLayout>
- </android.support.design.widget.CoordinatorLayout>
上面这段代码中,ToolBar标记了layout_scrollFlags滚动事件,那么当LinearLayout滚动时便可触发ToolBar中的layout_scrollFlags效果。即往上滑动隐藏ToolBar,下滑出现ToolBar,而不会隐藏TabLayout,因为TabLayout没有标记scrollFlags事件,相反,如果TabLayout也标记了ScrollFlags事件,那么LinearLayout的下滑时ToolBar和TabLayout都会隐藏了。layout_scrollFlags中的几个值:
scroll: 所有想滚动出屏幕的view都需要设置这个flag, 没有设置这个flag的view将被固定在屏幕顶部。
enterAlways:这个flag让任意向下的滚动都会导致该view变为可见,启用快速“返回模式”。
enterAlwaysCollapsed:当你的视图已经设置minHeight属性又使用此标志时,你的视图只能已最小高度进入,只有当滚动视图到达顶部时才扩大到完整高度。
exitUntilCollapsed:滚动退出屏幕,最后折叠在顶端。【注意】: 设置了layout_scrollFlags标志的View必须在没有设置的View的之前定义,这样可以确保设置过的View都从上面移出, 只留下那些固定的View在下面。
- TabLayout
来看看TabLayout的三种实现方式:
- 固定的Tab,根据TabLayout的宽度适配

- 固定的Tab,在TabLayout中居中显示

- 可滑动的Tab

要实现上述效果,首先就需要加入TabLayout:[html] view plaincopyprint?
- <android.support.design.widget.TabLayout
- android:id="@+id/tabLayout"
- android:layout_width="match_parent"
- android:layout_height="wrap_content"
- android:background="#30469b"
- app:tabGravity="fill"
- app:tabMode="fixed"
- app:tabSelectedTextColor="#ff0000"
- app:tabTextColor="#ffffff" />
- tabGravity —Tab的重心,有填充和居中两个值,为别为fill和center。
- tabMode —Tab的模式,有固定和滚动两个模式,分别为 fixed 和 scrollable。
- tabTextColor —设置默认状态下Tab上字体的颜色。
- tabSelectedTextColor —设置选中状态下Tab上字体的颜色。
- TabLayout mTabLayout = (TabLayout) findViewById(R.id.tabLayout);
- mTabLayout.addTab(mTabLayout.newTab().setText("TabOne"));//给TabLayout添加Tab
- mTabLayout.addTab(mTabLayout.newTab().setText("TabTwo"));
- mTabLayout.addTab(mTabLayout.newTab().setText("TabThree"));
- mTabLayout.setupWithViewPager(mViewPager);//给TabLayout设置关联ViewPager,如果设置了ViewPager,那么ViewPagerAdapter中的getPageTitle()方法返回的就是Tab上的标题
- ViewPager mViewPager = (ViewPager) findViewById(R.id.viewpager);
- MyViewPagerAdapter viewPagerAdapter = new MyViewPagerAdapter(getSupportFragmentManager());
- viewPagerAdapter.addFragment(FragmentOne.newInstance(), "TabOne");//添加Fragment
- viewPagerAdapter.addFragment(FragmentTwo.newInstance(), "TabTwo");
- viewPagerAdapter.addFragment(FragmentThree.newInstance(), "TabThree");
- mViewPager.setAdapter(viewPagerAdapter);//设置适配器
- public class MyViewPagerAdapter extends FragmentPagerAdapter {
- private final List<Fragment> mFragments = new ArrayList<>();//添加的Fragment的集合
- private final List<String> mFragmentsTitles = new ArrayList<>();//每个Fragment对应的title的集合
- public MyViewPagerAdapter(FragmentManager fm) {
- super(fm);
- }
- /**
- * @param fragment 添加Fragment
- * @param fragmentTitle Fragment的标题,即TabLayout中对应Tab的标题
- */
- public void addFragment(Fragment fragment, String fragmentTitle) {
- mFragments.add(fragment);
- mFragmentsTitles.add(fragmentTitle);
- }
- @Override
- public Fragment getItem(int position) {
- //得到对应position的Fragment
- return mFragments.get(position);
- }
- @Override
- public int getCount() {
- //返回Fragment的数量
- return mFragments.size();
- }
- @Override
- public CharSequence getPageTitle(int position) {
- //得到对应position的Fragment的title
- return mFragmentsTitles.get(position);
- }
- }
上面两个控件如果明白怎么用了,那么这个效果就很简单了,我就直接贴代码了。。。主布局:activity_main.xml[html] view plaincopyprint?
- <android.support.design.widget.CoordinatorLayout
- xmlns:android="http://schemas.android.com/apk/res/android"
- xmlns:app="http://schemas.android.com/apk/res-auto"
- android:id="@+id/coordinator_layout"
- android:layout_width="match_parent"
- android:layout_height="match_parent">
- <android.support.design.widget.AppBarLayout
- android:layout_width="match_parent"
- android:layout_height="wrap_content"
- android:fitsSystemWindows="true">
- <android.support.v7.widget.Toolbar
- android:id="@+id/toolBar"
- android:layout_width="match_parent"
- android:layout_height="?attr/actionBarSize"
- android:background="#30469b"
- app:layout_scrollFlags="scroll|enterAlways" />
- <android.support.design.widget.TabLayout
- android:id="@+id/tabLayout"
- android:layout_width="match_parent"
- android:layout_height="wrap_content"
- android:background="#30469b"
- app:tabGravity="fill"
- app:tabMode="fixed"
- app:tabSelectedTextColor="#ff0000"
- app:tabTextColor="#ffffff" />
- </android.support.design.widget.AppBarLayout>
- <LinearLayout
- android:layout_width="match_parent"
- android:layout_height="match_parent"
- android:orientation="vertical"
- android:scrollbars="none"
- app:layout_behavior="@string/appbar_scrolling_view_behavior">
- <android.support.v4.view.ViewPager
- android:id="@+id/viewpager"
- android:layout_width="match_parent"
- android:layout_height="match_parent" />
- </LinearLayout>
- </android.support.design.widget.CoordinatorLayout>
- public class MainActivity extends ActionBarActivity {
- @Override
- protected void onCreate(Bundle savedInstanceState) {
- super.onCreate(savedInstanceState);
- setContentView(R.layout.activity_main);
- Toolbar mToolbar = (Toolbar) findViewById(R.id.toolBar);
- mToolbar.setTitleTextColor(Color.WHITE);//设置ToolBar的titl颜色
- setSupportActionBar(mToolbar);
- ViewPager mViewPager = (ViewPager) findViewById(R.id.viewpager);
- MyViewPagerAdapter viewPagerAdapter = new MyViewPagerAdapter(getSupportFragmentManager());
- viewPagerAdapter.addFragment(FragmentOne.newInstance(), "TabOne");//添加Fragment
- viewPagerAdapter.addFragment(FragmentTwo.newInstance(), "TabTwo");
- viewPagerAdapter.addFragment(FragmentThree.newInstance(), "TabThree");
- mViewPager.setAdapter(viewPagerAdapter);//设置适配器
- TabLayout mTabLayout = (TabLayout) findViewById(R.id.tabLayout);
- mTabLayout.addTab(mTabLayout.newTab().setText("TabOne"));//给TabLayout添加Tab
- mTabLayout.addTab(mTabLayout.newTab().setText("TabTwo"));
- mTabLayout.addTab(mTabLayout.newTab().setText("TabThree"));
- mTabLayout.setupWithViewPager(mViewPager);//给TabLayout设置关联ViewPager,如果设置了ViewPager,那么ViewPagerAdapter中的getPageTitle()方法返回的就是Tab上的标题
- }
- }
源码地址:http://download.csdn.net/detail/jdsjlzx/9607407
声明:该文观点仅代表作者本人,牛骨文系教育信息发布平台,牛骨文仅提供信息存储空间服务。
