

(一):写在前面的话
接着上一篇继续更新,上一篇文章已经把FastDev4Android项目做了大体的了解,包括项目结构已经需要进行完善的功能,那么今天我们继续完善这个项目;今天我们主要将的是实现一个首页自动无限循环组件我这边采用的是Gallery(重写)+FlowIndicator(自定义);
项目地址
(二)Gallery控件讲解
2.1:说明-实现效果如下: 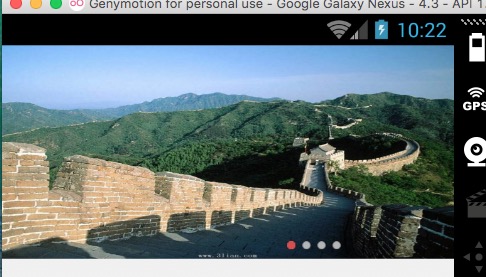
Gallery为画廊控件相信大家对此非常熟悉,同时这个Gallery组件已经早就过时了,虽然官方说这个组件会造成内存过大,缓存机制不行,或者说缓存机制完全不行,不过如果作为初级阶段要实现自动轮播用这个练手还是非常方便的。虽然现在一般可以采用viewpager或者RecyleView来进行实现,后面我们还会更新viewpager和recyleview实现的图片轮播组件;
2.2:实现方式:
要实现图片的自动无限轮播,那么最重要要实现自动轮播的功能,在Gallery我们只需要实现一个定时器,每个一段时间调用Gallery的方法来切换图片如下: 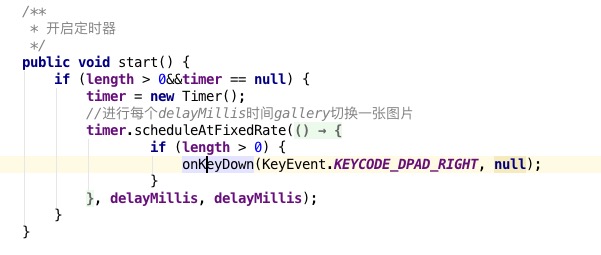
接着在定时器中直接调用onkeydown让gallery来切换图片,我们来看一下onkeydown的方法:
  /**
     * Handles left, right, and clicking
     * @see android.view.View#onKeyDown
     */
    @Override
    public boolean onKeyDown(int keyCode, KeyEvent event) {
        switch (keyCode) {

        case KeyEvent.KEYCODE_DPAD_LEFT:
            if (moveDirection(-1)) {
                playSoundEffect(SoundEffectConstants.NAVIGATION_LEFT);
                return true;
            }
            break;
        case KeyEvent.KEYCODE_DPAD_RIGHT:
            if (moveDirection(1)) {
                playSoundEffect(SoundEffectConstants.NAVIGATION_RIGHT);
                return true;
            }
            break;
        case KeyEvent.KEYCODE_DPAD_CENTER:
        case KeyEvent.KEYCODE_ENTER:
            mReceivedInvokeKeyDown = true;
            // fallthrough to default handling
        }

        return super.onKeyDown(keyCode, event);
    }
上边的源代码我们可以很清晰看到KEYCODE_DPAD_LEFT,KEYCODE_DPAD_RIGHT这两个参数,OK那么我们在调用onkeydown传入参数的时候传入这两个值就OK了。那么我们该如果设置这两个参数呢?其实很简单gallery是提供我们手指滑动来切换的,也就是Gallery实现了GestureDetector.OnGestureListener手势接口,那么我们可以重写onFing方法判断是向左还是向右滑动,代码如下:
    @Override
    public boolean onFling(MotionEvent e1, MotionEvent e2, float velocityX,
                           float velocityY) {
        int kEvent;
        if (isScrollingLeft(e1, e2)) {
            kEvent = KeyEvent.KEYCODE_DPAD_LEFT; //设置手势滑动的方法 --向左
        } else {
            kEvent = KeyEvent.KEYCODE_DPAD_RIGHT; //设置手势滑动的方法--向右
        }
        onKeyDown(kEvent, null);  //进行设置galler切换图片
        if (this.getSelectedItemPosition() == 0) {
            this.setSelection(length);
        }
        return false;
    }
下面我们来看一下AutoGallery的源代码,详细了解一下实现方法:
package com.chinaztt.fda.widget;

import android.content.Context;
import android.util.AttributeSet;
import android.view.KeyEvent;
import android.view.MotionEvent;
import android.view.View;
import android.widget.Gallery;

import java.util.Timer;
import java.util.TimerTask;

/**
 * 当前类注释:重写Gallery对画廊控件进行重写,扩展成可以自动切换图片Gallery
 * 这个图片轮播控件还是比较之前封装的,现在一般采用viewpager进行封装,后面我这边也会介绍
 * 项目名:FastDev4Android
 * 包名:com.chinaztt.fda.widget
 * 作者:江清清 on 15/10/23 08:41
 * 邮箱:jiangqqlmj@163.com
 * QQ: 781931404
 * 公司:江苏中天科技软件技术有限公司
 */
public class AutoGallery extends Gallery implements View.OnTouchListener {
    //画廊图片的数量
    private int length;
    //自动切换图片的时间
    private long delayMillis = 5000;
    //定时器
    private Timer timer = null;

    public AutoGallery(Context context) {
        super(context);
        setOnTouchListener(this);
    }

    public AutoGallery(Context context, AttributeSet attrs) {
        super(context, attrs);
        setOnTouchListener(this);
    }

    public AutoGallery(Context context, AttributeSet attrs, int defStyle) {
        super(context, attrs, defStyle);
        setOnTouchListener(this);
    }

    public int getLength() {
        return this.length;
    }

    public void setLength(int length) {
        this.length = length;
    }

    public void setDelayMillis(long delayMillis) {
        this.delayMillis = delayMillis;
    }

    /**
     * 重写Galler中手指滑动的手势方法
     * @param e1
     * @param e2
     * @param velocityX
     * @param velocityY
     * @return
     */
    @Override
    public boolean onFling(MotionEvent e1, MotionEvent e2, float velocityX,
                           float velocityY) {
        int kEvent;
        if (isScrollingLeft(e1, e2)) {
            kEvent = KeyEvent.KEYCODE_DPAD_LEFT; //设置手势滑动的方法 --向左
        } else {
            kEvent = KeyEvent.KEYCODE_DPAD_RIGHT; //设置手势滑动的方法--向右
        }
        onKeyDown(kEvent, null);  //进行设置galler切换图片
        if (this.getSelectedItemPosition() == 0) {
            this.setSelection(length);
        }
        return false;
    }

    /**
     * 进行判断滑动方向
     * @param e1
     * @param e2
     * @return
     */
    private boolean isScrollingLeft(MotionEvent e1, MotionEvent e2) {
        return e2.getX() > e1.getX();
    }

    /**
     * 开启定时器
     */
    public void start() {
        if (length > 0&&timer == null) {
            timer = new Timer();
            //进行每个delayMillis时间gallery切换一张图片
            timer.scheduleAtFixedRate(new TimerTask() {
                @Override
                public void run() {
                    if (length > 0) {
                        onKeyDown(KeyEvent.KEYCODE_DPAD_RIGHT, null);
                    }
                }
            }, delayMillis, delayMillis);
        }
    }

    /**
     * 关闭定时器
     */
    public void stop() {
        if (timer != null) {
            timer.cancel();
            timer = null;
        }
    }

    /**
     * 重写手指触摸的事件,当手指按下的时候,需要关闭gallery自动切换
     * 当手指抬开得时候 需要打开gallery自动切换功能
     * @param v
     * @param event
     * @return
     */
    @Override
    public boolean onTouch(View v, MotionEvent event) {
        switch (event.getAction()) {
            case MotionEvent.ACTION_DOWN:
                stop();
                break;
            case MotionEvent.ACTION_UP:
            case MotionEvent.ACTION_CANCEL:
                start();
                break;
        }
        return false;
    }
}
(三)FlowIndicator控件讲解
3.1:实现效果: 
3.2:指示器是一个自定义的view,通过实时的绘制,首先我们需要定义圆点的attrs属性文件如下:
<!--图片轮播下面指示器自定义属性-->
    <declare-styleable name="FlowIndicator">
        <attr name="point_normal_color" format="color" /> <!--指示器小圆点正常颜色-->
        <attr name="point_seleted_color" format="color" /> <!--指示器小圆点选中颜色-->
        <attr name="radius" format="dimension" />       <!--指示器原点的半径-->
        <attr name="count" format="integer" />          <!--指示器原点的数量-->
        <attr name="space" format="dimension" />      <!--每个指示器原点的间隔-->
    </declare-styleable>
然后我们在FlowDicator中进行获取到相关属性,并且进行绘制ondraw即可,不过在绘制的时候需要判断以下当前是否选中,这样分别绘制选中和未选中的原点;
@Override
    protected void onDraw(Canvas canvas) {
        super.onDraw(canvas);
        float width = (getWidth() - ((radius * 2 * count) + (space * (count - 1)))) / 2.f;
        Log.d(TAG_FLOWINDICATOR,"当前选中的为:"+this.seleted);
        for (int i = 0; i < count; i++) {
            if (i == seleted) {
                paint.setStyle(Style.FILL);
                canvas.drawBitmap(bmp_selected, 130+width + getPaddingLeft()
                        + radius + i * (space + radius + radius), 0, null);
            } else {
                paint.setStyle(Style.FILL);
                canvas.drawBitmap(bmp_normal, 130+width + getPaddingLeft() + radius
                        + i * (space + radius + radius), 0, null);
            }
        }
    }
3.3:具体实现代码,FlowIndicator.java
package com.chinaztt.fda.widget;

import android.content.Context;
import android.content.res.TypedArray;
import android.graphics.Bitmap;
import android.graphics.BitmapFactory;
import android.graphics.Canvas;
import android.graphics.Paint;
import android.graphics.Paint.Style;
import android.util.AttributeSet;
import android.view.View;

import com.chinaztt.fda.ui.R;
import com.chinaztt.fda.utils.Log;

/**
 * 自动播放Gallery指示器
 * @author jiangqq
 *
 */
public class FlowIndicator extends View {
    private static  final  String TAG_FLOWINDICATOR="FlowIndicator";
    private int count;
    private float space, radius;
    private Paint paint = new Paint(Paint.ANTI_ALIAS_FLAG);
    private Bitmap bmp_selected, bmp_normal;
    // 选中
    private int seleted = 0;

    public FlowIndicator(Context context, AttributeSet attrs) {
        super(context, attrs);
        TypedArray a = context.obtainStyledAttributes(attrs,
                R.styleable.FlowIndicator);
        //小圆点数量
        count = a.getInteger(R.styleable.FlowIndicator_count, 4);
        //每个小圆点间隔距离
        space = a.getDimension(R.styleable.FlowIndicator_space, 4);
        //小圆点半径
        radius = a.getDimension(R.styleable.FlowIndicator_radius, 7);
        //正常 没有选中的图片
        bmp_normal = BitmapFactory.decodeResource(getResources(),
                R.drawable.hui);
        //选中的图片
        bmp_selected = BitmapFactory.decodeResource(getResources(),
                R.drawable.lan);
        a.recycle();
    }

    //当前选中的索引,并且重绘指示器view
    public void setSeletion(int index) {
        this.seleted = index;
        invalidate();
    }
    //设置指示器的数量
    public void setCount(int count) {
        this.count = count;
        invalidate();
    }
    //设置指示器 下一个圆点
    public void next() {
        if (seleted < count - 1)
            seleted++;
        else
            seleted = 0;
        invalidate();
    }
    //设置指示器 前一个圆点
    public void previous() {
        if (seleted > 0)
            seleted--;
        else
            seleted = count - 1;
        invalidate();
    }

    /**
     * 重写绘制指示器view
     * @param canvas
     */
    @Override
    protected void onDraw(Canvas canvas) {
        super.onDraw(canvas);
        float width = (getWidth() - ((radius * 2 * count) + (space * (count - 1)))) / 2.f;
        Log.d(TAG_FLOWINDICATOR,"当前选中的为:"+this.seleted);
        for (int i = 0; i < count; i++) {
            if (i == seleted) {
                paint.setStyle(Style.FILL);
                canvas.drawBitmap(bmp_selected, 130+width + getPaddingLeft()
                        + radius + i * (space + radius + radius), 0, null);
            } else {
                paint.setStyle(Style.FILL);
                canvas.drawBitmap(bmp_normal, 130+width + getPaddingLeft() + radius
                        + i * (space + radius + radius), 0, null);
            }
        }
    }

    /**
     * 进行view大小的测量
     * @param widthMeasureSpec
     * @param heightMeasureSpec
     */
    @Override
    protected void onMeasure(int widthMeasureSpec, int heightMeasureSpec) {
        setMeasuredDimension(measureWidth(widthMeasureSpec),
                measureHeight(heightMeasureSpec));
    }

    private int measureWidth(int measureSpec) {
        int result = 0;
        int specMode = MeasureSpec.getMode(measureSpec);
        int specSize = MeasureSpec.getSize(measureSpec);

        if (specMode == MeasureSpec.EXACTLY) {
            result = specSize;
        } else {
            result = (int) (getPaddingLeft() + getPaddingRight()
                    + (count * 2 * radius) + (count - 1) * radius + 1);
            if (specMode == MeasureSpec.AT_MOST) {
                result = Math.min(result, specSize);
            }
        }
        return result;
    }

    private int measureHeight(int measureSpec) {
        int result = 0;
        int specMode = MeasureSpec.getMode(measureSpec);
        int specSize = MeasureSpec.getSize(measureSpec);

        if (specMode == MeasureSpec.EXACTLY) {
            result = specSize;
        } else {
            result = (int) (2 * radius + getPaddingTop() + getPaddingBottom() + 1);
            if (specMode == MeasureSpec.AT_MOST) {
                result = Math.min(result, specSize);
            }
        }
        return result;
    }
}
(四):该组件的使用方法
我们创建布局文件使用当前组件的包名路径,然后进行初始化并且设置数据,最后绑定事件监听器即可;
package com.chinaztt.fda.test;

import android.os.Bundle;
import android.os.PersistableBundle;
import android.view.LayoutInflater;
import android.view.View;
import android.view.ViewGroup;
import android.widget.AdapterView;
import android.widget.BaseAdapter;
import android.widget.ImageView;

import com.chinaztt.fda.ui.R;
import com.chinaztt.fda.ui.base.BaseActivity;
import com.chinaztt.fda.widget.AutoGallery;
import com.chinaztt.fda.widget.FlowIndicator;
/**
 * 当前类注释: 图片轮播封装类的简单使用
 * 项目名:FastDev4Android
 * 包名:com.chinaztt.fda.test
 * 作者:江清清 on 15/10/23 08:35
 * 邮箱:jiangqqlmj@163.com
 * QQ: 781931404
 * 公司:江苏中天科技软件技术有限公司
 */
public class GalleryIndicatorActivity extends BaseActivity{
    private LayoutInflater mInflater;
    private int[] mImages;
    private AutoGallery headline_image_gallery;        //自动图片轮播Gallery
    private FlowIndicator galleryFlowIndicator;  //指示器控件
    private int circleSelectedPosition = 0; // 默认指示器的圆圈的位置为第一项
    private int gallerySelectedPositon = 0; // 默认gallery的图片为第一张

    @Override
    protected void onCreate(Bundle savedInstanceState) {
        super.onCreate(savedInstanceState);
        setContentView(R.layout.gallery_indicator_layout);
        mInflater=getLayouInflater();
        mImages=new int[]{
                R.drawable.one,
                R.drawable.two,
                R.drawable.three,
                R.drawable.four
        };
        headline_image_gallery=(AutoGallery)this.findViewById(R.id.headline_image_gallery);
        galleryFlowIndicator=(FlowIndicator)this.findViewById(R.id.headline_circle_indicator);

        int topSize = mImages.length;
        //设置指示器圆点的数量
        galleryFlowIndicator.setCount(topSize);
        //设置当前的位置
        galleryFlowIndicator.setSeletion(circleSelectedPosition);
        //设置画廊 图片的数量
        headline_image_gallery.setLength(topSize);
        headline_image_gallery.setAdapter(new GalleryIndicatorAdapter());

        gallerySelectedPositon = topSize * 20 + circleSelectedPosition;
        //设置画廊当前所指的位置 索引
        headline_image_gallery.setSelection(gallerySelectedPositon);
        headline_image_gallery.start();

        //gallery滚动选择监听
        headline_image_gallery
                .setOnItemSelectedListener(new AdapterView.OnItemSelectedListener() {
                    @Override
                    public void onItemSelected(AdapterView<?> parent,
                                               View view, int position, long id) {
                        gallerySelectedPositon = position;
                        circleSelectedPosition = position
                                % headline_image_gallery.getLength();
                        galleryFlowIndicator
                                .setSeletion(circleSelectedPosition);

                    }
                    @Override
                    public void onNothingSelected(AdapterView<?> parent) {

                    }
                });
        //gallery点击选中事件
        headline_image_gallery.setOnItemClickListener(new AdapterView.OnItemClickListener() {
            @Override
            public void onItemClick(AdapterView<?> parent, View view, int position, long id) {
                int index=position
                        % headline_image_gallery.getLength()+1;
                showToastMsgShort("点击了第"+index+"个图片!");
            }
        });
    }

    class GalleryIndicatorAdapter extends BaseAdapter{
        @Override
        public int getCount() {
            return Integer.MAX_VALUE;
        }

        @Override
        public Object getItem(int position) {
            return mImages[position];
        }

        @Override
        public long getItemId(int position) {
            return position;
        }

        @Override
        public View getView(int position, View convertView, ViewGroup parent) {
            Hondler _Hondler=null;
            if(convertView==null){
                _Hondler=new Hondler();
                convertView=mInflater.inflate(R.layout.headline_gallery_item,null);
                _Hondler.headline_gallery_imageview=(ImageView)convertView.findViewById(R.id.headline_gallery_imageview);
                convertView.setTag(_Hondler);
            }else
            {
                _Hondler=(Hondler)convertView.getTag();
            }
            int mPosition = position % mImages.length;
            _Hondler.headline_gallery_imageview.setImageResource(mImages[mPosition]);
            return convertView;
        }
    }

    static class Hondler{
        ImageView headline_gallery_imageview;
    }
}
上面是该组件的基本使用方法,由于篇幅的原因,布局文件这类我这边就没有贴上去,主要讲解了控件的主要实现方法,如果需要具体了解该项目和该组件可以去github中clone一下代码;
项目地址如下:https://github.com/jiangqqlmj/FastDev4Android