

部署 Seafile 服务器(使用 MySQL)
此文档用来说明通过预编译好的安装包,来安装并运行基于 MySQL 的 Seafile服务器.
下载
到下载页面下载最新的服务器安装包.
部署和目录设计
假设你公司的名称为 haiwen,你也已经下载 seafile-server1.4.0* 到你的home 目录下。 我们建议这样的目录结构:
mkdir haiwen
mv seafile-server_* haiwen
cd haiwen
#将 seafile-server_* 移动到 haiwen 目录下后
tar -xzf seafile-server_*
mkdir installed
mv seafile-server_* installed
现在,你的目录看起来应该像这样:
#tree haiwen -L 2
haiwen
├── installed
│   └── seafile-server_1.8.2_x86-64.tar.gz
└── seafile-server-1.8.2
    ├── reset-admin.sh
    ├── runtime
    ├── seafile
    ├── seafile.sh
    ├── seahub
    ├── seahub.sh
    ├── setup-seafile.sh
    └── upgrade
这样设计目录的好处在于
- 和 seafile 相关的配置文件都可以放在 haiwen 目录下,便于集中管理.
- 后续升级时,你只需要解压最新的安装包到 haiwen 目录下.
这样你可以重用 haiwen 目录下已经存在的配置文件,而不用重新配置.
准备 MySQL 数据库
Seafile 服务器有三个组件需要拥有自己的数据库:
- ccnet server
- seafile server
- seahub
Seafile 服务器组件更多信息请看[[Seafile服务器组件概览]].
有两种方法可以初始化数据库:
- 通过
setup-seafile-mysql.sh脚本创建数据库. - 自己或其他人(比如数据库管理员)创建
我们建议采用第一种方法. 脚本会要求你提供 MySQL数据库的的根密码,之后创建:
- ccnet/seafile/seahub 数据库
- 一个可以连接到这些数据库的用户
然而,有时你不得不使用第二种方法.如果你没有根密码,你需要通过拥有这种权限的人(比如数据库管理员)来帮助你创建三个数据库,和一个能连接这三个数据库的用户.例如,为 ccnet/seafile/seahub 分别创建如下三个数据库: ccnet-db /seafile-db / seahub-db, 和一个可以连接这三个数据库的 MySQL用户seafile:
create database `ccnet-db` character set = "utf8";
create database `seafile-db` character set = "utf8";
create database `seahub-db` character set = "utf8";

create user "seafile"@"localhost" identified by "seafile";

GRANT ALL PRIVILEGES ON `ccnet-db`.* to `seafile`;
GRANT ALL PRIVILEGES ON `seafile-db`.* to `seafile`;
GRANT ALL PRIVILEGES ON `seahub-db`.* to `seafile`;
安装 Seafile 服务器
安装前的准备工作
安装 Seafile 服务器之前,请确认已安装以下软件
- python 2.7
- python-setuptools
- python-imaging
- python-mysqldb
#在Debian/Ubuntu系统下
apt-get update
apt-get install python2.7 python-setuptools python-imaging python-mysqldb
安装
cd seafile-server-*
./setup-seafile-mysql.sh  #运行安装脚本并回答预设问题
如果你的系统中没有安装上面的某个软件,那么 Seafile初始化脚本会提醒你安装相应的软件包.

该脚本会依次询问你一些问题,从而一步步引导你配置 Seafile 的各项参数
| 参数 | 作用 | 说明 |
|---|---|---|
seafile server name | seafile 服务器的名字,将来在客户端会显示为这个名字 | 3 ~ 15 个字符,可以用英文字母,数字,下划线 |
seafile server ip or domain | seafile 服务器的 IP 地址或者域名 | 客户端将通过这个 IP 或者地址来访问你的 Seafile 服务 |
ccnet server port | ccnet 使用的 TCP 端口 | 一般使用默认的10001 端口,如果已经被占用,可以设置为其他的端口 |
seafile data dir | seafile 数据存放的目录,用上面的例子,默认将是 /data/haiwen/seafile-data | seafile 数据将随着使用而逐渐增加,请把它放在一个有足够大空闲空间的分区上 |
seafile server port | seafile 服务器 使用的 TCP 端口 | 一般使用默认的 12001 端口,如果已经被占用,可以设置为其他的端口 |
seafile fileserver port | seafile fileserver 使用的 TCP 端口 | 一般使用默认的 8082 端口,如果已经被占用,可以设置为其他的端口 |
seahub admin email | sehaub管理员的登录帐户名 | 使用一个 email 地址 |
seahub admin password | seahub 管理员的密码 |
在这里, 你会被要求选择一种创建 Seafile 数据库的方式:
-------------------------------------------------------
Please choose a way to initialize seafile databases:
-------------------------------------------------------

[1] Create new ccnet/seafile/seahub databases
[2] Use existing ccnet/seafile/seahub databases
具体选择哪项, 取决于你是否拥有根密码.
- 如果选择
1, 你需要提供根密码. 脚本程序会创建数据库和用户。 - 如果选择
2, ccnet/seafile/seahub数据库应该已经被你(或者其他人)提前创建。
如果选择 [1] Create new ccnet/seafile/seahub databases,你会被问三个问题:
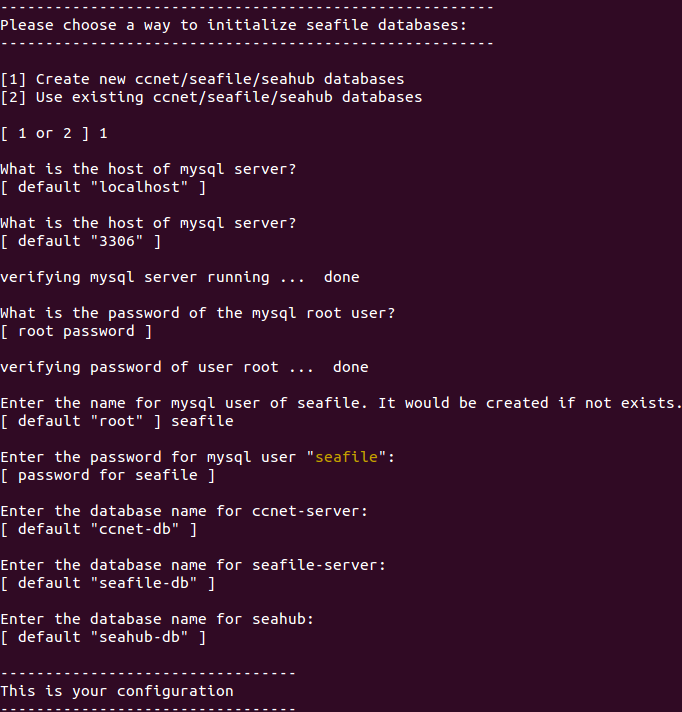
| Question | Description | Note |
|---|---|---|
mysql server host | the host address of the mysql server | the default is localhost |
mysql server port | the port of the mysql server | the default is 3306. Almost every mysql server uses this port. |
root password | the password of mysql root account | the root password is required to create new databases and a new user |
mysql user for seafile | the username for seafile programs to use to access MySQL server | if the user does not exist, it would be created |
password for seafile mysql user | the password for the user above | |
ccnet dabase name | the name of the database used by ccnet, default is "ccnet-db" | the database would be created if not existing |
seafile dabase name | the name of the database used by seafile, default is "seafile-db" | the database would be created if not existing |
seahub dabase name | the name of the database used by seahub, default is "seahub-db" | the database would be created if not existing |
如果你选择[2] Use existing ccnet/seafile/seahub databases,你会被问到如下三个问题:
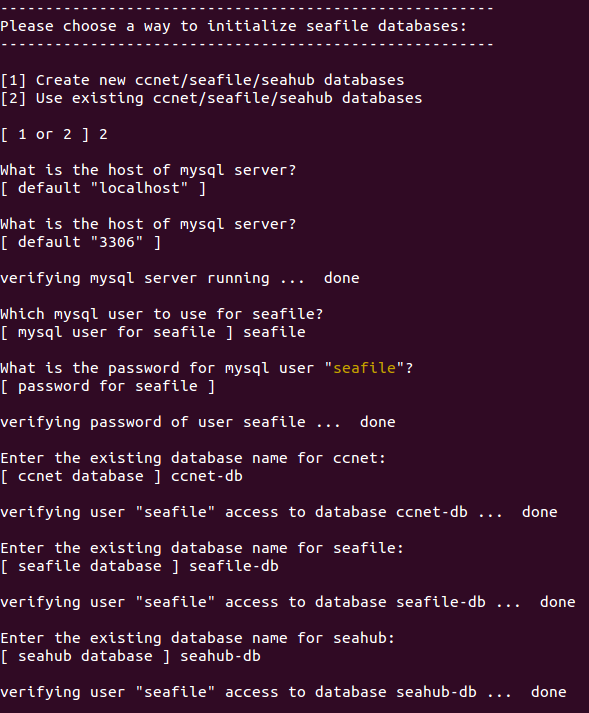
| Question | Description | Note |
|---|---|---|
mysql server host | the host address of the mysql server | the default is localhost |
mysql server port | the port of the mysql server | the default is 3306. Almost every mysql server uses this port |
mysql user for seafile | the user for seafile programs to use to access MySQL server | the user must already exists |
password for seafile mysql user | the password for the user above | |
ccnet dabase name | the name of the database used by ccnet | this database must already exist |
seafile dabase name | the name of the database used by seafile, default is "seafile-db" | this database must already exist |
seahub dabase name | the name of the database used by seahub, default is "seahub-db" | this database must already exist |
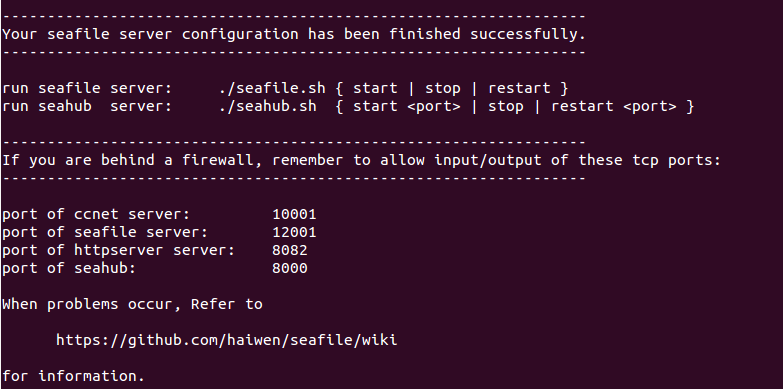
如果安装正确完成,你会看到下面这样的输出
现在你的目录结构看起来应该是这样:
#tree haiwen -L 2
haiwen
├── ccnet               # configuration files
│   ├── ccnet.conf
│   ├── mykey.peer
│   ├── PeerMgr
│   └── seafile.ini
├── installed
│   └── seafile-server_1.8.2_x86-64.tar.gz
├── seafile-data
│   └── seafile.conf
├── seafile-server-1.8.2  # active version
│   ├── reset-admin.sh
│   ├── runtime
│   ├── seafile
│   ├── seafile.sh
│   ├── seahub
│   ├── seahub.sh
│   ├── setup-seafile.sh
│   └── upgrade
├── seafile-server-latest  # symbolic link to seafile-server-1.8.2
├── seahub-data
│   └── avatars
├── seahub_settings.py   # optional config file
└── seahub_settings.pyc
seafile-server-latest文件夹为指向当前 Seafile 服务器文件夹的符号链接.将来你升级到新版本后, 升级脚本会自动更新使其始终指向最新的 Seafile服务器文件夹..
启动 Seafile 服务器
启动之前
因为 Seafile 在客户端和服务器之间使用持续连接,如果你的客户端数量巨大, 你应该在启动 Seafile 之前修改你的 Linux 文件最大打开数,如下:
ulimit -n 30000
启动 Seafile 服务器和 Seahub 网站
在 seafile-server-1.8.2 目录下,运行如下命令
- 启动 Seafile:
./seafile.sh start # 启动 Seafile 服务
- 启动 Seahub
./seahub.sh start <port> # 启动 Seahub 网站 (默认运行在8000端口上)
小贴士: 你第一次启动 seahub 时,seahub.sh 脚本会提示你创建一个 seafile 管理员帐号。
服务启动后, 打开浏览器并输入以下地址
http://192.168.1.111:8000/
你会被重定向到登陆页面. 输入你在安装 Seafile 时提供的用户名和密码后,你会进入 Myhome 页面,新建资料库.
恭喜! 现在你已经成功的安装了 Seafile 服务器.
在另一端口上运行 Seahub
如果你不想在默认的 8000 端口上运行 Seahub, 而是想自定义端口(比如8001)中运行,请按以下步骤操作:
- 关闭 Seafile 服务器
./seahub.sh stop # 停止 Seafile 进程
./seafile.sh stop # 停止 Seahub
- 更改
haiwen/ccnet/ccnet.conf文件中SERVICE_URL的值(假设你的 ip或者域名时192.168.1.100), 如下:
SERVICE_URL = http://192.168.1.100:8001
- 重启 Seafile 服务器
./seafile.sh start # 启动 Seafile 服务
./seahub.sh start 8001 # 启动 Seahub 网站 (运行在8001端口上)
ccnet.conf更多细节请看(server_configuration.md) .
关闭/重启 Seafile 和 Seahub
关闭
./seahub.sh stop # 停止 Seahub
./seafile.sh stop # 停止 Seafile 进程
重启
./seafile.sh restart # 停止当前的 Seafile 进程,然后重启 Seafile
./seahub.sh restart  # 停止当前的 Seahub 进程,并在 8000 端口重新启动 Seahub
如果停止/重启的脚本运行失败
大多数情况下 seafile.sh seahub.sh 脚本可以正常工作。如果遇到问题:
- 使用pgrep命令检查 seafile/seahub 进程是否还在运行中
pgrep -f seafile-controller # 查看 Seafile 进程
pgrep -f "manage.py run_gunicorn" # 查看 Seahub 进程
- 使用pkill命令杀掉相关进程
pkill -f seafile-controller # 结束 Seafile 进程
pkill -f "manage.py run_gunicorn" # 结束 Seafile 进程
OK!
查看seafile更多信息请移至..