

пјҲ81пјүпјҡе…ғзҙ еёғеұҖ
дёҠдёҖз« жҲ‘们д»Ӣз»ҚдәҶ QMLВ дёӯз”ЁдәҺе®ҡдҪҚзҡ„еҮ з§Қе…ғзҙ пјҢиў«з§°дёәе®ҡдҪҚеҷЁгҖӮйҷӨдәҶе®ҡдҪҚеҷЁпјҢQMLВ иҝҳжҸҗдҫӣдәҶеҸҰеӨ–дёҖз§Қз”ЁдәҺеёғеұҖзҡ„жңәеҲ¶гҖӮжҲ‘们е°Ҷиҝҷз§ҚжңәеҲ¶жҲҗдёәй”ҡзӮ№пјҲanchorпјүгҖӮй”ҡзӮ№е…Ғи®ёжҲ‘们зҒөжҙ»ең°и®ҫзҪ®дёӨдёӘе…ғзҙ зҡ„зӣёеҜ№дҪҚзҪ®гҖӮе®ғдҪҝдёӨдёӘе…ғзҙ д№Ӣй—ҙеҪўжҲҗдёҖз§Қзұ»дјјдәҺй”ҡзҡ„е…ізі»пјҢд№ҹе°ұжҳҜдёӨдёӘе…ғзҙ д№Ӣй—ҙеҪўжҲҗдёҖдёӘеӣәе®ҡзӮ№гҖӮй”ҡзӮ№зҡ„иЎҢдёәзұ»дјјдәҺдёҖз§Қй“ҫжҺҘпјҢе®ғиҰҒжҜ”еҚ•зәҜең°и®Ўз®—еқҗж Үж”№еҸҳжӣҙејәгҖӮз”ұдәҺй”ҡзӮ№жҸҸиҝ°зҡ„жҳҜзӣёеҜ№дҪҚзҪ®пјҢжүҖд»ҘеңЁдҪҝз”Ёй”ҡзӮ№ж—¶пјҢжҲ‘们еҝ…йЎ»жҢҮе®ҡдёӨдёӘе…ғзҙ пјҢеЈ°жҳҺе…¶дёӯдёҖдёӘе…ғзҙ зӣёеҜ№дәҺеҸҰеӨ–дёҖдёӘе…ғзҙ гҖӮй”ҡзӮ№жҳҜItemе…ғзҙ зҡ„еҹәжң¬еұһжҖ§д№ӢдёҖпјҢеӣ иҖҢйҖӮз”ЁдәҺжүҖжңү QML еҸҜи§Ҷе…ғзҙ гҖӮ
дёҖдёӘе…ғзҙ жңү 6 дёӘдё»иҰҒзҡ„й”ҡзӮ№зҡ„е®ҡдҪҚзәҝпјҢеҰӮдёӢеӣҫжүҖзӨәпјҡ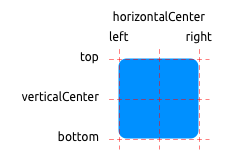
иҝҷ 6 дёӘе®ҡдҪҚзәҝеҲҶеҲ«жҳҜпјҡtopгҖҒbottomгҖҒleftгҖҒrightгҖҒhorizontalCenterе’ҢverticalCenterгҖӮеҜ№дәҺTextе…ғзҙ пјҢиҝҳжңүдёҖдёӘbaselineй”ҡзӮ№гҖӮжҜҸдёҖдёӘй”ҡзӮ№е®ҡдҪҚзәҝйғҪеҸҜд»Ҙз»“еҗҲдёҖдёӘеҒҸ移зҡ„ж•°еҖјгҖӮе…¶дёӯпјҢtopгҖҒbottomгҖҒleftе’Ңrightз§°дёәеӨ–иҫ№жЎҶпјӣhorizontalCenterгҖҒverticalCenterе’Ңbaselineз§°дёәеҒҸ移йҮҸгҖӮ
дёӢйқўпјҢжҲ‘们дҪҝз”ЁдҫӢеӯҗжқҘиҜҙжҳҺиҝҷдәӣй”ҡзӮ№зҡ„дҪҝз”ЁгҖӮйҰ–е…ҲпјҢжҲ‘们йңҖиҰҒйҮҚж–°е®ҡд№үдёҖдёӢдёҠдёҖз« дҪҝз”ЁиҝҮзҡ„BlueRectangle组件пјҡ
import QtQuick 2.0

Rectangle {
    width: 48
    height: 48
    color: "blue"
    border.color: Qt.lighter(color)

    MouseArea {
        anchors.fill: parent
        drag.target: parent
    }
}
з®ҖеҚ•жқҘиҜҙпјҢжҲ‘们еңЁBlueRectangleжңҖеҗҺеўһеҠ дәҶдёҖдёӘMouseArea组件гҖӮеүҚйқўзҡ„з« иҠӮдёӯпјҢжҲ‘们з®ҖеҚ•дҪҝз”ЁдәҶиҝҷдёӘ组件гҖӮйЎҫеҗҚжҖқд№үпјҢиҝҷжҳҜдёҖдёӘз”ЁдәҺеӨ„зҗҶйј ж ҮдәӢ件зҡ„组件гҖӮд№ӢеүҚжҲ‘们дҪҝз”ЁдәҶе®ғеӨ„зҗҶйј ж ҮзӮ№еҮ»дәӢ件гҖӮиҝҷйҮҢпјҢжҲ‘们дҪҝз”ЁдәҶе…¶жӢ–еҠЁдәӢ件гҖӮanchors.fill: parentдёҖиЎҢзҡ„еҗ«д№ү马дёҠе°ұдјҡи§ЈйҮҠпјӣdrag.target: parentеҲҷиҜҙжҳҺжӢ–еҠЁзӣ®ж ҮжҳҜparentгҖӮжҲ‘们зҡ„жӢ–еҠЁеҜ№иұЎжҳҜMouseAreaзҡ„зҲ¶з»„件пјҢд№ҹе°ұжҳҜBlueRectangle组件гҖӮ
жҺҘдёӢжқҘзңӢ第дёҖдёӘдҫӢеӯҗпјҡ
д»Јз ҒеҰӮдёӢпјҡ
import QtQuick 2.0

Rectangle {
    id: root
    width: 220
    height: 220
    color: "black"

    GreenRectangle {
        x: 10
        y: 10
        width: 100
        height: 100
        BlueRectangle {
            width: 12
            anchors.fill: parent
            anchors.margins: 8
        }
    }
}
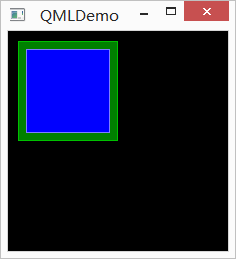
еңЁиҝҷдёӘдҫӢеӯҗдёӯпјҢжҲ‘们дҪҝз”Ёanchors.fillи®ҫзҪ®еҶ…йғЁи“қиүІзҹ©еҪўзҡ„й”ҡзӮ№дёәеЎ«е……пјҲfillпјүпјҢеЎ«е……зҡ„зӣ®зҡ„еҜ№иұЎжҳҜparentпјӣеЎ«е……иҫ№и·қжҳҜ 8pxгҖӮжіЁж„ҸпјҢе°Ҫз®ЎжҲ‘们и®ҫзҪ®дәҶи“қиүІзҹ©еҪўе®ҪеәҰдёә 12pxпјҢдҪҶжҳҜеӣ дёәй”ҡзӮ№зҡ„дјҳе…Ҳзә§иҰҒй«ҳдәҺе®ҪеәҰеұһжҖ§и®ҫзҪ®пјҢжүҖд»Ҙи“қиүІзҹ©еҪўзҡ„е®һйҷ…е®ҪеәҰжҳҜ 100px вҖ“ 8px вҖ“ 8px = 84pxгҖӮ
第дәҢдёӘдҫӢеӯҗпјҡ
д»Јз ҒеҰӮдёӢпјҡ
import QtQuick 2.0

Rectangle {
    id: root
    width: 220
    height: 220
    color: "black"

    GreenRectangle {
        x: 10
        y: 10
        width: 100
        height: 100
        BlueRectangle {
            width: 48
            y: 8
            anchors.left: parent.left
            anchors.leftMargin: 8
        }
    }
}
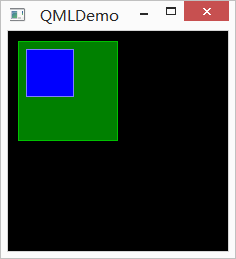
иҝҷж¬ЎпјҢжҲ‘们дҪҝз”Ёanchors.leftи®ҫзҪ®еҶ…йғЁи“қиүІзҹ©еҪўзҡ„й”ҡзӮ№дёәзҲ¶з»„件зҡ„е·Ұиҫ№зәҝпјҲparent.leftпјүпјӣе·Ұиҫ№и·қжҳҜ 8pxгҖӮеҸҰеӨ–пјҢжҲ‘们еҸҜд»ҘиҜ•зқҖжӢ–еҠЁи“қиүІзҹ©еҪўпјҢзңӢе®ғзҡ„移еҠЁж–№ејҸгҖӮеңЁжҲ‘们жӢ–еҠЁж—¶пјҢи“қиүІзҹ©еҪўеҸӘиғҪжІҝзқҖи·қзҰ»зҲ¶з»„件е·Ұиҫ№ 8px зҡ„дҪҚзҪ®дёҠдёӢ移еҠЁпјҢиҝҷжҳҜз”ұдәҺжҲ‘们и®ҫзҪ®дәҶй”ҡзӮ№зҡ„зјҳж•…гҖӮжӯЈеҰӮжҲ‘们еүҚйқўжҸҗеҲ°иҝҮзҡ„пјҢй”ҡзӮ№иҰҒжҜ”еҚ•зәҜең°и®Ўз®—еқҗж Үж”№еҸҳзҡ„ж•ҲжһңжӣҙејәпјҢжӣҙдјҳе…ҲгҖӮ
第дёүдёӘдҫӢеӯҗпјҡ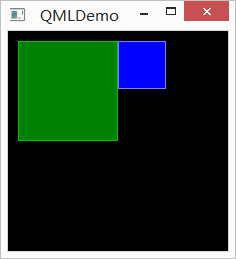
д»Јз ҒеҰӮдёӢпјҡ
import QtQuick 2.0

Rectangle {
    id: root
    width: 220
    height: 220
    color: "black"

    GreenRectangle {
        x: 10
        y: 10
        width: 100
        height: 100
        BlueRectangle {
            width: 48
            anchors.left: parent.right
        }
    }
}
иҝҷйҮҢпјҢжҲ‘们дҝ®ж”№д»Јз Ғдёәanchors.left: parent.rightпјҢд№ҹе°ұжҳҜе°Ҷ组件й”ҡзӮ№зҡ„е·Ұиҫ№зәҝи®ҫзҪ®дёәзҲ¶з»„件зҡ„еҸіиҫ№зәҝгҖӮж•ҲжһңеҚіеҰӮдёҠеӣҫжүҖзӨәгҖӮеҪ“жҲ‘们жӢ–еҠЁз»„件时пјҢдҫқ然еҸӘиғҪдёҠдёӢ移еҠЁгҖӮ
дёӢдёҖдёӘдҫӢеӯҗпјҡ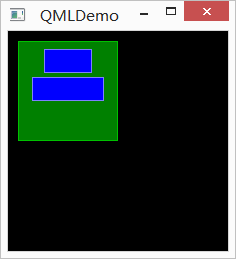
д»Јз ҒеҰӮдёӢпјҡ
import QtQuick 2.0

Rectangle {
    id: root
    width: 220
    height: 220
    color: "black"

    GreenRectangle {
        x: 10
        y: 10
        width: 100
        height: 100

        BlueRectangle {
            id: blue1
            width: 48; height: 24
            y: 8
            anchors.horizontalCenter: parent.horizontalCenter
        }
        BlueRectangle {
            id: blue2
            width: 72; height: 24
            anchors.top: blue1.bottom
            anchors.topMargin: 4
            anchors.horizontalCenter: blue1.horizontalCenter
        }
    }
}
иҝҷз®—жҳҜдёҖдёӘзЁҚеҫ®еӨҚжқӮзҡ„дҫӢеӯҗгҖӮиҝҷйҮҢжңүдёӨдёӘи“қиүІзҹ©еҪўпјҡblue1е’Ңblue2гҖӮblue1зҡ„й”ҡзӮ№ж°ҙе№ідёӯеҝғзәҝи®ҫзҪ®дёәзҲ¶з»„件зҡ„ж°ҙе№ідёӯеҝғпјӣblue2зҡ„й”ҡзӮ№дёҠиҫ№зәҝзӣёеҜ№дәҺblue1зҡ„еә•йғЁпјҢе…¶дёӯиҫ№и·қдёә 4pxпјҢеҸҰеӨ–пјҢжҲ‘们иҝҳеўһеҠ дәҶдёҖдёӘж°ҙе№ідёӯзәҝдёәblue1зҡ„ж°ҙе№ідёӯзәҝгҖӮиҝҷж ·пјҢblue1зӣёеҜ№дәҺзҲ¶з»„件пјҢblue2зӣёеҜ№дәҺblue1пјҢиҝҷж ·дҫҝеҶіе®ҡдәҶдёүиҖ…д№Ӣй—ҙзҡ„зӣёеҜ№е…ізі»гҖӮеҪ“жҲ‘们жӢ–еҠЁи“қиүІзҹ©еҪўж—¶еҸҜд»ҘеҸ‘зҺ°пјҢblue1е’Ңblue2зҡ„зӣёеҜ№дҪҚзҪ®е§Ӣз»ҲдёҚеҸҳпјҢеӣ дёәжҲ‘们已з»ҸжҳҺзЎ®жҢҮе®ҡдәҶиҝҷз§ҚзӣёеҜ№дҪҚзҪ®пјҢиҖҢдәҢиҖ…еҸҜд»ҘеғҸдёҖдёӘж•ҙдҪ“дјјзҡ„еҗҢж—¶дёҠдёӢ移еҠЁпјҲеӣ дёәжҲ‘们没жңүжҢҮе®ҡе…¶дёӯд»»дҪ•дёҖдёӘзҡ„дёҠдёӢиҫ№и·қдёҺзҲ¶з»„件зҡ„е…ізі»пјүгҖӮ
еҸҰеӨ–дёҖдёӘдҫӢеӯҗпјҡ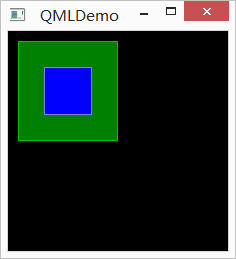
д»Јз ҒеҰӮдёӢжүҖзӨәпјҡ
import QtQuick 2.0

Rectangle {
    id: root
    width: 220
    height: 220
    color: "black"

    GreenRectangle {
        x: 10
        y: 10
        width: 100
        height: 100

        BlueRectangle {
            width: 48
            anchors.centerIn: parent
        }
    }
}
дёҺ第дёҖдёӘдҫӢеӯҗзұ»дјјпјҢжҲ‘们дҪҝз”Ёзҡ„жҳҜanchors.centerIn: parentе°Ҷи“қиүІзҹ©еҪўзҡ„дёӯеҝғеӣәе®ҡеңЁзҲ¶з»„件зҡ„дёӯеҝғгҖӮз”ұдәҺжҲ‘们已з»ҸжҢҮжҳҺжҳҜдёӯеҝғпјҢжүҖд»Ҙд№ҹдёҚиғҪжӢ–еҠЁиҝҷдёӘи“қиүІзҹ©еҪўгҖӮ
жңҖеҗҺдёҖдёӘдҫӢеӯҗпјҡ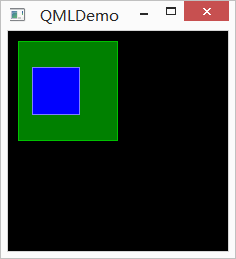
д»Јз ҒеҰӮдёӢпјҡ
import QtQuick 2.0

Rectangle {
    id: root
    width: 220
    height: 220
    color: "black"

    GreenRectangle {
        x: 10
        y: 10
        width: 100
        height: 100

        BlueRectangle {
            width: 48
            anchors.horizontalCenter: parent.horizontalCenter
            anchors.horizontalCenterOffset: -12
            anchors.verticalCenter: parent.verticalCenter
        }
    }
}
дёҠдёҖдёӘдҫӢеӯҗдёӯпјҢanchors.centerIn: parentеҸҜд»ҘзңӢдҪңзӯүд»·дәҺanchors.horizontalCenter: parent.horizontalCenterе’Ңanchors.verticalCenter: parent.verticalCenterгҖӮиҖҢиҝҷйҮҢпјҢжҲ‘们и®ҫзҪ®дәҶanchors.horizontalCenterOffsetдёә -12пјҢд№ҹе°ұжҳҜеҗ‘е·ҰеҒҸ移 12pxгҖӮеҪ“然пјҢжҲ‘们д№ҹеҸҜд»ҘеңЁanchors.centerIn: parentзҡ„еҹәзЎҖдёҠеўһеҠ anchors.horizontalCenterOffsetзҡ„еҖјпјҢдәҢиҖ…жҳҜзӯүд»·зҡ„гҖӮз”ұдәҺжҲ‘们еңЁиҝҷйҮҢжҢҮе®ҡзҡ„зӣёеҜ№дҪҚзҪ®е·Із»ҸеҫҲжҳҺзЎ®пјҢжӢ–еҠЁд№ҹжҳҜж— ж•Ҳзҡ„гҖӮ
иҮіжӯӨпјҢжҲ‘们з®ҖеҚ•д»Ӣз»ҚдәҶ QMLВ дёӯе®ҡдҪҚеҷЁе’Ңй”ҡзӮ№зҡ„жҰӮеҝөгҖӮзңӢиө·жқҘиҝҷдәӣе…ғзҙ е’ҢжңәеҲ¶йғҪеҫҲз®ҖеҚ•пјҢдҪҶжҳҜпјҢйҖҡиҝҮжңүжңәең°з»“еҗҲпјҢи¶ід»ҘзҒөжҙ»еә”еҜ№жӣҙеӨҚжқӮзҡ„еңәжҷҜгҖӮжҲ‘们жүҖиҰҒеҒҡзҡ„е°ұжҳҜдёҚж–ӯзҶҹжӮүгҖҒж·ұеҢ–еҜ№иҝҷдәӣе®ҡдҪҚеёғеұҖжҠҖжңҜзҡ„зҗҶи§ЈгҖӮ