

з»„еҗҲжҺ§д»¶жҳҜиҮӘе®ҡд№үжҺ§д»¶зҡ„дёҖз§ҚпјҢеҸӘдёҚиҝҮе®ғжҳҜз”ұе…¶д»–еҮ дёӘеҺҹз”ҹжҺ§д»¶з»„еҗҲиҖҢжҲҗпјҢж•…еҗҚз»„еҗҲжҺ§д»¶гҖӮ
еңЁе®һйҷ…йЎ№зӣ®дёӯпјҢGUIдјҡйҒҮеҲ°дёҖдәӣеҸҜд»ҘжҸҗеҸ–еҮәжқҘеҒҡжҲҗиҮӘе®ҡд№үжҺ§д»¶жғ…еҶөгҖӮ
дёҖдёӘиҮӘе®ҡд№үжҺ§д»¶зҡ„еҘҪеӨ„е°ұжҳҜжҠҠдёҖдәӣйңҖиҰҒжЁЎеқ—еҢ–зҡ„UIе’ҢйҖ»иҫ‘ж”ҫеңЁдёҖиө·пјҢеҒҡеҲ°дәҶй«ҳеҶ…иҒҡпјҢеҗ‘е…¶д»–жЁЎеқ—жҸҗдҫӣжҺҘеҸЈе№¶еҫҲе°‘
В дҫқиө–еӨ–з•ҢпјҢиҝҷж ·е°ұжҳҜдҪҺиҖҰеҗҲгҖӮдёҖдёӘиҮӘе®ҡд№үжҺ§д»¶е°ұжҳҜдёҖдёӘе°Ғй—ӯзҡ„зҺӢеӣҪпјҢиҝҷйҮҢз”ұдҪ жҺҢжҺ§гҖӮ
дёҠиҝ°жҳҜжҲ‘иҮӘе·ұзҡ„дёҖдёӘдҪ“дјҡпјҢжғіеҝ…еӨ§е®¶д№ҹдјҡеёёеҒҡиҮӘе®ҡд№үжҺ§д»¶еҗ§пјҢе°ұеғҸйҖ»иҫ‘йғЁеҲҶзҡ„жЁЎеқ—еҢ–дёҖж ·гҖӮ
дёӢйқўжҲ‘иҰҒеҒҡдёҖдёӘдҫӢеӯҗпјҢиҜ·зңӢе®ҢжҲҗеӣҫгҖӮ
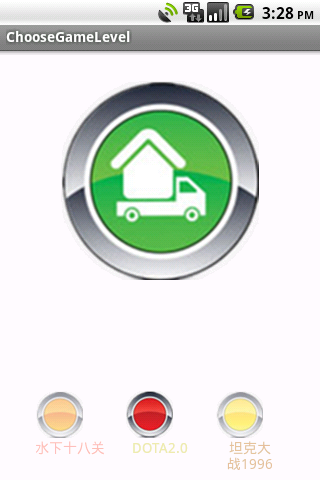
дёӢйқўдёҖжҺ’еӣҫзүҮеҠ ж–Үеӯ—е°ұжҳҜз»„еҗҲжҺ§д»¶дәҶпјҢжҲ‘жҳҜжҖҺд№ҲеҒҡзҡ„е‘ўпјҹ
е…¶е®һиҝҷйҮҢз”ЁеҲ°дәҶдёӨдёӘз»„еҗҲжҺ§д»¶пјҢдёҖдёӘжҳҜеӣҫзүҮ+ж–Үеӯ—пјҢжҲ‘жҠҠе®ғеҸ«дёҖдёӘItemпјҢиҖҢдёүдёӘеңЁдёҖиө·е°ұжҳҜеҸҰдёҖдёӘжҺ§д»¶дәҶгҖӮ
йҮҚзӮ№зңӢиҝҷдёӘItemпјҢе®ғжңүиҮӘе·ұзҡ„еұһжҖ§еҰӮеӣҫзүҮгҖҒж–Үеӯ—гҖҒеӣҫзүҮеӨ§е°ҸгҖҒж–Үеӯ—еӨ§е°ҸгҖҒдёҚйҖҸжҳҺеәҰзӯүзӯүгҖӮиҝҷдәӣжҠҠе®ғе®ҡд№үеңЁattrж–Ү件дёӯпјҢ然еҗҺеңЁxmlж–Ү件дёӯ
й…ҚзҪ®пјҢе°ұеғҸжҲ‘们用еҺҹз”ҹжҺ§д»¶дёҖж ·гҖӮ
е…ҲзңӢattrж–Ү件гҖӮ
xmlВ version="1.0"В encoding="utf-8"?>В В
resources>В В
В В В В В В В В declare-styleableВ name="LevelMenuItem">В В
В В В В В В В В attrВ name="text"В format="string"В />В В
В В В В В В В В attrВ name="text_color"В format="color"/>В В
В В В В В В В В attrВ name="text_size"В format="dimension"В />В В В В В В В В В В
В В В В В В В В attrВ name="image_src"В format="reference"/>В В
В В В В В В В В attrВ name="image_bg"В format="reference"/>В В
В В В В В В В В attrВ name="image_alpha"В format="integer"В />В В
В В В В В В В В attrВ name="image_height"В format="dimension">attr>В В
В В В В В В В В attrВ name="image_width"В format="dimension"В />В В
В В В В declare-styleable>В В
resources>В В
иҝҷдёӘж–Ү件еңЁvaluesдёӢпјҢе’Ңstringж–Ү件еҗҢзә§гҖӮжҠҠдҪ иҮӘе·ұиҰҒе®ҡд№үзҡ„еұһжҖ§йғҪеҶҷеңЁиҝҷйҮҢеҗ§гҖӮformatжҳҜеұһжҖ§зҡ„вҖңеҚ•дҪҚвҖқпјҢеҰӮжһңдҪ иҰҒй—®жңүеӨҡе°‘дёӯformatе‘Җпјҹзӯ”жЎҲеңЁиҝҷйҮҢгҖӮ
жңүдәҶеұһжҖ§дәҶпјҢдёӢйқўзңӢзңӢеёғеұҖж–Ү件level_menu_item.xmlгҖӮ
xmlВ version="1.0"В encoding="utf-8"?>В В
LinearLayoutВ xmlns:android="http://schemas.android.com/apk/res/android"В В
В В В В android:layout_width="fill_parent"В В
В В В В android:layout_height="fill_parent"В В
В В В В android:orientation="vertical"В >В В
В В В В В В В В ImageViewВ В
В В В В В В В В В В В В android:id="@+id/image_item"В В
В В В В В В В В В В В В android:layout_width="fill_parent"В В
В В В В В В В В В В В В android:layout_height="fill_parent"В В
В В В В В В В В В В В В android:scaleType="fitCenter"В В
В В В В В В В В В В В В />В В
В В В В В В В В В TextViewВ В
В В В В В В В В В В В В android:id="@+id/tv_item"В В
В В В В В В В В В В В В android:layout_width="fill_parent"В В
В В В В В В В В В В В В android:layout_height="wrap_content"В В
В В В В В В В В В В В В android:gravity="center_horizontal"В В
В В В В В В В В В В В В android:textColor="#23ffffff"В В
В В В В В В В В В В В В android:textSize="25sp"В В В
В В В В В В В В В />В В В В В В
LinearLayout>В В
иҝҷйҮҢе”ҜдёҖеҖјеҫ—дёҖиҜҙзҡ„жҳҜж–Үжң¬зҡ„йўңиүІгҖӮеӨ§е®¶зңӢи§Ғд»–жҳҜ8дҪҚзҡ„пјҢеүҚдёӨдҪҚжҳҜиЎЁзӨәдёҚйҖҸжҳҺеәҰзҡ„пјҢеҗҺе…ӯдҪҚжҳҜиЎЁзӨәйўңиүІзҡ„пјҢдёүиүІпјҢиҢғеӣҙйғҪжҳҜ00пҪһffгҖӮ
еҰӮжһңеңЁjavaдёӯи®ҫзҪ®йўңиүІпјҢйңҖиҰҒиҝҷж ·гҖӮ
setTextColor(0x23ffffff);В В
е…ідәҺдёҚйҖҸжҳҺеәҰпјҢдёҖиҲ¬зҫҺе·Ҙдјҡе®ҡд№үгҖӮжңүдәӣиҰҒжұӮдёҚйҖҸжҳҺеҰӮ30%иҝҷж ·зҡ„пјҢеҸҜд»Ҙз”Ёж•ҙеһӢжҚўз®—дёҖдёӢгҖӮ00пҪһffеҜ№еә”еҚҒиҝӣеҲ¶дёә0пҪһ255пјҢйӮЈд№Ҳ30%е°ұжҳҜ255x0.3=76.5пјҢ用科еӯҰи®Ўз®—жңәжҚўз®—дёә4cгҖӮ
жӣҙеӨҡйўңиүІзӣёе…іиҜ·зңӢгҖҠAndroidдёӯи®ҫзҪ®ж–Үжң¬йўңиүІзҡ„дёүз§ҚеҠһжі•гҖӢ
然еҗҺжҲ‘们е°ұиҰҒеҶҷдёҖдёӘзұ»пјҢжҲ‘иҝҷ继жүҝеӯҗзәҝжҖ§еёғеұҖгҖӮжңүдёӨдёӘжһ„йҖ еҮҪж•°пјҢжҲ‘们主иҰҒеңЁдёӨдёӘеҸӮж•°зҡ„еҮҪж•°дёӯе·ҘдҪңгҖӮ
publicВ classВ LevelMenuItemВ extendsВ LinearLayoutВ {В В
В В В В В В
В В В В publicВ LevelMenuItem(ContextВ context,В AttributeSetВ attrs)В {В В
В В В В В В В В super(context,В attrs);В В
В В В В В В В В В В
В В В В }В В
иҝҷдёӘзұ»дёӯжҲ‘们иҰҒе®ҢжҲҗзҡ„е·ҘдҪңжҳҜпјҢеҲқе§ӢеҢ–жҺ§д»¶еұһжҖ§гҖҒжҸҗдҫӣеӨ–йғЁдҝ®ж”№еұһжҖ§зҡ„жҺҘеҸЈгҖҒжҺ§д»¶зӮ№еҮ»зҡ„еӣһи°ғжҺҘеҸЈгҖӮ
жӯӨзұ»е®Ңж•ҙд»Јз Ғпјҡ
packageВ com.linc.game;В В
В В
importВ android.content.Context;В В
importВ android.content.res.TypedArray;В В
importВ android.util.AttributeSet;В В
importВ android.view.LayoutInflater;В В
importВ android.view.View;В В
importВ android.widget.ImageView;В В
importВ android.widget.LinearLayout;В В
importВ android.widget.TextView;В В
/**В
В *В иҮӘе®ҡд№үдёҖдёӘе…іеҚЎВ
В *В е…ұжңү7дёӘеұһжҖ§пјҢзңӢattrж–Ү件В
В *В еңЁзЁӢеәҸдёӯжҸҗдҫӣдҝ®ж”№иҝҷ7дёӘеұһжҖ§зҡ„жҺҘеҸЈпјҢВ
В *В дёҖдёӘиҮӘе®ҡд№үжҺ§д»¶зҡ„д»»еҠЎе°ұз®—е®ҢжҲҗгҖӮВ
В *В дёҖдёӘиҮӘе®ҡд№үжҺ§д»¶зҡ„еҘҪеӨ„е°ұжҳҜжҠҠдёҖдәӣйңҖиҰҒжЁЎеқ—еҢ–зҡ„В
В *В UIе’ҢйҖ»иҫ‘ж”ҫеңЁдёҖиө·пјҢеҒҡеҲ°дәҶй«ҳеҶ…иҒҡпјҢеҗ‘е…¶д»–жЁЎеқ—жҸҗдҫӣжҺҘеҸЈе№¶еҫҲе°‘В
В *В дҫқиө–еӨ–з•ҢпјҢиҝҷж ·е°ұжҳҜдҪҺиҖҰеҗҲгҖӮдёҖдёӘиҮӘе®ҡд№үжҺ§д»¶е°ұжҳҜдёҖдёӘе°Ғй—ӯзҡ„зҺӢеӣҪпјҢВ
В *В иҝҷйҮҢз”ұдҪ жҺҢжҺ§гҖӮВ
В *В В
В *В зј–еҶҷж—¶пјҢеҰӮжһңйҒҮеҲ°еңЁattrйҮҢеҶҷеҘҪеұһжҖ§пјҢдҪҶжҳҜеңЁиҝҷйҮҢи®ӨдёҚеҮәжқҘпјҢВ
В *В е°ұcleanдёҖдёӢйЎ№зӣ®гҖӮеҲҮи®°гҖӮВ
В *В В
В *В @authorВ lincВ
В *В
В */В В
publicВ classВ LevelMenuItemВ extendsВ LinearLayoutВ {В В
В В В В privateВ TextViewВ mTextViewВ =В null;В В
В В В В privateВ ImageViewВ mImageViewВ =В null;В В
В В В В В В
В В В В publicВ LevelMenuItem(ContextВ context)В {В В
В В В В В В В В super(context);В В
В В В В }В В
В В В В publicВ LevelMenuItem(ContextВ context,В AttributeSetВ attrs)В {В В
В В В В В В В В super(context,В attrs);В В
В В В В В В В В В В
В В В В В В В В LayoutInflaterВ layoutInflaterВ =В (LayoutInflater)В context.В В
В В В В В В В В В В В В В В В В В В В В В В В В getSystemService(Context.LAYOUT_INFLATER_SERVICE);В В
В В В В В В В В layoutInflater.inflate(R.layout.level_menu_item,В this);В В
В В В В В В В В В В
В В В В В В В В TypedArrayВ typedArrayВ =В context.obtainStyledAttributes(attrsВ В
В В В В В В В В В В В В В В В В ,R.styleable.LevelMenuItem);В В
В В В В В В В В В В
В В В В В В В В initWidget(typedArray);В В
В В В В }В В
В В В В privateВ voidВ initWidget(TypedArrayВ typedArray)В В
В В В В {В В
В В В В В В В В mTextViewВ =В (TextView)findViewById(R.id.tv_item);В В
В В В В В В В В StringВ textStringВ =В typedArray.getString(R.styleable.LevelMenuItem_text);В В
В В В В В В В В intВ textColorВ =В typedArray.getColor(R.styleable.LevelMenuItem_text_color,В В
В В В В В В В В В В В В В В В В 0xffffffff);В В
В В В В В В В В floatВ textSizeВ =В typedArray.getDimension(R.styleable.LevelMenuItem_text_size,В В
В В В В В В В В В В В В В В В В 20);В В
В В В В В В В В mTextView.setText(textString);В В
В В В В В В В В mTextView.setTextColor(textColor);В В
В В В В В В В В mTextView.setTextSize(textSize);В В
В В В В В В В В В В
В В В В В В В В mImageViewВ =В (ImageView)findViewById(R.id.image_item);В В
В В В В В В В В intВ imageHeightВ =В (int)В typedArray.getDimension(R.styleable.LevelMenuItem_image_height,В 25);В В
В В В В В В В В intВ imageWidthВ =В (int)В typedArray.getDimension(R.styleable.LevelMenuItem_image_width,В 25);В В
В В В В В В В В intВ imageSrcВ =В typedArray.getResourceId(R.styleable.LevelMenuItem_image_src,В 0);В В
В В В В В В В В intВ imageBgВ =В typedArray.getResourceId(R.styleable.LevelMenuItem_image_bg,В 0);В В
В В В В В В В В intВ imageAlphaВ =В typedArray.getInt(R.styleable.LevelMenuItem_image_alpha,В 255);В В
В В В В В В В В mImageView.setAlpha(imageAlpha);В В
В В В В В В В В mImageView.setImageResource(imageSrc);В В
В В В В В В В В mImageView.setBackgroundResource(imageBg);В В
В В В В В В В В LayoutParamsВ layoutParamsВ =В newВ LayoutParams(imageWidth,В imageHeight);В В
В В В В В В В В mImageView.setLayoutParams(layoutParams);В В
В В В В В В В В В В
В В В В В В В В typedArray.recycle();В В
В В В В }В В
В В В В /**В
В В В В В *В и®ҫзҪ®жӯӨжҺ§д»¶зҡ„ж–Үжң¬В
В В В В В *В @paramВ textВ
В В В В В */В В
В В В В publicВ voidВ setText(StringВ text)В В
В В В В {В В
В В В В В В В В mTextView.setText(text);В В
В В В В }В В
В В В В /**В
В В В В В *В и®ҫзҪ®ж–Үеӯ—йўңиүІВ
В В В В В *В @paramВ textColorВ
В В В В В */В В
В В В В publicВ voidВ setTextColor(intВ textColor)В В
В В В В {В В
В В В В В В В В mTextView.setTextColor(textColor);В В
В В В В }В В
В В В В /**В
В В В В В *В и®ҫзҪ®еӯ—дҪ“еӨ§е°ҸВ
В В В В В *В @paramВ textSizeВ
В В В В В */В В
В В В В publicВ voidВ setTextSize(intВ textSize)В В
В В В В {В В
В В В В В В В В mTextView.setTextSize(textSize);В В
В В В В }В В
В В В В /**В
В В В В В *В и®ҫзҪ®еӣҫзүҮВ
В В В В В *В @paramВ resIdВ
В В В В В */В В
В В В В publicВ voidВ setImageResource(intВ resId)В В
В В В В {В В
В В В В В В В В mImageView.setImageResource(resId);В В
В В В В }В В
В В В В /**В
В В В В В *В и®ҫзҪ®еӣҫзүҮиғҢжҷҜВ
В В В В В */В В
В В В В publicВ voidВ setBackgroundResource(intВ resId)В В
В В В В {В В
В В В В В В В В mImageView.setBackgroundResource(resId);В В
В В В В }В В В В В
В В В В /**В
В В В В В *В и®ҫзҪ®еӣҫзүҮзҡ„дёҚйҖҸеҗҚеәҰВ
В В В В В *В @paramВ alphaВ
В В В В В */В В
В В В В publicВ voidВ setImageAlpha(intВ alpha)В В
В В В В {В В
В В В В В В В В mImageView.setAlpha(alpha);В В
В В В В }В В
В В В В /**В
В В В В В *В и®ҫзҪ®еӣҫзүҮзҡ„еӨ§е°ҸВ
В В В В В *В иҝҷйҮҢйқўйңҖиҰҒдҪҝз”ЁLayoutParamsиҝҷдёӘеёғеұҖеҸӮж•°жқҘи®ҫзҪ®В
В В В В В *В @paramВ widthВ
В В В В В *В @paramВ heightВ
В В В В В */В В
В В В В publicВ voidВ setImageSize(intВ width,intВ height)В В
В В В В {В В
В В В В В В В В LayoutParamsВ layoutParamsВ =В newВ LayoutParams(width,В height);В В
В В В В В В В В mImageView.setLayoutParams(layoutParams);В В
В В В В }В В
В В В В /**В
В В В В В *В imageзӮ№еҮ»дәӢ件зҡ„еӣһи°ғВ
В В В В В *В @paramВ listenerВ
В В В В В */В В
В В В В publicВ voidВ setOnClickListener(OnItemClickListenerВ listener)В В
В В В В {В В
В В В В В В В В mImageView.setOnClickListener(newВ View.OnClickListener()В {В В
В В В В В В В В В В В В @OverrideВ В
В В В В В В В В В В В В publicВ voidВ onClick(ViewВ v)В {В В
В В В В В В В В В В В В В В В В listener.onImageClick();В В
В В В В В В В В В В В В }В В
В В В В В В В В });В В
В В В В }В В
В В В В /**В
В В В В В *В зӮ№еҮ»дәӢ件жҺҘеҸЈВ
В В В В В *В @authorВ lincВ
В В В В В *В
В В В В В */В В
В В В В publicВ interfaceВ OnItemClickListenerВ В
В В В В {В В
В В В В В В В В publicВ voidВ onImageClick();В В
В В В В }В В
}В В
еҘҪпјҢдёҖдёӘе®Ңж•ҙзҡ„з»„еҗҲжҺ§д»¶е°ұеҒҡеҘҪдәҶпјҢйӮЈд№ҲпјҢжҲ‘们еҰӮдҪ•дҪҝз”Ёе‘ўпјҹ
жҲ‘иҰҒеңЁLevelMenuдёӯз”Ёе®ғгҖӮxmlж–Ү件еҰӮдёӢпјҡ
xmlВ version="1.0"В encoding="utf-8"?>В В LinearLayoutВ xmlns:android="http://schemas.android.com/apk/res/android"В В
В В В В xmlns:linc="http://schemas.android.com/apk/res/com.linc.game"В В
В В В В android:layout_width="fill_parent"В В
В В В В android:layout_height="fill_parent"В В
В В В В android:orientation="horizontal">В В В В В В
В В В В com.linc.game.LevelMenuItemВ В
В В В В В В В В android:id="@+id/item1"В В
В В В В В В В В android:layout_width="70dp"В В
В В В В В В В В android:layout_height="80dp"В В
В В В В В В В В linc:text="@string/item1"В В
В В В В В В В В linc:text_size="14sp"В В
В В В В В В В В linc:text_color="#80fa8072"В В
В В В В В В В В linc:image_src="@drawable/orange_button_selector"В В
В В В В В В В В linc:image_alpha="128"В В
В В В В В В В В linc:image_height="48dp"В В
В В В В В В В В linc:image_width="48dp"В В
В В В В В В В В />В В
В В В В com.linc.game.LevelMenuItemВ В
В В В В В В В В android:id="@+id/item2"В В
В В В В В В В В android:layout_marginLeft="20dp"В В
В В В В В В В В android:layout_width="70dp"В В
В В В В В В В В android:layout_height="80dp"В В
В В В В В В В В linc:text="@string/item2"В В
В В В В В В В В linc:text_size="14sp"В В
В В В В В В В В linc:text_color="#ffeee8aa"В В
В В В В В В В В linc:image_src="@drawable/red_button_selector"В В
В В В В В В В В linc:image_alpha="255"В В
В В В В В В В В linc:image_height="48dp"В В
В В В В В В В В linc:image_width="48dp"В В
В В В В В В В В />В В В В В
В В В В com.linc.game.LevelMenuItemВ В
В В В В В В В В android:id="@+id/item3"В В
В В В В В В В В android:layout_marginLeft="20dp"В В
В В В В В В В В android:layout_width="70dp"В В
В В В В В В В В android:layout_height="80dp"В В
В В В В В В В В linc:text="@string/item3"В В
В В В В В В В В linc:text_size="14sp"В В
В В В В В В В В linc:text_color="#80cd853f"В В
В В В В В В В В linc:image_src="@drawable/yellow_button_selector"В В
В В В В В В В В linc:image_alpha="128"В В
В В В В В В В В linc:image_height="48dp"В В
В В В В В В В В linc:image_width="48dp"В В
В В В В В В В В />В В В В В В В В В
LinearLayout>В В
еҠ е…ҘиҮӘе·ұеҢ…еҗҚзҡ„зҙўеј•
xmlns:linc="http://schemas.android.com/apk/res/com.linc.game"В В
еү©дёӢзҡ„е°ұдёҖзӣ®дәҶ然дәҶгҖӮ
LevelMenu.java
packageВ com.linc.game;В В
В В
importВ com.linc.game.LevelMenuItem.OnItemClickListener;В В
importВ android.content.Context;В В
importВ android.util.AttributeSet;В В
importВ android.util.Log;В В
importВ android.view.LayoutInflater;В В
importВ android.widget.LinearLayout;В В
В В
publicВ classВ LevelMenuВ extendsВ LinearLayoutВ {В В
В В В В privateВ LevelMenuItemВ item1,item2,item3;В В
В В В В В В
В В В В publicВ LevelMenu(ContextВ context)В {В В
В В В В В В В В super(context);В В
В В В В В В В В В В
В В В В }В В
В В
В В В В В В
В В В В publicВ LevelMenu(ContextВ context,В AttributeSetВ attrs)В {В В
В В В В В В В В super(context,В attrs);В В
В В В В В В В В LayoutInflaterВ layoutInflaterВ =В (LayoutInflater)В context.В В
В В В В В В В В В В В В getSystemService(Context.LAYOUT_INFLATER_SERVICE);В В
В В В В В В В В layoutInflater.inflate(R.layout.level_menu,В this);В В
В В В В В В В В initWidget();В В
В В В В }В В
В В В В privateВ voidВ initWidget()В В
В В В В {В В
В В В В В В В В item1В =В (LevelMenuItem)findViewById(R.id.item1);В В
В В В В В В В В item2В =В (LevelMenuItem)findViewById(R.id.item2);В В
В В В В В В В В item3В =В (LevelMenuItem)findViewById(R.id.item3);В В
В В В В В В В В В В
В В В В В В В В item1.setOnClickListener(newВ OnItemClickListener()В {В В
В В В В В В В В В В В В @OverrideВ В
В В В В В В В В В В В В publicВ voidВ onImageClick()В {В В
В В В В В В В В В В В В В В В В Log.e("dfjdkfjd","dfdfd");В В
В В В В В В В В В В В В }В В
В В В В В В В В });В В
В В В В }В В
}В В
еңЁеӨ„зҗҶеӣҫзүҮзӮ№еҮ»дәӢ件зҡ„ж—¶еҖҷпјҢжҲ‘з”ЁеҲ°дәҶйҖүжӢ©еҷЁпјҲselectorпјүпјҢиҝҷжҳҜжҲ‘们е®һйҷ…ејҖеҸ‘дёӯжңҖеёёз”Ёзҡ„е°ҸжҠҖе·§дәҶгҖӮе®ғиғҪжҸҸиҝ°зҡ„зҠ¶жҖҒеҫҲеӨҡпјҢеҗ„дҪҚзңӢе®ҳеҸҜд»ҘеҺ»жҹҘжҹҘгҖӮ
xmlВ version="1.0"В encoding="utf-8"?>В В
selectorВ xmlns:android="http://schemas.android.com/apk/res/android"В >В В
В В В В itemВ android:state_pressed="true"В В
В В В В В В В В android:drawable="@drawable/button_push"/>В В
В В В В itemВ android:drawable="@drawable/orange_button"/>В В
selector>В В
еҘҪпјҢз»„еҗҲжҺ§д»¶зҡ„дҫӢеӯҗе…ҲеҲ°иҝҷйҮҢпјҢе®һйҷ…еҠҹиғҪеңЁдёӢдёҖдёӘе®һжҲҳжҠҖе·§дёӯжј”з»ғгҖӮ
еӨ§е®¶еңЁеҒҡиҮӘе®ҡд№үжҺ§д»¶ж—¶йңҖиҰҒжіЁж„Ҹзҡ„жҳҜпјҡ
1гҖҒиҮӘе®ҡд№үжҺ§д»¶зұ»дёҚиғҪжҳҜжҳҜжҠҪиұЎзұ»
2гҖҒиҰҒз”Ё
(ContextВ context,В AttributeSetВ attrs)В В
иҝҷдёӘжһ„йҖ еҮҪж•°
еҗҰеҲҷжҠҘй”ҷпјҡandroid.view.InflateException: Binary XML file line #15: Error inflating claгҖӮгҖӮгҖӮ