

дЄАгАБHibernateеЉАеПСгАВ
дЄКзѓЗеНЪеЃҐеЈ≤зїПдЄЇе§ІеЃґдїЛзїНдЇЖжМБдєЕе±Вж°ЖжЮґзЪДеПСе±ХжµБз®ЛпЉМжМБдєЕе±Вж°ЖжЮґзЪДзІНз±їгАВ
дЄЇдЇЖиГље§ЯдљњзФ®HibernateењЂйАЯдЄКжЙЛпЉМжИСдїђеЕИиЃ≤иІ£дЄАдЄ™зЃАеНХзЪДHibernateеЇФзФ®еЃЮдЊЛhibernate_firstгАВ
дЇМгАБеЉАеПСжµБз®ЛгАВ
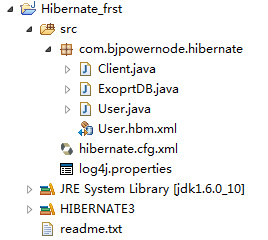
1.й¶ЦеЕИеЬ®MyEclipceдЄ≠жЦ∞еїЇдЄАдЄ™hibernate_firstзЪДй°єзЫЃпЉМзДґеРОжЦ∞еїЇеРОзЪДй°єзЫЃзЫЃељХдЄЇпЉЪ
3.зЉЦеЖЩжМБдєЕеМЦз±їUser.java
package com.bjpowernode.hibernate;

import java.util.Date;

public class User {

	private String id;

	private String name;

	private String password;

	private Date createTime;

	private Date expireTime;

	public String getId() {
		return id;
	}

	public void setId(String id) {
		this.id = id;
	}

	public String getName() {
		return name;
	}

	public void setName(String name) {
		this.name = name;
	}

	public String getPassword() {
		return password;
	}

	public void setPassword(String password) {
		this.password = password;
	}

	public Date getCreateTime() {
		return createTime;
	}

	public void setCreateTime(Date createTime) {
		this.createTime = createTime;
	}

	public Date getExpireTime() {
		return expireTime;
	}

	public void setExpireTime(Date expireTime) {
		this.expireTime = expireTime;
	}
}
4.зЉЦеЖЩзФЯжИРжШ†е∞ДжЦЗдїґUser.hbm.xmlгАВ
<?xml version="1.0"?>
<!DOCTYPE hibernate-mapping PUBLIC
	"-//Hibernate/Hibernate Mapping DTD 3.0//EN"
	"http://hibernate.sourceforge.net/hibernate-mapping-3.0.dtd">
<hibernate-mapping>
	<class name="com.bjpowernode.hibernate.User">
		<id name="id">
			<generator class="uuid"/>
		</id>
		<property name="name"/>
		<property name="password"/>
		<property name="createTime"/>
		<property name="expireTime"/>
	</class>
</hibernate-mapping>
5.зЉЦеЖЩhibernate.cfg.xmlжЦЗдїґгАВ
<!DOCTYPE hibernate-configuration PUBLIC
	"-//Hibernate/Hibernate Configuration DTD 3.0//EN"
	"http://hibernate.sourceforge.net/hibernate-configuration-3.0.dtd">

<hibernate-configuration>
	<session-factory >
		<property name="hibernate.connection.driver_class">com.mysql.jdbc.Driver</property>
<property name="hibernate.connection.url">jdbc:mysql://localhost:3306/hibernate_frist</property>
<property name="hibernate.connection.username">root</property>
<property name="hibernate.connection.password">root</property>
<property name="hibernate.dialect">org.hibernate.dialect.MySQLDialect</property>
<property name="hibernate.show_sql">true</property>
<property name="hibernate.format_sql">true</property>
	<mapping resource="com/bjpowernode/hibernate/User.hbm.xml"/>
	</session-factory>
</hibernate-configuration>
6.зФЯжИРи°®зЪДз±їExportDB.javaгАВ
package com.bjpowernode.hibernate;
import org.hibernate.cfg.Configuration;
import org.hibernate.tool.hbm2ddl.SchemaExport;
/**
* е∞ЖhbmзФЯжИРddl
* @author Administrator
*
*/
public class ExportDB {
public static void main(String[] args) {
//йїШиЃ§иѓїеПЦhibernate.cfg.xmlжЦЗдїґ
Configuration cfg = new Configuration().configure();
SchemaExport export = new SchemaExport(cfg);
export.create(true, true);
}
}
7.дї•дЄКеЕ≠дЄ™ж≠•й™§еЈ≤зїПжККи°®еїЇиµЈжЭ•дЇЖдЄЛйЭҐжИСдїђе∞±дњЭе≠ШдЄ™жХ∞жНЃпЉМжЦ∞еїЇдЄАдЄ™Client.javaз±їжЭ•е≠ШеЕ•дЄАдЄ™жХ∞жНЃгАВдї£з†Бе¶ВдЄЛпЉЪ
package com.bjpowernode.hibernate;
import java.util.Date;
import org.hibernate.Session;
import org.hibernate.SessionFactory;
import org.hibernate.cfg.Configuration;
public class Client {
public static void main(String[] args) {
//иѓїеПЦhibernate.cfg.xmlжЦЗдїґ
Configuration cfg = new Configuration().configure();
//еїЇзЂЛSessionFactory
SessionFactory factory = cfg.buildSessionFactory();
//еПЦеЊЧsession
Session session = null;
try {
session = factory.openSession();
//еЉАеРѓдЇЛеК°
session.beginTransaction();
User user = new User();
user.setName("еЉ†дЄЙ");
user.setPassword("123");
user.setCreateTime(new Date());
user.setExpireTime(new Date());
//дњЭе≠ШUserеѓєи±°
session.save(user);
//жПРдЇ§дЇЛеК°
session.getTransaction().commit();
}catch(Exception e) {
e.printStackTrace();
//еЫЮжїЪдЇЛеК°
session.getTransaction().rollback();
}finally {
if (session != null) {
if (session.isOpen()) {
//еЕ≥йЧ≠session
session.close();
}
}
}
}
}
дЄЙгАБжАїзїУгАВ
дЄАдЄ™зЃАеНХзЪДHibernateдЊЛе≠Ре∞±еЗЇжЭ•дЇЖеЬ®HibernateеИЭе≠¶жЧґеИ©зФ®ињЩдЄ™дЊЛе≠РеПѓдї•иЃ©жИСдїђжЫіе•љзЪДеЕ•йЧ®гАВ