

дЄАгАБж¶Вињ∞гАВ
еЬ®еЊИе§ЪдЉБдЄЪзЪДеЉАж≥ХдЄ≠еЄЄеЄЄзФ®еИ∞SpringMVC+Spring+HibernateпЉИmybatisпЉЙињЩж†ЈзЪДжЮґжЮДпЉМSpringMVCзЫЄељУдЇОStrutsжШѓй°µйЭҐеИ∞ContorllerзЫіжО•зЪДдЇ§дЇТзЪДж°ЖжЮґдєЯжШѓзХМйЭҐжККдњ°жБѓдЉ†иЊУеИ∞Contorllerе±ВзЪДдЄАзІНжЮґжЮДпЉМйАЪињЗињЩдЄ™жЮґжЮДеПѓдї•иЃ©жИСдїђжККй°µйЭҐеТМContorllerе±ВиІ£иА¶пЉМдљњеЊЧеЉАеПСдЇЇеСШзЪДеИЖеЈ•жЫіеК†жШОз°ЃгАВ
дЇМгАБдї£з†БжЉФз§ЇгАВ
1гАБй¶ЦеЕИйЕНзљЃSpringMVCзОѓеҐГгАВ
1.1еѓЉеЕ•jarгАВ
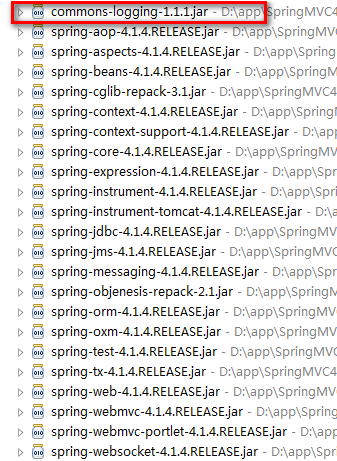
еАЉеЊЧж≥®жДПзЪДжШѓзЇҐиЙ≤ж†ЗиЃ∞зЪДcommons-loggingињЩдЄ™jarеМЕдЄАеЃЪеЊЧеЉХеЕ•ињЫеОїдЄНзДґдЉЪжК•йФЩгАВ
1.2гАБxmlйЕНзљЃжЦЗдїґгАВ
web.xml
		<?xml version="1.0" encoding="UTF-8"?>
		<web-app xmlns:xsi="http://www.w3.org/2001/XMLSchema-instance" xmlns="http://xmlns.jcp.org/xml/ns/javaee" xsi:schemaLocation="http://xmlns.jcp.org/xml/ns/javaee http://xmlns.jcp.org/xml/ns/javaee/web-app_3_1.xsd" id="WebApp_ID" version="3.1">
		<servlet>
				<servlet-name>springMVC</servlet-name>
				<servlet-class>org.springframework.web.servlet.DispatcherServlet</servlet-class>
				<load-on-startup>1</load-on-startup>
			</servlet>
			<servlet-mapping>
				<servlet-name>springMVC</servlet-name>
				<url-pattern>*.spring</url-pattern>
			</servlet-mapping>
			<welcome-file-list>
				<welcome-file>index.jsp</welcome-file>
			</welcome-file-list>
		</web-app>
springMVC-servlet.xml
<?xml version="1.0" encoding="UTF-8"?>
<beans xmlns="http://www.springframework.org/schema/beans"
	xmlns:xsi="http://www.w3.org/2001/XMLSchema-instance" xmlns:p="http://www.springframework.org/schema/p"
	xmlns:context="http://www.springframework.org/schema/context"
	xsi:schemaLocation="
        http://www.springframework.org/schema/beans
        http://www.springframework.org/schema/beans/spring-beans-3.0.xsd
        http://www.springframework.org/schema/context
        http://www.springframework.org/schema/context/spring-context-3.0.xsd">
	<context:component-scan base-package="com.gaowei.controller" />
</beans>
2гАБеЙНеП∞зХМйЭҐдї£з†БгАВ
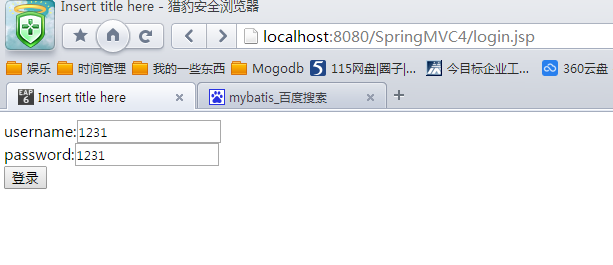
login.jsp
<%@ page language="java" contentType="text/html; charset=UTF-8"
pageEncoding="UTF-8"%>
<!DOCTYPE html PUBLIC "-//W3C//DTD HTML 4.01 Transitional//EN" "http://www.w3.org/TR/html4/loose.dtd">
<html>
<head>
<meta http-equiv="Content-Type" content="text/html; charset=UTF-8">
<title>Insert title here</title>
</head>
<body>
<form action="login.spring" method="post">
username:<input type="text" name="username">
<br/>
password:<input type="text" name="password">
<br/>
<input type="submit" value="зЩїељХ">
</form>
</body>
</html>
No.jsp
<%@ page language="java" contentType="text/html; charset=UTF-8"
    pageEncoding="UTF-8"%>
<!DOCTYPE html PUBLIC "-//W3C//DTD HTML 4.01 Transitional//EN" "http://www.w3.org/TR/html4/loose.dtd">
<html>
<head>
<meta http-equiv="Content-Type" content="text/html; charset=UTF-8">
<title>Insert title here</title>
</head>
<body>
No!
</body>
</html>
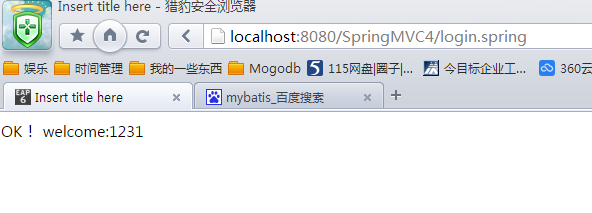
Ok.jsp
<%@ page language="java" contentType="text/html; charset=UTF-8"
pageEncoding="UTF-8"%>
<!DOCTYPE html PUBLIC "-//W3C//DTD HTML 4.01 Transitional//EN" "http://www.w3.org/TR/html4/loose.dtd">
<html>
<head>
<meta http-equiv="Content-Type" content="text/html; charset=UTF-8">
<title>Insert title here</title>
</head>
<body>
OKпЉБ welcome:${username}
</body>
</html>
3гАБContorllerе±ВжО•жФґеЙНеП∞зЪДдЄ§зІНжЦєеЉПгАВ
жЦєеЉПдЄАпЉЪ
еИ©зФ®@RequestParamињЩдЄ™ж≥®иІ£
package com.gaowei.controller;
import org.springframework.stereotype.Controller;
import org.springframework.ui.Model;
import org.springframework.web.bind.annotation.RequestMapping;
import org.springframework.web.bind.annotation.RequestParam;
@Controller
public class Login {
//жЦєеЉПдЄА
@RequestMapping("/login")
public String login(@RequestParam("username") String username,
@RequestParam("password") String password,Model model){
if (username.equals(password))
{
model.addAttribute("username", username);
return "ok.jsp";
} else {
return "no.jsp";
}
}
}
жЦєеЉПдЇМпЉЪ
package com.gaowei.controller;
import org.springframework.stereotype.Controller;
import org.springframework.ui.Model;
import org.springframework.web.bind.annotation.RequestMapping;
import org.springframework.web.bind.annotation.RequestParam;
@Controller
public class Login {
@RequestMapping("/login")
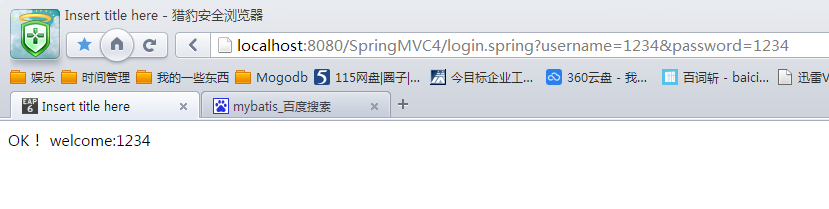
public String login(String username,String password,Model model){
if (username.equals(password))
{
model.addAttribute("username", username);
return "ok.jsp";
} else {
return "no.jsp";
}
}
}
4гАБзХМйЭҐзїУжЮЬгАВ
зђђдЄАзІНдЉ†еАЉжЦєеЉПпЉЪ
зђђдЇМзІНдЉ†еАЉжЦєеЉПпЉЪ
дЄЙгАБжАїзїУгАВ
ињЩйЗМдљУзО∞еЗЇдЇЖSpringMVCдЉ†еАЉжЦєеЉПзЪДе§Ъж†ЈжАІжї°иґ≥дЇЖеЉАеПСдЇЇеСШзЪДдЄНеРМйЬАж±ВгАВзђђдЄАзІНзФ®жЭ•и°®еНХзЪДжПРдЇ§гАВзђђдЇМзІНзФ®жЭ•зХМйЭҐйЧізЫЄдЇТдЉ†еАЉпЉМдєЯдЄЇдЇЖжЦєдЊњеЉАеПСдЇЇеСШеИ©зФ®AJAXгАВ