

AndroidеЇХйГ®tabеИЗжНҐзХМйЭҐзЪДеЃЮзО∞жѓФиЊГзЃАеНХпЉМеПѓдї•еИ©зФ®TabHostзЫіжО•еЃЮзО∞пЉМеЃЮзО∞жЦєеЉПзљСдЄКиµДжЇРеЊИе§ЪгАВйВ£дєИйЩ§дЇЖзФ®зЙєеЃЪзЪДзїДдїґжЭ•еЃЮзО∞tabе§ЦиГљдЄНиГљиЗ™еЈ±еЖЩдї£з†БеЃЮзО∞еСҐгАВз≠Фж°ИжШѓиВѓеЃЪзЪДгАВињШжЬЙдЄАдЄ™еЊИеЄЄзФ®зЪДйЧЃйҐШпЉМе∞±жШѓдЄНеРМзЪДtabзХМйЭҐиГљеР¶еЃЮзО∞дЄНеРМзЪДж†ЗйҐШж†ПпЉЯињЩдЄ™йЬАж±ВеЬ®й°єзЫЃдЄ≠зїПеЄЄзҐ∞еИ∞пЉМжЬђжЦЗе∞ЖиЃ≤еПЩAndroidеЇХйГ®tabеИЗжНҐзХМйЭҐзЪДеЃЮзО∞дї•еПКеЃГдЄОж†ЗйҐШж†ПзЪДзїУеРИгАВеЃЮзО∞жХИжЮЬеЫЊе¶ВдЄЛпЉЪ
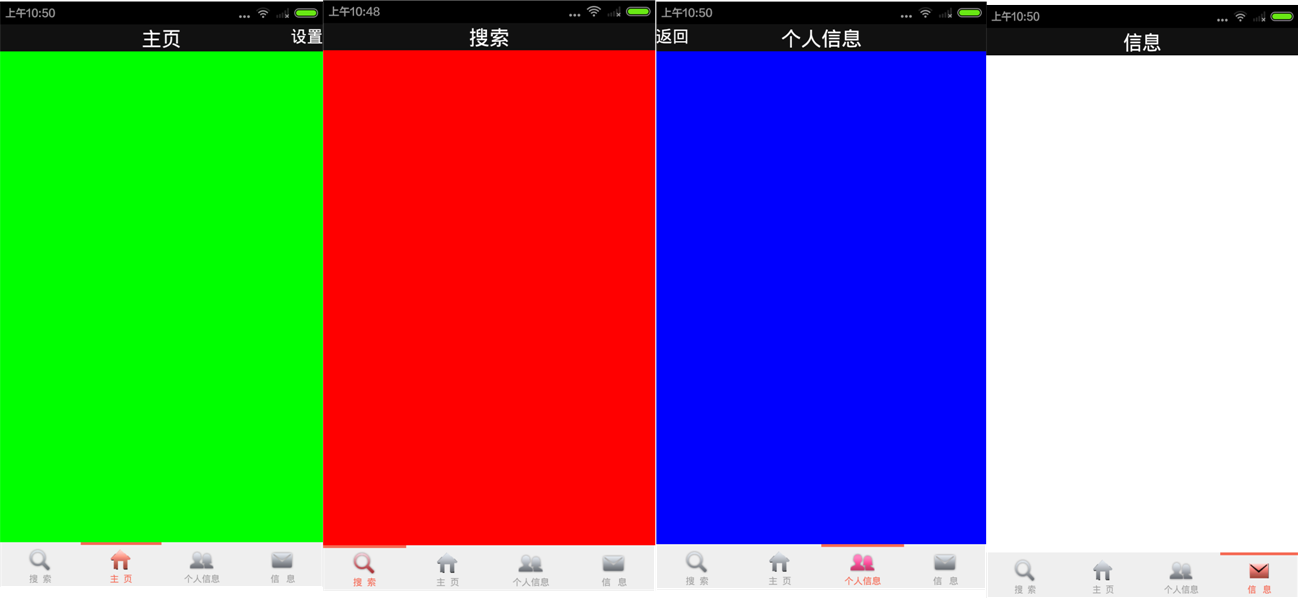
дЄКеЫЊе∞±жШѓжИСдїђи¶БеЃЮзО∞зЪДжХИжЮЬеЫЊпЉМеИЗжНҐеИ∞дЄНеРМзЪДзХМйЭҐжЬЙдЄНеРМзЪДжШЊз§Їж†ЗйҐШгАВдЄНе§ЪиѓізЫіжО•дЄКдї£з†БгАВ
й¶ЦеЕИељУзДґжШѓеЄГе±АжЦЗдїґпЉМеЕИеЃЮзО∞ж†ЗйҐШж†ПеЄГе±АгАВжЦ∞еїЇtitle.xmlжЦЗдїґ
<?xml version="1.0" encoding="utf-8"?>
<RelativeLayout xmlns:android="http://schemas.android.com/apk/res/android"
    android:layout_width="match_parent"
    android:layout_height="48dp"
    android:background="#111111" >

    <TextView
        android:id="@+id/title_left"
        android:layout_width="wrap_content"
        android:layout_height="wrap_content"
        android:layout_alignParentLeft="true"
        android:textColor="#ffffff"
        android:textSize="18dp"
        android:visibility="gone" />

    <TextView
        android:id="@+id/title"
        android:layout_width="wrap_content"
        android:layout_height="wrap_content"
         android:layout_centerInParent="true"
        android:textColor="#ffffff"
        android:textSize="22dp"/>

    <TextView
        android:id="@+id/title_right"
        android:layout_width="wrap_content"
        android:layout_height="wrap_content"
        android:layout_alignParentRight="true"
        android:textColor="#ffffff"
        android:textSize="18dp"
        android:visibility="gone" />

</RelativeLayout>
дї•дЄКеЃЮзО∞дЇЖж†ЗйҐШж†ПзЪДеЄГе±АпЉМtitle_leftеТМtitle_rightеИЖеИЂжШѓж†ЗйҐШж†ПзЪДеЈ¶гАБеП≥жМЙйТЃпЉМйїШиЃ§жГЕеЖµдЄЛе∞ЖеЕґиЃЊзљЃдЄЇдЄНеПѓиІБгАВ
жО•дЄЛжЭ•е∞±жШѓtabж†ПеЄГе±АжЦЗдїґзЪДеЃЮзО∞пЉМжЦ∞еїЇдЄАдЄ™tab.xml
<?xml version="1.0" encoding="utf-8"?>
<LinearLayout xmlns:android="http://schemas.android.com/apk/res/android"
xmlns:tools="http://schemas.android.com/tools"
android:id="@+id/main_bottom"
android:layout_width="fill_parent"
android:layout_height="wrap_content"
android:layout_alignParentBottom="true"
android:background="#efefef"
android:orientation="horizontal" >
<LinearLayout
android:id="@+id/nav_search"
android:layout_width="fill_parent"
android:layout_height="fill_parent"
android:layout_weight="1"
android:orientation="vertical" >
<View
android:id="@+id/nav_search_color"
android:layout_width="fill_parent"
android:layout_height="3dp"
android:background="@color/nav_pressed"
android:duplicateParentState="true" />
<ImageView
android:id="@+id/nav_search_img"
android:layout_width="wrap_content"
android:layout_height="wrap_content"
android:layout_gravity="center_horizontal"
android:layout_marginTop="3dp"
android:scaleType="center"
android:src="@drawable/icon_square_nor1" />
<TextView
android:id="@+id/nav_search_text"
android:layout_width="wrap_content"
android:layout_height="wrap_content"
android:layout_gravity="center_horizontal"
android:text="жРЬ зіҐ"
android:textColor="@color/nav_pressed"
android:textSize="10sp" />
</LinearLayout>
<LinearLayout
android:id="@+id/nav_home_layout"
android:layout_width="fill_parent"
android:layout_height="fill_parent"
android:layout_weight="1"
android:orientation="vertical" >
<View
android:id="@+id/nav_home_color"
android:layout_width="fill_parent"
android:layout_height="3dp"
android:background="@color/nav_normal" />
<ImageView
android:id="@+id/nav_home_img"
android:layout_width="wrap_content"
android:layout_height="wrap_content"
android:layout_gravity="center_horizontal"
android:layout_marginTop="3dp"
android:scaleType="center"
android:src="@drawable/icon_home_nor" />
<TextView
android:id="@+id/nav_home_text"
android:layout_width="fill_parent"
android:layout_height="wrap_content"
android:gravity="center_horizontal"
android:text="дЄї й°µ"
android:textColor="@color/nav_text_normal"
android:textSize="10sp" />
</LinearLayout>
<LinearLayout
android:id="@+id/nav_selfinfo_layout"
android:layout_width="fill_parent"
android:layout_height="fill_parent"
android:layout_weight="1"
android:orientation="vertical" >
<View
android:id="@+id/nav_selfinfo_color"
android:layout_width="fill_parent"
android:layout_height="3dp"
android:background="@color/nav_normal" />
<ImageView
android:id="@+id/nav_selfinfo_img"
android:layout_width="wrap_content"
android:layout_height="wrap_content"
android:layout_gravity="center_horizontal"
android:layout_marginTop="3dp"
android:scaleType="center"
android:src="@drawable/icon_selfinfo_nor" />
<TextView
android:id="@+id/nav_selfinfo_text"
android:layout_width="fill_parent"
android:layout_height="wrap_content"
android:gravity="center_horizontal"
android:text="дЄ™дЇЇдњ°жБѓ"
android:textColor="@color/nav_text_normal"
android:textSize="10sp" />
</LinearLayout>
<LinearLayout
android:id="@+id/nav_mess_layout"
android:layout_width="fill_parent"
android:layout_height="fill_parent"
android:layout_weight="1"
android:orientation="vertical" >
<View
android:id="@+id/nav_mess_color"
android:layout_width="fill_parent"
android:layout_height="3dp"
android:background="@color/nav_normal" />
<ImageView
android:id="@+id/nav_mess_img"
android:layout_width="wrap_content"
android:layout_height="wrap_content"
android:layout_gravity="center_horizontal"
android:layout_marginTop="3dp"
android:scaleType="center"
android:src="@drawable/icon_meassage_nor" />
<TextView
android:id="@+id/nav_mess_text"
android:layout_width="fill_parent"
android:layout_height="wrap_content"
android:layout_marginBottom="3dp"
android:gravity="center_horizontal"
android:text="дњ° жБѓ"
android:textColor="@color/nav_text_normal"
android:textSize="10sp" />
</LinearLayout>
</LinearLayout>
еП™йЬАи¶БзЬЛдЄАйГ®еИЖе∞±еПѓдї•дЇЖпЉМдЄАдЄ™LinearLayoutеМЕжЛђзЭАдЄАдЄ™View,ImageViewеТМTextViewпЉМеЕґдЄ≠ViewжШѓеЇХйГ®ж†ПдЄКжЦєзЪДйВ£жЭ°ж®™зЇњгАВImagViewдЄОTextViewдЄНзФ®иѓіпЉМе∞±жШѓеЇХйГ®ж†ПзЪДе§іеГПеТМе§іеГПдЄЛжЦєзЪДжЦЗе≠ЧгАВ
дЄїеЄГе±АжЦЗдїґе∞±жШѓеИ©зФ®includeжККж†ЗйҐШж†ПдЄОеЇХйГ®ж†ПиЮНеРИеИ∞дЄАиµЈпЉМеєґзФ®ViewPageжЭ•жШЊз§ЇдЄНеРМй°µйЭҐгАВеЄГе±Ае¶ВдЄЛпЉЪ
<RelativeLayout xmlns:android="http://schemas.android.com/apk/res/android"
    xmlns:tools="http://schemas.android.com/tools"
    android:layout_width="match_parent"
    android:layout_height="match_parent"
    tools:context=".MainActivity" >

    <include
        android:id="@+id/top"
        android:layout_width="match_parent"
        android:layout_height="wrap_content"
        android:layout_alignParentTop="true"
        layout="@layout/title" />

    <include
        android:id="@+id/tab"
        android:layout_width="match_parent"
        android:layout_height="wrap_content"
        android:layout_alignParentBottom="true"
        layout="@layout/tab" />
     <LinearLayout
        android:layout_width="fill_parent"
    android:layout_height="wrap_content"
    android:layout_below="@id/top"
    android:layout_above="@id/tab"
        android:orientation="vertical" >
        <android.support.v4.view.ViewPager
        android:id="@+id/viewpager"
        android:layout_width="wrap_content"
        android:layout_height="wrap_content"
        android:layout_gravity="center" >
        </android.support.v4.view.ViewPager>
    </LinearLayout>

</RelativeLayout>
жО•дЄЛжЭ•зЪДеЃЮзО∞жИСдїђзФ®еИ∞дЇЖFragment,еЫЫдЄ™й°µйЭҐеИЖеИЂеК†иљљдЇЖеЫЫдЄ™FragmentгАВжЙАдї•и¶БеЖЩеЫЫдЄ™дЄНеРМзЪДfragment.xml,ињЩдЄ™ж†єжНЃдЄНеРМйЬАж±ВињЫи°МзЉЦеЖЩгАВйВ£йЗНе§іжИПжЭ•дЇЖпЉМдЄЛйЭҐиііеЗЇдЄїз®ЛеЇПгАВдї£з†БжЬЙзВєйХњпЉМдљЖдЄНзФ®жЛЕењГпЉМеЕґеЃЮзО∞еОЯзРЖеЊИзЃАеНХгАВ
public class MainActivity extends FragmentActivity {
private ViewPager m_vp;
private int navIndex = 0;
private int currIndex = 0;
private Fragment mfragment1;
private Fragment mfragment2;
private Fragment mfragment3;
private Fragment mfragment4;
private List<Fragment> fragmentList;
@Override
protected void onCreate(Bundle savedInstanceState) {
super.onCreate(savedInstanceState);
setContentView(R.layout.activity_main);
initTitle();
getView();
initFragments();
}
/**
* еИЭеІЛеМЦж†ЗйҐШпЉМеєґеК†иљљеЫЫдЄ™Fragment
*/
public void initTitle(){
((TextView) findViewById(R.id.title)).setText("жРЬ糥");
((TextView)findViewById(R.id.title_left)).setVisibility(View.INVISIBLE);
((TextView)findViewById(R.id.title_right)).setVisibility(View.INVISIBLE);
}
private void getView(){
m_vp = (ViewPager)findViewById(R.id.viewpager);
mfragment1 = new Fragment1();
mfragment2 = new Fragment2();
mfragment3 = new Fragment3();
mfragment4 = new Fragment4();
}
/**
* еИЭеІЛеМЦй°µйЭҐ
*/
public void initFragments()
{
fragmentList = new ArrayList<Fragment>();
fragmentList.add(mfragment1);
fragmentList.add(mfragment2);
fragmentList.add(mfragment3);
fragmentList.add(mfragment4);
findViewById(R.id.nav_search).setOnClickListener(new MyOnClickListener(0));
findViewById(R.id.nav_home_layout).setOnClickListener(new MyOnClickListener(1));
findViewById(R.id.nav_selfinfo_layout).setOnClickListener(new MyOnClickListener(2));
findViewById(R.id.nav_mess_layout).setOnClickListener(new MyOnClickListener(3));
setNavState(navIndex, 0);
m_vp.setAdapter(new MyViewPagerAdapter(getSupportFragmentManager()));
m_vp.setOnPageChangeListener(new OnPageChangeListener() {
@Override
public void onPageSelected(int arg0) {
Log.i("zhi", arg0+"");
switch (arg0) {
case 0:
if (navIndex != 0){
// зВєеЗїдєЛеЙНе¶ВжЮЬе∞±жШѓињЩдЄ™жОІдїґпЉМдЄНеПШеМЦ
setNavState(navIndex, 0);
navIndex = 0;
}
break;
case 1:
if (navIndex != 1){
// зВєеЗїдєЛеЙНе¶ВжЮЬе∞±жШѓињЩдЄ™жОІдїґпЉМдЄНеПШеМЦ
setNavState(navIndex, 1);
navIndex = 1;
}
break;
case 2:
if (navIndex != 2){
// зВєеЗїдєЛеЙНе¶ВжЮЬе∞±жШѓињЩдЄ™жОІдїґпЉМдЄНеПШеМЦ
setNavState(navIndex, 2);
navIndex = 2;
}
break;
case 3:
if (navIndex != 3){
// зВєеЗїдєЛеЙНе¶ВжЮЬе∞±жШѓињЩдЄ™жОІдїґпЉМдЄНеПШеМЦ
setNavState(navIndex, 3);
navIndex = 3;
}
break;
default:
break;
}
}
@Override
public void onPageScrolled(int arg0, float arg1, int arg2) {
}
@Override
public void onPageScrollStateChanged(int arg0) {
}
});
}
private void setNavState(int before, int after) {
// зВєеЗїдєЛеЙНзЪДйВ£дЄ™жМЙйТЃжБҐе§Нж≠£еЄЄ
switch (before) {
case 0:
findViewById(R.id.nav_search_color).setBackgroundResource(R.color.nav_normal);
((ImageView )findViewById(R.id.nav_search_img)).setImageResource(R.drawable.icon_square_nor);
((TextView) findViewById(R.id.nav_search_text)).setTextColor(getResources().getColor(R.color.nav_text_normal));
break;
case 1:
findViewById(R.id.nav_home_color).setBackgroundResource(R.color.nav_normal);
((ImageView )findViewById(R.id.nav_home_img)).setImageResource(R.drawable.icon_home_nor);
((TextView) findViewById(R.id.nav_home_text)).setTextColor(getResources().getColor(R.color.nav_text_normal));
((TextView)findViewById(R.id.title_right)).setVisibility(View.INVISIBLE);
break;
case 2:
findViewById(R.id.nav_selfinfo_color).setBackgroundResource(R.color.nav_normal);
((ImageView )findViewById(R.id.nav_selfinfo_img)).setImageResource(R.drawable.icon_selfinfo_nor);
((TextView) findViewById(R.id.nav_selfinfo_text)).setTextColor(getResources().getColor(R.color.nav_text_normal));
((TextView)findViewById(R.id.title_left)).setVisibility(View.INVISIBLE);
break;
case 3:
findViewById(R.id.nav_mess_color).setBackgroundResource(R.color.nav_normal);
((ImageView )findViewById(R.id.nav_mess_img)).setImageResource(R.drawable.icon_meassage_nor);
((TextView) findViewById(R.id.nav_mess_text)).setTextColor(getResources().getColor(R.color.nav_text_normal));
break;
default:
break;
}
// зВєеЗїеИ∞зЪДйВ£дЄ™жШЊз§ЇзКґжАБ
switch (after) {
case 0:
findViewById(R.id.nav_search_color).setBackgroundResource(R.color.nav_pressed);
((ImageView )findViewById(R.id.nav_search_img)).setImageResource(R.drawable.icon_square_nor1);
((TextView) findViewById(R.id.nav_search_text)).setTextColor(getResources().getColor(R.color.nav_text_pressed));
((TextView) findViewById(R.id.title)).setText("жРЬ糥");
break;
case 1:
findViewById(R.id.nav_home_color).setBackgroundResource(R.color.nav_pressed);
((ImageView )findViewById(R.id.nav_home_img)).setImageResource(R.drawable.icon_home_nor1);
((TextView) findViewById(R.id.nav_home_text)).setTextColor(getResources().getColor(R.color.nav_text_pressed));
((TextView)findViewById(R.id.title_right)).setVisibility(View.VISIBLE);
((TextView)findViewById(R.id.title_right)).setText("иЃЊзљЃ");
((TextView) findViewById(R.id.title)).setText("дЄїй°µ");
break;
case 2:
findViewById(R.id.nav_selfinfo_color).setBackgroundResource(R.color.nav_pressed);
((ImageView )findViewById(R.id.nav_selfinfo_img)).setImageResource(R.drawable.icon_selfinfo_sel1);
((TextView) findViewById(R.id.nav_selfinfo_text)).setTextColor(getResources().getColor(R.color.nav_text_pressed));
((TextView)findViewById(R.id.title_left)).setVisibility(View.VISIBLE);
((TextView)findViewById(R.id.title_left)).setText("ињФеЫЮ");
((TextView) findViewById(R.id.title)).setText("дЄ™дЇЇдњ°жБѓ");
break;
case 3:
findViewById(R.id.nav_mess_color).setBackgroundResource(R.color.nav_pressed);
((ImageView )findViewById(R.id.nav_mess_img)).setImageResource(R.drawable.icon_meassage_nor1);
((TextView) findViewById(R.id.nav_mess_text)).setTextColor(getResources().getColor(R.color.nav_text_pressed));
((TextView) findViewById(R.id.title)).setText("дњ°жБѓ");
break;
default:
break;
}
}
public class MyViewPagerAdapter extends FragmentPagerAdapter{
public MyViewPagerAdapter(FragmentManager fm) {
super(fm);
// TODO Auto-generated constructor stub
}
@Override
public Fragment getItem(int arg0) {
return fragmentList.get(arg0);
}
@Override
public int getCount() {
return fragmentList.size();
}
}
public class MyOnClickListener implements View.OnClickListener {
private int index = 0;
public MyOnClickListener(int i) {
index = i;
currIndex=i;
}
@Override
public void onClick(View v) {
m_vp.setCurrentItem(index);
}
};
}
зЫЄдњ°е§ІеЃґйГљиГљзЬЛжЗВпЉМињЩйЗМзЃАеНХиЃ≤иІ£дЄАдЄЛгАВз®ЛеЇПй¶ЦеЕИињРи°МinitTitleеѓєж†ЗйҐШж†ПињЫи°МеИЭеІЛеМЦпЉМеЬ®getViewдЄ≠еЃЪдєЙдЄАдЄ™listи£ЕдЄКеЫЫдЄ™FragmentпЉМжЦєдЊњдєЛеРОзЪДи∞ГзФ®гАВinitFragmentsпЉИпЉЙжЦєж≥ХдЄїи¶БжШѓеЃМжИРеѓєзХМйЭҐзЪДеК†иљљеТМзЫСеРђдЄНеИ∞зЪДиІ¶еПСдЇЛдїґгАВињЩйЗМзФ®еИ∞дЇЖViewpageињЫи°Мй°µйЭҐзЪДеИЗжНҐгАВй¶ЦеЕИжШѓзЫСеРђеЇХйГ®ж†ПжМЙйТЃзЪДзЪДзВєеЗїдЇЛдїґпЉМзВєеЗїзЪДжМЙйТЃиІ¶еПСViewPageзЪДsetCurrentItemжЦєж≥ХеК†иљљдЄНеРМзЪДViewPageй°µгАВViewPageеѓєй°µйЭҐзЪДеПШеМЦињЫи°МзЫСеРђпЉМдЄНеРМй°µйЭҐи∞ГзФ®дЄНеРМзЪДsetNavState()жЦєж≥ХгАВжЬАеРОе∞±еП™еЙ©дЄЛдЇЖиІ£setNavStateзЪДдљЬзФ®дЇЖгАВsetNavStateжЦєж≥ХзФ®дЇОеѓєеЇХйГ®жМЙйТЃзЪДеЫЊж†ЗгАБе≠ЧдљУзКґжАБињШжЬЙж†ЗйҐШж†ПзЪДжШЊз§ЇзКґжАБињЫи°МеК®жАБеПШеМЦпЉМswitch(before)жШѓжУНдљЬдєЛеЙНзВєеЗїзЪДйВ£дЄ™жМЙйТЃзЪДзКґжАБпЉМswitch(after)жШѓжУНдљЬдєЛеРОзВєеЗїзЪДжМЙйТЃзЪДзКґжАБгАВ
еИ∞ињЩйЗМдЄїеЗљжХ∞е∞±иЃ≤еЃМдЇЖгАВжО•дЄЛжЭ•и¶БеБЪжШѓзЪДе∞±еЃЪдєЙиЗ™еЈ±зЪДFragementпЉМиЃ©еЃГдїђеОїеЃЮзО∞жИСдїђжГ≥и¶БзЪДзХМйЭҐгАВиЗ≥ж≠§жИСдїђдЄАдЄ™иЗ™еЃЪдєЙзЪДеЇХtabзХМйЭҐе∞±еЃМжИРдЇЖгАВжШѓдЄНжШѓеЊИзЃАеНХгАВдї•дЄЛжИСиііеЗЇжЇРдї£з†БпЉМдЄЛиљљдЄНзФ®зІѓеИЖпЉМеП™еЄМжЬЫеѓєе§ІеЃґжЬЙзВєеЄЃеК©гАВ