

еЊИжЧ©дєЛеЙНе∞±жГ≥еЖЩдЄЛеЕ≥дЇОVolleyзЪДжЇРз†БиІ£жЮРгАВдЄАеЉАеІЛе≠¶androidзљСзїЬиЃњйЧЃйГљжШѓдљњзФ®HttpClientпЉМеИЪжО•иІ¶дєИVolleyзЪДжЧґеАЩе∞±зЮђйЧізИ±дЄНйЗКжЙЛпЉМиЩљиѓізО∞еЬ®й°єзЫЃдЄ≠дљњзФ®OkHttpе§ЪдЇЫпЉИVolleyжЫіжЦ∞жЕҐпЉЙпЉМдљЖжШѓдљЬдЄЇgoogleиЗ™еЃґжО®еЗЇзЪДзљСзїЬж°ЖжЮґпЉМVolleyињШжШѓжЬЙеЊИе§ЪеАЉеЊЧе≠¶дє†зЪДеЬ∞жЦєгАВињЩзѓЗеНЪеЃҐжШѓжИСеѓєVolleyжЇРз†БеИЖжЮРеРОзЪДдЄАдЄ™жАїзїУгАВ
VolleyзЪДдљњзФ®
VolleyзЪДдљњзФ®йЭЮеЄЄзЃАеНХпЉМзЫЄдњ°е§ІеЃґйГљеЊИзЖЯжВЙгАВй¶ЦеЕИйЬАи¶БиОЈеПЦеИ∞дЄАдЄ™RequestQueueеѓєи±°гАВ
RequestQueue mQueue = Volley.newRequestQueue(context);
е¶ВжЮЬжГ≥йАЪињЗзљСзїЬиОЈеПЦjsonпЉМе¶ВдЄЛпЉЪ
StringRequest stringRequest = new StringRequest("http://www.baidu.com",
                        new Response.Listener<String>() {
                            @Override
                            public void onResponse(String response) {
                                Log.d("TAG", response);
                            }
                        }, new Response.ErrorListener() {
                            @Override
                            public void onErrorResponse(VolleyError error) {
                                Log.e("TAG", error.getMessage(), error);
                            }
                        });
еП™и¶БеЬ®onResponseдЄ≠е§ДзРЖињФеЫЮзЪДresponseеН≥еПѓгАВе¶ВжЮЬиЃњйЧЃеЗЇйФЩпЉМеИЩдЉЪи∞ГзФ®onErrorResonseжЦєж≥ХгАВ ж≥®жДПVolleyжШѓеЉВж≠•пЉМжШѓеЬ®е≠РзЇњз®ЛдЄ≠ињЫи°МзљСзїЬиЃњйЧЃпЉМиАМonResponseйЗМзЪДдї£з†БжШѓеЬ®дЄїзЇњз®ЛдЄ≠жЙІи°МгАВжЙАдї•дљњзФ®VolleyзЪДеЬ∞жЦєеИЗиЃ∞дЄНи¶БжККеЃГељУжИРеНХзЇњз®ЛпЉМињЩжШѓеИЭе≠¶иАЕзїПеЄЄзКѓйФЩзЪДеЬ∞жЦєгАВжЬАеРОпЉМе∞ЖињЩдЄ™StringRequestеѓєи±°жЈїеК†еИ∞RequestQueueйЗМйЭҐе∞±еПѓдї•дЇЖгАВ
mQueue.add(stringRequest);
е¶ВжЮЬи¶БеК†иљљеЫЊзЙЗпЉМеИЩй¶ЦеЕИи¶БеЃЪдєЙдЄАдЄ™ImageCacheпЉМзФ®дЇОеЃЪдєЙеЫЊзЙЗзЪДзЉУе≠ШгАВйАЪињЗImageLoaderжЭ•еК†иљљеЫЊзЙЗ,ImageListenerеИЩзФ®дЇОжМЗеЃЪImageViewдї•еПКеʆ蚚姱賕еТМеК†иљљињЗз®ЛдЄ≠йїШиЃ§еЫЊзЙЗ пЉЪ
            private final LruCache<String, Bitmap> mLruCache = new LruCache<String, Bitmap>(
                    (int) (Runtime.getRuntime().maxMemory() / 10))
            {
                @Override
                protected int sizeOf(String key, Bitmap value)
                {
                    return value.getRowBytes() * value.getHeight();
                }
            };

            @Override
            public void putBitmap(String url, Bitmap bitmap)
            {
                mLruCache.put(url, bitmap);
            }

            @Override
            public Bitmap getBitmap(String url)
            {
                return mLruCache.get(url);
            }
        });
ImageListener listener = ImageLoader.getImageListener(imageView,
        R.drawable.default, R.drawable.failed);
        imageLoader.get(imageurl, listener);
дїЛзїНеЃМзЃАеНХзФ®ж≥ХдєЛеРОпЉМе∞±жЭ•еИЖжЮРжЇРдї£з†БдЇЖгАВ
VolleyжЇРз†БеИЖжЮР
еЕИзЬЛдЄЛеЃШзљСзїЩеЗЇзЪДдїЛзїНеЫЊпЉЪ¬†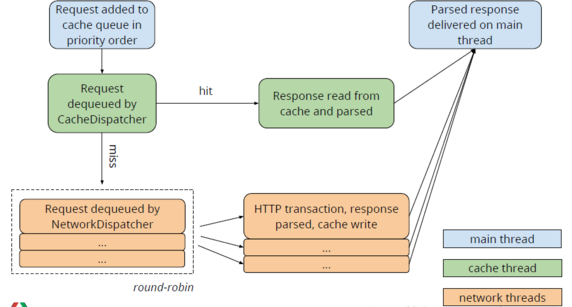 ¬†
 
ињЩйЗМжИСдїђеЕИжЬЙдЄ™е§Іж¶ВзЪДдїЛзїНпЉМиУЭиЙ≤жШѓдЄїзЇњз®ЛпЉМзїњиЙ≤жШѓCacheDispatcherпЉИз°ђзЫШзЉУе≠ШпЉЙзЇњз®ЛпЉМзЇҐиЙ≤жШѓNetworkDispatcher(зљСзїЬиѓЈж±ВзЇњз®Л)гАВжИСдїђеЬ®дЄїзЇњз®ЛдЄ≠и∞ГзФ®RequestQueueзЪДadd()жЦєж≥ХжЭ•жЈїеК†дЄАжЭ°зљСзїЬиѓЈж±ВпЉМињЩжЭ°иѓЈж±ВдЉЪеЕИ襀еК†еЕ•еИ∞зЉУе≠ШйШЯеИЧељУдЄ≠пЉМе¶ВжЮЬеПСзО∞еПѓдї•жЙЊеИ∞зЫЄеЇФзЪДзЉУе≠ШзїУжЮЬе∞±зЫіжО•иѓїеПЦзЉУе≠ШеєґиІ£жЮРпЉМзДґеРОеЫЮи∞ГзїЩдЄїзЇњз®ЛгАВе¶ВжЮЬеЬ®зЉУе≠ШдЄ≠ж≤°жЬЙжЙЊеИ∞зїУжЮЬпЉМеИЩе∞ЖињЩжЭ°иѓЈж±ВеК†еЕ•еИ∞зљСзїЬиѓЈж±ВйШЯеИЧдЄ≠пЉМзДґеРОе§ДзРЖеПСйАБHTTPиѓЈж±ВпЉМиІ£жЮРеУНеЇФзїУжЮЬпЉМеЖЩеЕ•зЉУе≠ШпЉМеєґеЫЮи∞ГдЄїзЇњз®ЛгАВжО•дЄЛжЭ•иѓ¶зїЖзЪДињЫи°МеИЖжЮРгАВ¬†
дЄНзФ®иѓіпЉМеЕ•еП£иВѓеЃЪжШѓVolley.newRequestQueue(context)гАВеЕИзЬЛдЄЛnewRequestQueueзЪДдї£з†БпЉЪ
public static RequestQueue newRequestQueue(Context context, HttpStack stack) {
        File cacheDir = new File(context.getCacheDir(), DEFAULT_CACHE_DIR);

        String userAgent = "volley/0";
        try {
            String packageName = context.getPackageName();
            PackageInfo info = context.getPackageManager().getPackageInfo(packageName, 0);
            userAgent = packageName + "/" + info. versionCode;
        } catch (NameNotFoundException e) {
        }

        if (stack == null) {
            if (Build.VERSION. SDK_INT >= 9) {
                stack = new HurlStack();
            } else {
                // Prior to Gingerbread, HttpUrlConnection was unreliable.
                // See: http://android-developers.blogspot.com/2011/09/androids-http-clients.html
                stack = new HttpClientStack(AndroidHttpClient. newInstance(userAgent));
            }
        }

        Network network = new BasicNetwork(stack);

        RequestQueue queue = new RequestQueue( new DiskBasedCache(cacheDir), network);
        queue.start();

        return queue;
    }
й¶ЦеЕИе∞Би£ЕеЊЧеИ∞userAgentпЉМUser-Agent е≠ЧжЃµиЃЊзљЃдЄЇ App зЪДpackageName/{versionCode}пЉМе¶ВжЮЬеЉВеЄЄеИЩдљњзФ® вАЬvolley/0вАЭгАВдЄКйЭҐдї£з†БдЄїи¶БжШѓеЃЮдЊЛеМЦstack пЉМе¶ВжЮЬSDKзЙИжЬђе§ІдЇО9пЉМдљњзФ®HurlStackпЉМеР¶еИЩдљњзФ®HttpClientStackгАВеЃЮйЩЕдЄКHurlStackзЪДеЖЕйГ®е∞±жШѓдљњзФ®HttpURLConnectionињЫи°МзљСзїЬйАЪиЃѓзЪДпЉМиАМHttpClientStackзЪДеЖЕйГ®еИЩжШѓдљњзФ®HttpClientињЫи°МзљСзїЬйАЪиЃѓзЪДгАВдєЯе∞±жШѓиѓіandroid2.2дї•дЄКзЪДйГљжШѓдљњзФ®HttpURLConnectionпЉМеР¶еИЩдљњзФ®HttpClientгАВжО•зЭАnewдЇЖдЄАдЄ™RequestQueueпЉМеєґи∞ГзФ®еЃГзЪДstartжЦєж≥ХгАВжЭ•зЬЛдЄЛеЃГзЪДRequestQueueжЮДйА†жЦєж≥ХпЉЪ
/** Number of network request dispatcher threads to start. */
    private static final int DEFAULT_NETWORK_THREAD_POOL_SIZE = 4;

    /** Cache interface for retrieving and storing responses. */
    private final Cache mCache;

    /** Network interface for performing requests. */
    private final Network mNetwork;

    /** Response delivery mechanism. */
    private final ResponseDelivery mDelivery;

    /** The network dispatchers. */
    private NetworkDispatcher[] mDispatchers;
   public RequestQueue(Cache cache, Network network, int threadPoolSize,
            ResponseDelivery delivery) {
        mCache = cache;
        mNetwork = network;
        mDispatchers = new NetworkDispatcher[threadPoolSize];
        mDelivery = delivery;
    }
еИЭеІЛеМЦдЄїи¶Бе∞±жШѓ4дЄ™еПВжХ∞пЉЪmCacheгАБmNetworkгАБmDispatchersгАБmDeliveryгАВзђђдЄАдЄ™жШѓз°ђзЫШзЉУе≠ШпЉЫзђђдЇМдЄ™дЄїи¶БзФ®дЇОHttpзЫЄеЕ≥жУНдљЬпЉЫзђђдЄЙдЄ™зФ®дЇОиљђеПСиѓЈж±ВзЪДпЉЫзђђеЫЫдЄ™еПВжХ∞зФ®дЇОжККзїУжЮЬиљђеПСеИ∞UIзЇњз®Л,йАЪињЗеЃГжЭ•еѓєе§Це£∞жШОжО•еП£гАВжО•дЄЛжЭ•зЬЛдЄЛstartжЦєж≥ХгАВ
 private static final int DEFAULT_NETWORK_THREAD_POOL_SIZE = 4;

    /** Cache interface for retrieving and storing responses. */
    private final Cache mCache;

    /** Network interface for performing requests. */
    private final Network mNetwork;

    /** Response delivery mechanism. */
    private final ResponseDelivery mDelivery;

    /** The network dispatchers. */
    private NetworkDispatcher[] mDispatchers;

 /**
     * Starts the dispatchers in this queue.
     */
    public void start() {
        stop();  // Make sure any currently running dispatchers are stopped.
        // Create the cache dispatcher and start it.
        mCacheDispatcher = new CacheDispatcher(mCacheQueue, mNetworkQueue, mCache, mDelivery);
        mCacheDispatcher.start();

        // Create network dispatchers (and corresponding threads) up to the pool size.
        for (int i = 0; i < mDispatchers.length; i++) {
            NetworkDispatcher networkDispatcher = new NetworkDispatcher(mNetworkQueue, mNetwork,
                    mCache, mDelivery);
            mDispatchers[i] = networkDispatcher;
            networkDispatcher.start();
        }
    }

    /**
     * Stops the cache and network dispatchers.
     */
    public void stop() {
        if (mCacheDispatcher != null) {
            mCacheDispatcher.quit();
        }
        for (int i = 0; i < mDispatchers.length; i++) {
            if (mDispatchers[i] != null) {
                mDispatchers[i].quit();
            }
        }
    }
й¶ЦеЕИи∞ГзФ®stop()жЦєж≥ХпЉМз°ЃдњЭж≠§жЧґжЙАжЬЙиљђеПСеЩ®йГље§ДдЇОеБЬж≠ҐзКґжАБгАВжО•дЄЛжЭ•е∞±newдЇЖдЄАдЄ™CacheDispatcherиљђеПСеЩ®пЉМеЃГеЕґеЃЮе∞±жШѓдЄАдЄ™зЇњз®ЛпЉМзФ®дЇОз°ђзЫШзЉУе≠ШгАВеЖНnewдЇЖеЫЫдЄ™NetworkDispatcherиљђеПСеЩ®пЉМзФ®дЇОзљСзїЬиѓЈж±ВгАВеєґеИЖеИЂи∞ГзФ®ињЩдЇЫзЇњз®ЛзЪДstart()жЦєж≥ХгАВе¶ВжЮЬжШѓеК†иљљеЫЊзЙЗпЉМжИСдїђињШйЬАеЃЪдєЙдЄАдЄ™imageLoaderпЉМжЭ•зЬЛзЬЛVolleyдЄ≠дЄЇжИСдїђеЃЪдєЙзЪДImageLoader,дЄїи¶БзЬЛеЃГзЪДgetжЦєж≥ХпЉЪ
 public ImageContainer get(String requestUrl, ImageListener imageListener,
            int maxWidth, int maxHeight) {
        // only fulfill requests that were initiated from the main thread.
        throwIfNotOnMainThread();

        final String cacheKey = getCacheKey(requestUrl, maxWidth, maxHeight);

        // Try to look up the request in the cache of remote images.
        Bitmap cachedBitmap = mCache.getBitmap(cacheKey);
        if (cachedBitmap != null) {
            // Return the cached bitmap.
            ImageContainer container = new ImageContainer(cachedBitmap, requestUrl, null, null);
            imageListener.onResponse(container, true);
            return container;
        }

        // The bitmap did not exist in the cache, fetch it!
        ImageContainer imageContainer =
                new ImageContainer(null, requestUrl, cacheKey, imageListener);

        // Update the caller to let them know that they should use the default bitmap.
        imageListener.onResponse(imageContainer, true);

        // Check to see if a request is already in-flight.
        BatchedImageRequest request = mInFlightRequests.get(cacheKey);
        if (request != null) {
            // If it is, add this request to the list of listeners.
            request.addContainer(imageContainer);
            return imageContainer;
        }

        // The request is not already in flight. Send the new request to the network and
        // track it.
        Request<?> newRequest =
            new ImageRequest(requestUrl, new Listener<Bitmap>() {
                @Override
                public void onResponse(Bitmap response) {
                    onGetImageSuccess(cacheKey, response);
                }
            }, maxWidth, maxHeight,
            Config.RGB_565, new ErrorListener() {
                @Override
                public void onErrorResponse(VolleyError error) {
                    onGetImageError(cacheKey, error);
                }
            });

        mRequestQueue.add(newRequest);
        mInFlightRequests.put(cacheKey,
                new BatchedImageRequest(newRequest, imageContainer));
        return imageContainer;
    }
дЄКйЭҐдї£з†БеЕЈдљУжµБз®ЛжШѓињЩж†ЈпЉМй¶ЦеЕИйАЪињЗthrowIfNotOnMainThread()жЦєж≥ХйЩРеИґењЕй°їеЬ®UIзЇњз®Ли∞ГзФ®пЉЫзДґеРОж†єжНЃдЉ†еЕ•зЪДеПВжХ∞иЃ°зЃЧcacheKeyпЉМиОЈеПЦзЉУе≠Ш;е¶ВжЮЬе≠ШеЬ®cacheпЉМзЫіжО•е∞ЖињФеЫЮзїУжЮЬе∞Би£ЕдЄЇдЄАдЄ™ImageContainerпЉМзДґеРОзЫіжО•еЫЮи∞ГimageListener.onResponse(container, true);ињЩжЧґжИСдїђе∞±еПѓдї•иЃЊзљЃеЫЊзЙЗдЇЖгАВе¶ВжЮЬдЄНе≠ШеЬ®пЉМйВ£е∞±еИЭеІЛеМЦдЄАдЄ™ImageContainerпЉМзДґеРОзЫіжО•еЫЮи∞ГimageListener.onResponse(imageContainer, true)пЉМињЩйЗМжШѓдЄЇдЇЖиЃ©жИСдїђиЃЊзљЃйїШиЃ§еЫЊзЙЗгАВжЙАдї•пЉМеЬ®еЃЮзО∞listenerзЪДжЧґеАЩпЉМи¶БеЕИеИ§жЦ≠resp.getBitmap()жШѓеР¶дЄЇnullпЉЫжО•дЄЛжЭ•ж£АжЯ•иѓ•urlжШѓеР¶жЧ©еЈ≤еК†еЕ•дЇЖиѓЈж±ВеѓєдЇЖпЉМе¶ВжЮЬеЈ≤еК†еЕ•пЉМеИЩе∞ЖеИЪеИЭеІЛеМЦзЪДImageContainerеК†еЕ•BatchedImageRequestгАВињЩе∞±жШѓеК†иљљеЫЊзЙЗжЧґзЪДеЖЕе≠ШзЉУе≠ШгАВ¬†
зДґеРОи∞ГзФ®RequestQueueзЪДadd()жЦєж≥Хе∞ЖRequestдЉ†еЕ•е∞±еПѓдї•еЃМжИРзљСзїЬиѓЈж±ВжУНдљЬдЇЖпЉМиЃ©жИСдїђжЭ•зЬЛзЬЛaddжЦєж≥ХдЄ≠еИ∞еЇХеБЪдЇЖдїАдєИдЇЛгАВ
 private final Map<String, Queue< Request<?>>> mWaitingRequests =
            new HashMap<String, Queue< Request<?>>>();

    /**
     * The set of all requests currently being processed by this RequestQueue. A Request
     * will be in this set if it is waiting in any queue or currently being processed by
     * any dispatcher.
     */
    private final Set<Request <?>> mCurrentRequests = new HashSet<Request<?>>();

    /** The cache triage queue. */
    private final PriorityBlockingQueue< Request<?>> mCacheQueue =
        new PriorityBlockingQueue< Request<?>>();

    /** The queue of requests that are actually going out to the network. */
    private final PriorityBlockingQueue< Request<?>> mNetworkQueue =
        new PriorityBlockingQueue< Request<?>>();
 /**
     * Adds a Request to the dispatch queue.
     * @param request The request to service
     * @return The passed -in request
     */
    public <T> Request<T> add(Request<T> request) {
        // Tag the request as belonging to this queue and add it to the set of current requests.
        request.setRequestQueue( this);
        synchronized ( mCurrentRequests) {
            mCurrentRequests.add(request);
        }

        // Process requests in the order they are added.
        request.setSequence(getSequenceNumber());
        request.addMarker( "add-to-queue");

        // If the request is uncacheable, skip the cache queue and go straight to the network.
        if (!request.shouldCache()) {
            mNetworkQueue.add(request);
            return request;
        }

        // Insert request into stage if there"s already a request with the same cache key in flight.
        synchronized ( mWaitingRequests) {
            String cacheKey = request.getCacheKey();
            if ( mWaitingRequests.containsKey(cacheKey)) {
                // There is already a request in flight. Queue up.
                Queue<Request<?>> stagedRequests = mWaitingRequests .get(cacheKey);
                if (stagedRequests == null) {
                    stagedRequests = new LinkedList<Request<?>>();
                }
                stagedRequests.add(request);
                mWaitingRequests.put(cacheKey, stagedRequests);
                if (VolleyLog. DEBUG) {
                    VolleyLog. v("Request for cacheKey=%s is in flight, putting on hold.", cacheKey);
                }
            } else {
                // Insert "null" queue for this cacheKey, indicating there is now a request in
                // flight.
                mWaitingRequests.put(cacheKey, null);
                mCacheQueue.add(request);
            }
            return request;
        }
    }
ињЩйЗМй¶ЦеЕИе∞ЖиѓЈж±ВеК†еЕ•mCurrentRequestsпЉМињЩдЄ™mCurrentRequestsжШѓдЄАдЄ™HashSetпЉМеЃГдњЭе≠ШдЇЖжЙАжЬЙйЬАи¶Бе§ДзРЖзЪДRequestпЉМдЄїи¶БдЄЇдЇЖжПРдЊЫcancelзЪДеЕ•еП£гАВе¶ВжЮЬиѓ•иѓЈж±ВдЄНеЇФ胕襀зЉУе≠ШеИЩзЫіжО•еК†еЕ•mNetworkQueueпЉМзДґеРОињФеЫЮгАВrequest.shouldCache()еЬ®йїШиЃ§жГЕеЖµдЄЛпЉМжѓПжЭ°иѓЈж±ВйГљжШѓеПѓдї•зЉУе≠ШзЪДпЉМељУзДґжИСдїђдєЯеПѓдї•и∞ГзФ®RequestзЪДsetShouldCache(false)жЦєж≥ХжЭ•жФєеПШињЩдЄАйїШиЃ§и°МдЄЇгАВ¬†
жО•дЄЛжЭ•еИ§жЦ≠иѓ•иѓЈж±ВжШѓеР¶жЬЙзЫЄеРМзЪДиѓЈж±Вж≠£еܮ襀е§ДзРЖпЉМе¶ВжЮЬжЬЙеИЩеК†еЕ•mWaitingRequestsпЉЫе¶ВжЮЬж≤°жЬЙпЉМеИЩеК†еЕ•mWaitingRequests.put(cacheKey, null)пЉМеєґе∞ЖrequestеК†еЕ•еИ∞CacheQueueдЄ≠гАВ¬†
жЬЙдЇЖйШЯеИЧпЉМжИСдїђе∞±жЭ•зЬЛзЬЛзЇњз®ЛжШѓе¶ВдљХжЙІи°МзЪДгАВеЕИзЬЛCacheDispatcherгАВ
public class CacheDispatcher extends Thread {

    private static final boolean DEBUG = VolleyLog.DEBUG;

    /** The queue of requests coming in for triage. */
    private final BlockingQueue<Request<?>> mCacheQueue;

    /** The queue of requests going out to the network. */
    private final BlockingQueue<Request<?>> mNetworkQueue;

    /** The cache to read from. */
    private final Cache mCache;

    /** For posting responses. */
    private final ResponseDelivery mDelivery;

    /** Used for telling us to die. */
    private volatile boolean mQuit = false;

    /**
     * Creates a new cache triage dispatcher thread.  You must call {@link #start()}
     * in order to begin processing.
     *
     * @param cacheQueue Queue of incoming requests for triage
     * @param networkQueue Queue to post requests that require network to
     * @param cache Cache interface to use for resolution
     * @param delivery Delivery interface to use for posting responses
     */
    public CacheDispatcher(
            BlockingQueue<Request<?>> cacheQueue, BlockingQueue<Request<?>> networkQueue,
            Cache cache, ResponseDelivery delivery) {
        mCacheQueue = cacheQueue;
        mNetworkQueue = networkQueue;
        mCache = cache;
        mDelivery = delivery;
    }

    /**
     * Forces this dispatcher to quit immediately.  If any requests are still in
     * the queue, they are not guaranteed to be processed.
     */
    public void quit() {
        mQuit = true;
        interrupt();
    }

    @Override
    public void run() {
        if (DEBUG) VolleyLog.v("start new dispatcher");
        Process.setThreadPriority(Process.THREAD_PRIORITY_BACKGROUND);

        // Make a blocking call to initialize the cache.
        mCache.initialize();

        while (true) {
            try {
                // Get a request from the cache triage queue, blocking until
                // at least one is available.
                final Request<?> request = mCacheQueue.take();
                request.addMarker("cache-queue-take");

                // If the request has been canceled, don"t bother dispatching it.
                if (request.isCanceled()) {
                    request.finish("cache-discard-canceled");
                    continue;
                }

                // Attempt to retrieve this item from cache.
                Cache.Entry entry = mCache.get(request.getCacheKey());
                if (entry == null) {
                    request.addMarker("cache-miss");
                    // Cache miss; send off to the network dispatcher.
                    mNetworkQueue.put(request);
                    continue;
                }

                // If it is completely expired, just send it to the network.
                if (entry.isExpired()) {
                    request.addMarker("cache-hit-expired");
                    request.setCacheEntry(entry);
                    mNetworkQueue.put(request);
                    continue;
                }

                // We have a cache hit; parse its data for delivery back to the request.
                request.addMarker("cache-hit");
                Response<?> response = request.parseNetworkResponse(
                        new NetworkResponse(entry.data, entry.responseHeaders));
                request.addMarker("cache-hit-parsed");

                if (!entry.refreshNeeded()) {
                    // Completely unexpired cache hit. Just deliver the response.
                    mDelivery.postResponse(request, response);
                } else {
                    // Soft-expired cache hit. We can deliver the cached response,
                    // but we need to also send the request to the network for
                    // refreshing.
                    request.addMarker("cache-hit-refresh-needed");
                    request.setCacheEntry(entry);

                    // Mark the response as intermediate.
                    response.intermediate = true;

                    // Post the intermediate response back to the user and have
                    // the delivery then forward the request along to the network.
                    mDelivery.postResponse(request, response, new Runnable() {
                        @Override
                        public void run() {
                            try {
                                mNetworkQueue.put(request);
                            } catch (InterruptedException e) {
                                // Not much we can do about this.
                            }
                        }
                    });
                }

            } catch (InterruptedException e) {
                // We may have been interrupted because it was time to quit.
                if (mQuit) {
                    return;
                }
                continue;
            }
        }
    }
}
жИСдїђи¶БзЯ•йБУCacheDispatcherжШѓз°ђзЫШзЉУе≠ШпЉМеИ∞ж≠§еПѓзЯ•VolleyдєЯжШѓжЬЙдЇМзЇІзЉУе≠ШзЪДгАВйЗНзВєзЬЛеЃГзЪДrunжЦєж≥ХгАВзЬЛеИ∞while(true)жЧґпЉМжИСдїђе∞±зЯ•йБУпЉМеЃГжШѓеЬ®дЄНжЦ≠зЪДжЙІи°МзЪДгАВй¶ЦеЕИдїОmCacheQueueдЄ≠еПЦеЗЇзЉУе≠ШпЉМе¶ВжЮЬж≤°жЬЙеПЦеИ∞пЉМе∞±жККеЃГеК†еЕ•mNetworkQueueдЄ≠пЉМеЖНеИ§жЦ≠зЉУе≠ШжШѓеР¶ињЗжЬЯпЉМе¶ВжЮЬињЗжЬЯпЉМдєЯжФЊеЕ•mNetworkQueueдЄ≠гАВеР¶еИЩе∞±еПЦеИ∞дЇЖеПѓзФ®зЪДзЉУе≠ШдЇЖпЉМеЖНи∞ГзФ®request.parseNetworkResponseиІ£жЮРдїОзЉУе≠ШдЄ≠еПЦеЗЇзЪДdataеТМresponseHeadersйАЪињЗmDelivery.postResponseиљђеПСпЉМзДґеРОеЫЮи∞ГеИ∞UIзЇњз®ЛпЉЫжИСдїђзЬЛдЄЛmDelivery.postResponseжЦєж≥ХпЉЪ
 @Override
    public void postResponse(Request<?> request, Response<?> response, Runnable runnable) {
        request.markDelivered();
        request.addMarker("post-response");
        mResponsePoster.execute(new ResponseDeliveryRunnable(request, response, runnable));
    }
дЄїи¶БзЬЛResponseDeliveryRunnableгАВ
 public ResponseDeliveryRunnable(Request request, Response response, Runnable runnable) {
            mRequest = request;
            mResponse = response;
            mRunnable = runnable;
        }

        @SuppressWarnings("unchecked")
        @Override
        public void run() {
            // If this request has canceled, finish it and don"t deliver.
            if (mRequest.isCanceled()) {
                mRequest.finish("canceled-at-delivery");
                return;
            }

            // Deliver a normal response or error, depending.
            if (mResponse.isSuccess()) {
                mRequest.deliverResponse(mResponse.result);
            } else {
                mRequest.deliverError(mResponse.error);
            }

            // If this is an intermediate response, add a marker, otherwise we"re done
            // and the request can be finished.
            if (mResponse.intermediate) {
                mRequest.addMarker("intermediate-response");
            } else {
                mRequest.finish("done");
            }

            // If we have been provided a post-delivery runnable, run it.
            if (mRunnable != null) {
                mRunnable.run();
            }
       }
еЬ®еЃГзЪДrunжЦєж≥ХдЄ≠пЉМе¶ВжЮЬиЃњйЧЃжИРеКЯдЉЪи∞ГзФ®mRequest.deliverResponse(mResponse.result)жЦєж≥ХпЉМеИ∞ињЩйЗМе∞±еЊИжШОдЇЖдЇЖпЉМеЫ†дЄЇжѓПдЄ™requestе≠Рз±їдЄ≠йГљи¶БйЗНеЖЩdeliverResponseпЉМжЬАеРОжИСдїђеЖНеЬ®ињЩдЄ™жЦєж≥ХдЄ≠е∞ЖеУНеЇФзЪДжХ∞жНЃеЫЮи∞ГеИ∞Response.ListenerзЪДonResponse()жЦєж≥ХдЄ≠е∞±еПѓдї•дЇЖгАВдї•StringRequestдЄЇдЊЛпЉЪ
 @Override
    protected void deliverResponse(String response) {
        mListener.onResponse (response);
    }
еИЖжЮРеЃМзЉУе≠ШпЉМжИСдїђжЭ•зЬЛдЄЛзљСзїЬеК†иљљгАВеЃГжШѓеЬ®NetworkDispatcherзЇњз®ЛдЄ≠еЃЮзО∞зЪДгАВ
public class NetworkDispatcher extends Thread {
    /** The queue of requests to service. */
    private final BlockingQueue<Request<?>> mQueue;
    /** The network interface for processing requests. */
    private final Network mNetwork;
    /** The cache to write to. */
    private final Cache mCache;
    /** For posting responses and errors. */
    private final ResponseDelivery mDelivery;
    /** Used for telling us to die. */
    private volatile boolean mQuit = false;

    /**
     * Creates a new network dispatcher thread.  You must call {@link #start()}
     * in order to begin processing.
     *
     * @param queue Queue of incoming requests for triage
     * @param network Network interface to use for performing requests
     * @param cache Cache interface to use for writing responses to cache
     * @param delivery Delivery interface to use for posting responses
     */
    public NetworkDispatcher(BlockingQueue<Request<?>> queue,
            Network network, Cache cache,
            ResponseDelivery delivery) {
        mQueue = queue;
        mNetwork = network;
        mCache = cache;
        mDelivery = delivery;
    }
 @Override
    public void run() {
        Process.setThreadPriority(Process. THREAD_PRIORITY_BACKGROUND);
        Request<?> request;
        while ( true) {
            try {
                // Take a request from the queue.
                request = mQueue.take();
            } catch (InterruptedException e) {
                // We may have been interrupted because it was time to quit.
                if ( mQuit) {
                    return;
                }
                continue;
            }

            try {
                request.addMarker( "network-queue-take" );

                // If the request was cancelled already, do not perform the
                // network request.
                if (request.isCanceled()) {
                    request.finish( "network-discard-cancelled" );
                    continue;
                }

                addTrafficStatsTag(request);

                // Perform the network request.
                NetworkResponse networkResponse = mNetwork.performRequest(request);
                request.addMarker( "network-http-complete" );

                // If the server returned 304 AND we delivered a response already,
                // we"re done -- don"t deliver a second identical response.
                if (networkResponse. notModified && request.hasHadResponseDelivered()) {
                    request.finish( "not-modified");
                    continue;
                }

                // Parse the response here on the worker thread.
                Response<?> response = request.parseNetworkResponse(networkResponse);
                request.addMarker( "network-parse-complete" );

                // Write to cache if applicable.
                // TODO: Only update cache metadata instead of entire record for 304s.
                if (request.shouldCache() && response. cacheEntry != null ) {
                    mCache.put(request.getCacheKey(), response.cacheEntry );
                    request.addMarker( "network-cache-written" );
                }

                // Post the response back.
                request.markDelivered();
                mDelivery.postResponse(request, response);
            } catch (VolleyError volleyError) {
                parseAndDeliverNetworkError(request, volleyError);
            } catch (Exception e) {
                VolleyLog. e(e, "Unhandled exception %s", e.toString());
                mDelivery.postError(request, new VolleyError(e));
            }
        }
    }
}
й¶ЦеЕИеПЦеЗЇиѓЈж±ВпЉЫзДґеРОйАЪињЗmNetwork.performRequest(request)е§ДзРЖжИСдїђзЪДиѓЈж±ВпЉМжЛњеИ∞NetworkResponseгАВзЬЛдЄЛperformRequestжЦєж≥ХпЉЪ
public NetworkResponse performRequest(Request<?> request) throws VolleyError {
long requestStart = SystemClock.elapsedRealtime();
while (true) {
HttpResponse httpResponse = null;
byte[] responseContents = null;
Map<String, String> responseHeaders = new HashMap<String, String>();
try {
// Gather headers.
Map<String, String> headers = new HashMap<String, String>();
addCacheHeaders(headers, request.getCacheEntry());
httpResponse = mHttpStack.performRequest(request, headers);
StatusLine statusLine = httpResponse.getStatusLine();
int statusCode = statusLine.getStatusCode();
responseHeaders = convertHeaders(httpResponse.getAllHeaders());
// Handle cache validation.
if (statusCode == HttpStatus.SC_NOT_MODIFIED) {
return new NetworkResponse(HttpStatus.SC_NOT_MODIFIED,
request.getCacheEntry() == null ? null : request.getCacheEntry().data,
responseHeaders, true);
}
// Some responses such as 204s do not have content. We must check.
if (httpResponse.getEntity() != null) {
responseContents = entityToBytes(httpResponse.getEntity());
} else {
// Add 0 byte response as a way of honestly representing a
// no-content request.
responseContents = new byte[0];
}
// if the request is slow, log it.
long requestLifetime = SystemClock.elapsedRealtime() - requestStart;
logSlowRequests(requestLifetime, request, responseContents, statusLine);
if (statusCode < 200 || statusCode > 299) {
throw new IOException();
}
return new NetworkResponse(statusCode, responseContents, responseHeaders, false);
} catch (Exception e) {
вА¶вА¶
}
}
}
дЄКйЭҐжЦєж≥ХдЄїи¶БжШѓзљСзїЬиѓЈж±ВзЪДдЄАдЇЫзїЖиКВпЉМжЙАдї•е¶ВжЮЬи¶БдњЃжФєиѓЈж±ВзЪДзїЖиКВе∞±и¶БеИ∞ж≠§е§ДдњЃжФєпЉИеРОйЭҐдЉЪиЃ≤еИ∞пЉЙгАВ¬†
еЬ®ињЩйЗМжЬНеК°еЩ®дЉЪињФеЫЮзЪДжХ∞жНЃзїДи£ЕжИРдЄАдЄ™NetworkResponseеѓєи±°ињЫи°МињФеЫЮгАВеЬ®NetworkDispatcherдЄ≠жФґеИ∞дЇЖNetworkResponseињЩдЄ™ињФеЫЮеАЉеРОеПИдЉЪи∞ГзФ®RequestзЪДparseNetworkResponse()жЦєж≥ХжЭ•иІ£жЮРNetworkResponseдЄ≠зЪДжХ∞жНЃпЉМеЖНе∞ЖжХ∞жНЃеЖЩеЕ•еИ∞зЉУе≠ШгАВparseNetworkResponseзЪДеЃЮзО∞жШѓдЇ§зїЩRequestзЪДе≠Рз±їжЭ•еЃМжИРзЪДпЉМдЄНеРМзІНз±їзЪДRequestиІ£жЮРзЪДжЦєеЉПдЄНеРМгАВе¶ВjsonдЄОgsonе∞±жЬЙеМЇеИЂгАВжЬАеРОдЄОCacheDispatcherдЄАж†Ји∞ГзФ®mDelivery.postResponse(request, response)ињФеЫЮеЫЮи∞ГпЉМињЩйЗМе∞±дЄНеЖНеИЖжЮРдЇЖгАВ¬†
еИ∞ињЩйЗМvolleyзЪДжЇРз†Бе∞±еИЖжЮРеЃМдЇЖпЉМжАїзїУдЄАдЄЛпЉЪ
- й¶ЦеЕИеИЭеІЛеМЦRequestQueueпЉМдЄїи¶Бе∞±жШѓеЉАеРѓCacheDispatcherеТМNetworkDispatcherзЇњз®ЛпЉМзЇњз®ЛдЉЪдЄНжЦ≠иѓїеПЦиѓЈж±ВпЉМж≤°жЬЙжґИжБѓеИЩйШїе°ЮгАВ
- ељУжИСдїђеПСеЗЇиѓЈж±Вдї•еРОпЉМдЉЪж†єжНЃurlпЉМImageViewе±ЮжАІз≠ЙпЉМжЮДйА†еЗЇдЄАдЄ™cacheKeyпЉМзДґеРОй¶ЦеЕИдїОLruCacheдЄ≠иОЈеПЦпЉМињЩдЄ™зЉУе≠ШжИСдїђиЗ™еЈ±жЮДеїЇзЪДпЉМињЩе∞±жШѓеЖЕе≠ШзЉУе≠ШпЉЫе¶ВжЮЬж≤°жЬЙеПЦеИ∞пЉМеИЩеИ§жЦ≠жШѓеР¶е≠ШеЬ®з°ђзЫШзЉУе≠ШпЉМињЩдЄАж≠•жШѓдїОgetCacheDirйЗМйЭҐиОЈеПЦпЉИйїШиЃ§5MпЉЙпЉЫе¶ВжЮЬж≤°жЬЙеПЦеИ∞пЉМеИЩдїОзљСзїЬиѓЈж±ВпЉЫ
VolleyзЪДжЙ©е±Х
жЈїеК†cookieе§і
volleyиЈЯhttpClientдЄНдЄАж†ЈпЉМеЃГжШѓдЄНдЉЪиЗ™еК®жЈїеК†cookieе§ізЪДгАВдљЖжШѓcookieеЬ®еЇФзФ®дЄ≠еНіеЊИйЗНи¶БпЉМеЃГдЉЪдњЭиѓБзЩїйЩЖеРОзЪДжУНдљЬйГље§ДдЇОдЄАдЄ™дЉЪиѓЭдЄ≠пЉМжЬЙжХИзЪДеҐЮеК†дЇЖеЃЙеЕ®жАІгАВйВ£дєИе¶ВдљХеЬ®volleyдЄ≠иЗ™еК®жЈїеК†cookieеСҐгАВ¬†
й¶ЦеЕИеЬ®жЦ∞еїЇAppliactionпЉМељУжИРеЕ®е±АзЪДApplicationпЉМзДґеРОеЬ®йЗМйЭҐзЉЦеЖЩеЬ®httpе§іеПВжХ∞дЄ≠иѓЖеИЂеЗЇcookieеТМжЈїеК†cookieеИ∞Httpе§ідї£з†БгАВ
/**
* Checks the response headers for session cookie and saves it
* if it finds it.
* @param headers Response Headers.
*/
public static final void checkSessionCookie(Map<String, String> headers) {
Log.e("TAG", "checkSessionCookie->headers:" + headers);
if (headers.containsKey(GlobalParams.SET_COOKIE_KEY) && headers.get(GlobalParams.SET_COOKIE_KEY).startsWith(GlobalParams.SESSION_COOKIE)) {
String cookie = headers.get(GlobalParams.SET_COOKIE_KEY);
if (cookie.length() > 0) {
//嚥е¶ВSet-Cookie:JSESSIONID=18D6BCC01453C6EB39BB0C4208F389EE; Path=/smdb
//ињЫи°МиІ£жЮРпЉМеПЦеЗЇJSESSIONIDзЪДvalue
String[] splitCookie = cookie.split(";");
String[] splitSessionId = splitCookie[0].split("=");
cookie = splitSessionId[1];
Editor prefEditor = preferences.edit();
prefEditor.putString(GlobalParams.SESSION_COOKIE, cookie);
prefEditor.commit();
}
}else {
if (null != httpclient.getCookieStore()) {
List<Cookie> cookies = httpclient.getCookieStore().getCookies();
for (Cookie cookie : cookies) {
if ("JSESSIONID".equals(cookie.getName())) {//еПЦеЊЧsessionзЪДvalue
String sessionId = cookie.getValue();
Editor prefEditor = preferences.edit();
prefEditor.putString(GlobalParams.SESSION_COOKIE, sessionId);
prefEditor.commit();
break;
}
}
if (!cookies.isEmpty()) {
for (int i = 0; i < cookies.size(); i++) {
cookie = cookies.get(i);//дњЭе≠ШcookieзЪДдњ°жБѓдљњеЊЧHttpClientеТМWebViewеЕ±дЇЂеРМдЄАдЄ™cookie
}
}
}
}
}
жО•зЭАе∞±и¶БеЬ®RequestзЪДе≠Рз±їдЄ≠еРИйАВеЬ∞жЦєжЈїеК†е§ідњ°жБѓпЉМеУ™дЄ™еЬ∞жЦєеРИйАВгАВжИСдїђжЭ•зЬЛдЄЛHurlStackзЪДperformRequestжЦєж≥ХгАВ
@Override
    public HttpResponse performRequest(Request<?> request, Map<String, String> additionalHeaders)
            throws IOException, AuthFailureError {
        String url = request.getUrl();
        HashMap<String, String> map = new HashMap<String, String>();
        map.putAll(request.getHeaders());
        map.putAll(additionalHeaders);
        if (mUrlRewriter != null) {
            String rewritten = mUrlRewriter.rewriteUrl(url);
            if (rewritten == null) {
                throw new IOException("URL blocked by rewriter: " + url);
            }
            url = rewritten;
        }
        URL parsedUrl = new URL(url);
        HttpURLConnection connection = openConnection(parsedUrl, request);
        for (String headerName : map.keySet()) {
            connection.addRequestProperty(headerName, map.get(headerName));
        }
        setConnectionParametersForRequest(connection, request);
        // Initialize HttpResponse with data from the HttpURLConnection.
        ProtocolVersion protocolVersion = new ProtocolVersion("HTTP", 1, 1);
        int responseCode = connection.getResponseCode();
        if (responseCode == -1) {
            // -1 is returned by getResponseCode() if the response code could not be retrieved.
            // Signal to the caller that something was wrong with the connection.
            throw new IOException("Could not retrieve response code from HttpUrlConnection.");
        }
        StatusLine responseStatus = new BasicStatusLine(protocolVersion,
                connection.getResponseCode(), connection.getResponseMessage());
        BasicHttpResponse response = new BasicHttpResponse(responseStatus);
        response.setEntity(entityFromConnection(connection));
        for (Entry<String, List<String>> header : connection.getHeaderFields().entrySet()) {
            if (header.getKey() != null) {
                Header h = new BasicHeader(header.getKey(), header.getValue().get(0));
                response.addHeader(h);
            }
        }
        return response;
    }
йЗНзВєзЬЛеИ∞map.putAll(request.getHeaders());жЙАдї•жИСдїђиАГиЩСеИ∞е¶ВжЮЬи¶БзїЩеЃГжЈїеК†е§ідњ°жБѓеПѓдї•еЬ®requestзЪДgetHeaders()жЦєж≥ХдЄ≠жЈїеК†гАВиЗ≥ж≠§жИСдїђдї•StringRequestдЄЇдЊЛпЉМйЗНеЖЩдЄАдЄ™з±їеПЂMyStringRequest:
public class MyStringRequest extends StringRequest {

    private final Map<String, String> mParams;
    /**
     * @param method
     * @param url
     * @param params
     *            A {@link HashMap} to post with the request. Null is allowed
     *            and indicates no parameters will be posted along with request.
     * @param listener
     * @param errorListener
     */
    public MyStringRequest(int method, String url, Map<String, String> params, Listener<String> listener,
            ErrorListener errorListener) {
        super(method, url, listener, errorListener);
        mParams = params;
    }

    @Override
    protected Map<String, String> getParams() {
        return mParams;
    }

    /* (non-Javadoc)
     * @see com.android.volley.toolbox.StringRequest#parseNetworkResponse(com.android.volley.NetworkResponse)
     */
    @Override
    protected Response<String> parseNetworkResponse(NetworkResponse response) {
        // since we don"t know which of the two underlying network vehicles
        // will Volley use, we have to handle and store session cookies manually
        Log.e("TAG", "parseNetworkResponse->response.headers:" + response.headers);
        GlobalApplication.checkSessionCookie(response.headers);
        return super.parseNetworkResponse(response);
    }

    /* (non-Javadoc)
     * @see com.android.volley.Request#getHeaders()
     */
    @Override
    public Map<String, String> getHeaders() throws AuthFailureError {
        Map<String, String> headers = super.getHeaders();
            if (headers == null || headers.equals(Collections.emptyMap())) {
                headers = new HashMap<String, String>();
            }
            GlobalApplication.addSessionCookie(headers);
        return headers;
    }

}
еЬ®parseNetworkResponseдЄ≠и∞ГзФ®checkSessionCookieиІ£жЮРе§ідњ°жБѓдЄ≠зЪДcookieпЉМзДґеРОйЗНеЖЩgetHeadersжЦєж≥ХпЉМи∞ГзФ®addSessionCookieжЈїеК†cookieгАВ
жЈїеК†йЗНеЃЪеРСеКЯиГљ
зљСзїЬиЃњйЧЃзїПеЄЄи¶БзФ®еИ∞йЗНеЃЪеРСпЉМиЩљиѓіеЬ®еЃҐжИЈзЂѓдЄ≠зФ®еЊЧжѓФиЊГе∞СгАВйВ£VolleyиГљдЄНиГљињЫи°МиЗ™еК®йЗНеЃЪеРСпЉМз≠Фж°ИжШѓеПѓдї•зЪДпЉМйЗНи¶БдњЃжФєдЄЛжЇРз†БгАВжЧҐзДґи¶БйЗНеЃЪеРСпЉМйВ£е∞±и¶БеЬ®иѓЈж±ВињФеЫЮзЪДињЫи°МеИ§жЦ≠пЉМжѓЂжЧ†зЦСйЧЃи¶БеЬ®BasicNetworkзЪДperformRequestдЄ≠дњЃжФєпЉМеЕИзЬЛдЄЛдњЃжФєеРОзЪДдї£з†БпЉЪ
@Override
public NetworkResponse performRequest(Request<?> request) throws VolleyError {
long requestStart = SystemClock.elapsedRealtime();
while (true) {
HttpResponse httpResponse = null;
byte[] responseContents = null;
Map<String, String> responseHeaders = new HashMap<String, String>();
try {
// Gather headers.
Map<String, String> headers = new HashMap<String, String>();
addCacheHeaders(headers, request.getCacheEntry());
httpResponse = mHttpStack.performRequest(request, headers);
StatusLine statusLine = httpResponse.getStatusLine();
int statusCode = statusLine.getStatusCode();
responseHeaders = convertHeaders(httpResponse.getAllHeaders());
// Handle cache validation.
if (statusCode == HttpStatus.SC_NOT_MODIFIED) {
return new NetworkResponse(HttpStatus.SC_NOT_MODIFIED,
request.getCacheEntry() == null ? null : request.getCacheEntry().data,
responseHeaders, true);
}
// Handle moved resources
//Line143-148дЄЇиІ£еЖ≥301/302йЗНеЃЪеРСйЧЃйҐШеҐЮеК†зЪДдї£з†БгАВ
//еПВиАГиІБhttps://github.com/elbuild/volley-plus/commit/4a65a4099d2b1d942f4d51a6df8734cf272564eb#diff-b4935f77d9f815bb7e0dba85e55dc707R150
 if (statusCode == HttpStatus.SC_MOVED_PERMANENTLY || statusCode == HttpStatus.SC_MOVED_TEMPORARILY) {
                    String newUrl = responseHeaders.get("Location");
                    request.setRedirectUrl(newUrl);
                }
// Some responses such as 204s do not have content. We must check.
if (httpResponse.getEntity() != null) {
responseContents = entityToBytes(httpResponse.getEntity());
} else {
// Add 0 byte response as a way of honestly representing a
// no-content request.
responseContents = new byte[0];
}
// if the request is slow, log it.
long requestLifetime = SystemClock.elapsedRealtime() - requestStart;
logSlowRequests(requestLifetime, request, responseContents, statusLine);
if (statusCode < 200 || statusCode > 299) {
throw new IOException();
}
return new NetworkResponse(statusCode, responseContents, responseHeaders, false);
} catch (SocketTimeoutException e) {
attemptRetryOnException("socket", request, new TimeoutError());
} catch (ConnectTimeoutException e) {
attemptRetryOnException("connection", request, new TimeoutError());
} catch (MalformedURLException e) {
throw new RuntimeException("Bad URL " + request.getUrl(), e);
} catch (IOException e) {
int statusCode = 0;
NetworkResponse networkResponse = null;
if (httpResponse != null) {
statusCode = httpResponse.getStatusLine().getStatusCode();
} else {
throw new NoConnectionError(e);
}
//Line143-148дЄЇиІ£еЖ≥301/302йЗНеЃЪеРСйЧЃйҐШеҐЮеК†зЪДдї£з†БгАВ
if (statusCode == HttpStatus.SC_MOVED_PERMANENTLY ||
statusCode == HttpStatus.SC_MOVED_TEMPORARILY) {
VolleyLog.e("Request at %s has been redirected to %s", request.getOriginUrl(), request.getUrl());
} else {
VolleyLog.e("Unexpected response code %d for %s", statusCode, request.getUrl());
}
if (responseContents != null) {
networkResponse = new NetworkResponse(statusCode, responseContents,
responseHeaders, false);
if (statusCode == HttpStatus.SC_UNAUTHORIZED ||
statusCode == HttpStatus.SC_FORBIDDEN) {
attemptRetryOnException("auth",
request, new AuthFailureError(networkResponse));
} else if (statusCode == HttpStatus.SC_MOVED_PERMANENTLY ||
statusCode == HttpStatus.SC_MOVED_TEMPORARILY) {
//else ifиѓ≠еП•дЄЇиІ£еЖ≥301/302йЗНеЃЪеРСйЧЃйҐШеҐЮеК†зЪДдї£з†БгАВиЃЊзљЃйЗНињЮиѓЈж±ВгАВ
attemptRetryOnException("redirect",
request, new AuthFailureError(networkResponse));
} else {
// TODO: Only throw ServerError for 5xx status codes.
throw new ServerError(networkResponse);
}
} else {
throw new NetworkError(networkResponse);
}
}
}
}
еЕґеЃЮйЗНзВєжЈїеК†дЇЖдї•дЄЛзЪДдї£з†БпЉЪ
if (statusCode == HttpStatus.SC_MOVED_PERMANENTLY || statusCode == HttpStatus.SC_MOVED_TEMPORARILY) {
String newUrl = responseHeaders.get("Location");
request.setRedirectUrl(newUrl);
}
дЄКйЭҐзЪДдї£з†Бе∞±жШѓеИ§жЦ≠ињФеЫЮcodeжШѓеР¶жШѓ301жИЦ302пЉМе¶ВжЮЬжШѓе∞±иОЈеПЦйЗНеЃЪеРСзЪДUrlпЉМеЖНиЃЊзљЃйЗНеЃЪеРСпЉМеЊИзЃАеНХгАВеИ∞ж≠§VolleyеЄЄиІБзЪДжЙ©е±ХеКЯиГље∞±иЃ≤еЃМдЇЖгАВ¬†
жЇРз†БиІ£жЮРзЪДжЦЗзЂ†йГљдЉЪжЬЙзВєйХњпЉМеЖЩеЃМдєЯи¶БжЬЙиАРењГгАВзїІзї≠еЭЪжМБгАВ