

еПИжЭ•дЄАзѓЗжЇРз†БеИЖжЮРжЦЗзЂ†гАВиЃ≤жЇРз†БеИЖжЮРжЦЗзЂ†жЬЙзЪДжЧґеАЩеЊИиЩЪпЉМеЫ†дЄЇжИСеП™иГљиЃ≤дЄ™жИСзЬЛжЗВзЪДе§Іж¶ВжµБз®ЛпЉМжЙАдї•зїЖиКВйГ®еИЖеПѓдї•ж≤°жЬЙжЈ±еЕ•з†Фз©ґпЉМзЬЛеЃМдєЛеРОдєЯеП™иГљдЇЖиІ£дЄ™е§Іж¶ВгАВдљЖдЄ™дЇЇиІЙеЊЧзЬЛжЇРз†БжЫійЗНи¶БзЪДжШѓжАЭиЈѓиАМдЄНжШѓзїЖиКВгАВдїК姩жЭ•еИЖжЮРдЄЛLayoutInflaterзЪДжЇРз†БгАВ¬†
дєЛжЙАдї•еИЖжЮРеЃГжШѓеЫ†дЄЇжИСдїђжЭ•еЄЄзїПеЄЄдљњзФ®еИ∞еЃГпЉМдљЖеЊАеЊАеП™зЯ•йБУеЃГжШѓеК†иљљviewзЪДиАМдЄНзЯ•еЃГеЕЈдљУзЪДеЃЮзО∞жЦєж≥ХгАВдЄНе§ЪиѓізЫіжО•еИЖжЮРгАВ
жЇРз†БеИЖжЮР
еє≥еЄЄжИСдїђдљњзФ®LayoutInflaterжЬАеЄЄиІБзЪДжЦєеЉПе¶ВпЉЪ
LayoutInflater inflate = LayoutInflater.from(Context context); LayoutInflater inflate = (LayoutInflater) context.getSystemService(Context.LAYOUT_INFLATER_SERVICE);
ињЩдЄ§зІНжЦєеЉПеЃЮиі®дЄКжШѓдЄАж†ЈзЪДгАВзЬЛжЭ•LayoutInflater.fromзЪДжЇРз†БпЉЪ
 public static LayoutInflater from(Context context) {
        LayoutInflater LayoutInflater =
                (LayoutInflater) context .getSystemService(Context. LAYOUT_INFLATER_SERVICE);
        if ( LayoutInflater == null) {
            throw new AssertionError( "LayoutInflater not found.");
        }
        return LayoutInflater;
    }
е•љеРІпЉМеЃГе∞±жШѓдЄАдЄ™жКЂзЭАcontext .getSystemServiceзЪЃзЪДзЛЉгАВеЕґеЃЮе∞±жШѓзЃАеНХзЪДе∞Би£ЕдЇЖдЄЛгАВеє≥еЄЄжИСдїђеЬ®иОЈеПЦз≥їзїЯзЪДдЄАдЇЫserviceе¶ВиОЈеПЦдЉ†жДЯеЩ®дєЛз±їзЪДйГљдЉЪзФ®еИ∞getSystemServiceпЉМйВ£дєИеЬ®ињЩйЗМcontext .getSystemServiceеПИжШѓеЕЈдљУжАОдєИеЃЮзО∞зЪДгАВ
getSystemService
дЇЖиІ£ињЩдЄ™йЧЃйҐШдєЛеЙНжИСдїђи¶БжЄЕж•ЪпЉМContextжШѓдїАдєИпЉМеє≥жЧґжИСдїђзїПеЄЄиѓіContextжШѓдЄКдЄЛжЦЗзОѓеҐГгАВеЕґеЃЮApplicationпЉМActivityпЉМServiceйГљдЉЪе≠ШеЬ®дЄАдЄ™ContextгАВеЃГзЪДеЕЈдљУеЃЮзО∞з±їжШѓContextImplгАВйВ£дєИзЫіжО•зЬЛContextImplпЉЪ
  @Override
    public Object getSystemService(String name) {
        ServiceFetcher fetcher = SYSTEM_SERVICE_MAP.get(name);
        return fetcher == null ? null : fetcher.getService(this);
    }
SYSTEM_SERVICE_MAPжШѓдїАдєИгАВжИСдїђзїІзї≠зЬЛContextImplзЪДдї£з†БпЉЪ
class ContextImpl extends Context {
private final static String TAG = "ContextImpl";
private final static boolean DEBUG = false;
/**
* Map from package name, to preference name, to cached preferences.
*/
private static ArrayMap<String, ArrayMap<String, SharedPreferencesImpl>> sSharedPrefs;
/**
* Override this class when the system service constructor needs a
* ContextImpl. Else, use StaticServiceFetcher below.
*/
/*package*/ static class ServiceFetcher {
int mContextCacheIndex = -1;
/**
* Main entrypoint; only override if you don"t need caching.
*/
public Object getService(ContextImpl ctx) {
ArrayList<Object> cache = ctx.mServiceCache;
Object service;
synchronized (cache) {
if (cache.size() == 0) {
// Initialize the cache vector on first access.
// At this point sNextPerContextServiceCacheIndex
// is the number of potential services that are
// cached per-Context.
for (int i = 0; i < sNextPerContextServiceCacheIndex; i++) {
cache.add(null);
}
} else {
service = cache.get(mContextCacheIndex);
if (service != null) {
return service;
}
}
service = createService(ctx);
cache.set(mContextCacheIndex, service);
return service;
}
}
/**
* Override this to create a new per-Context instance of the
* service. getService() will handle locking and caching.
*/
public Object createService(ContextImpl ctx) {
throw new RuntimeException("Not implemented");
}
}
abstract static class StaticServiceFetcher extends ServiceFetcher {
private Object mCachedInstance;
@Override
public final Object getService(ContextImpl unused) {
synchronized (StaticServiceFetcher.this) {
Object service = mCachedInstance;
if (service != null) {
return service;
}
return mCachedInstance = createStaticService();
}
}
public abstract Object createStaticService();
}
private static final HashMap<String, ServiceFetcher> SYSTEM_SERVICE_MAP =
new HashMap<String, ServiceFetcher>();
private static int sNextPerContextServiceCacheIndex = 0;
private static void registerService(String serviceName, ServiceFetcher fetcher) {
if (!(fetcher instanceof StaticServiceFetcher)) {
fetcher.mContextCacheIndex = sNextPerContextServiceCacheIndex++;
}
SYSTEM_SERVICE_MAP.put(serviceName, fetcher);
}
static {
вА¶вА¶вА¶вА¶
registerService(LAYOUT_INFLATER_SERVICE, new ServiceFetcher() {
public Object createService(ContextImpl ctx) {
return PolicyManager.makeNewLayoutInflater(ctx.getOuterContext());
}});
вА¶вА¶вА¶вА¶
}
еЬ®иЩЪжЛЯжЬЇзђђдЄАжђ°еК†иљљиѓ•з±їжЧґе∞±дЉЪж≥®еЖМеРДзІНServiceFatcher,еМЕжЛђLayoutInflaterпЉМињЩдЄ™жШѓеЬ®дЄАз≥їеИЧзЪДregisterServiceдЄ≠еЃЮзО∞зЪДгАВзДґеРОе∞ЖеЃГдїђе≠ШеВ®еЬ®SYSTEM_SERVICE_MAPињЩдЄ™HashMapдЄ≠пЉМдї•еРОи¶БзФ®еП™йЬАдїОдЄ≠иОЈеПЦпЉМж≥®еЖМжШѓеЬ®йЭЩжАБдї£з†БеЭЧдЄ≠ињЫи°МзЪДпЉМдєЯе∞±жШѓиѓіеЃГеП™дЉЪжЙІи°МдЄАжђ°пЉМдњЭиѓБеЃЮдЊЛзЪДеФѓдЄАжАІгАВињЩеПѓдї•иѓіжШѓзФ®еЃєеЩ®жЭ•еЃЮзО∞зЪДеНХдЊЛж®°еЉПгАВжЬАеРОйАЪињЗgetSystemServiceиОЈеПЦзЫЄеЇФзЪДServiceгАВ¬†
жИСдїђйЗНзВєеЕ≥ж≥®еИ∞PolicyManager.makeNewLayoutInflateињЩеП•дї£з†БпЉМеЃГжЬАзїИи∞ГзФ®зЪДжШѓPolicyдЄ≠зЪДmakeNewLayoutInflateжЦєж≥ХгАВ
public class Policy implements IPolicy {
    private static final String TAG = "PhonePolicy";
    static {
        // For performance reasons, preload some policy specific classes when
        // the policy gets loaded.
        for (String s : preload_classes) {
            try {
                Class.forName(s);
            } catch (ClassNotFoundException ex) {
                Log.e(TAG, "Could not preload class for phone policy: " + s);
            }
        }
    }

    public Window makeNewWindow(Context context) {
        return new PhoneWindow(context);
    }

    public LayoutInflater makeNewLayoutInflater(Context context) {
        return new PhoneLayoutInflater(context);
    }
}
еЬ®ињЩйЗМзЬЛеИ∞WindowеЕЈдљУеЃЮзО∞з±їжШѓPhoneWindowпЉМLayoutInflaterзЪДеЕЈдљУеЃЮзО∞жШѓPhoneLayoutInflaterгАВ
PhoneLayoutInflater
зЬЛдЄЛPhoneLayoutInflaterзЪДдї£з†БгАВ
public class PhoneLayoutInflater extends LayoutInflater {
    private static final String[] sClassPrefixList = {
        "android.widget.",
        "android.webkit.",
        "android.app."
    };

    /**
     * Instead of instantiating directly, you should retrieve an instance
     * through {@link Context#getSystemService}
     *
     * @param context The Context in which in which to find resources and other
     *                application-specific things.
     *
     * @see Context#getSystemService
     */
    public PhoneLayoutInflater(Context context) {
        super(context);
    }

    protected PhoneLayoutInflater(LayoutInflater original, Context newContext) {
        super(original, newContext);
    }

    /** Override onCreateView to instantiate names that correspond to the
        widgets known to the Widget factory. If we don"t find a match,
        call through to our super class.
    */
    @Override protected View onCreateView(String name, AttributeSet attrs) throws ClassNotFoundException {
        for (String prefix : sClassPrefixList) {
            try {
                View view = createView(name, prefix, attrs);
                if (view != null) {
                    return view;
                }
            } catch (ClassNotFoundException e) {
                // In this case we want to let the base class take a crack
                // at it.
            }
        }

        return super.onCreateView(name, attrs);
    }

}
еЃГйЗНеЃЪдЇЖonCreateView жЦєж≥ХпЉМеЕґеЃЮе∞±жШѓдЄЇз≥їзїЯViewеК†дЄКзЫЄеЇФзЪДеЙНзЉАгАВе¶ВTextViewиѓїеЗЇзЪДеЃМжХіиЈѓеЊДдЉЪжШѓandroid.widget.TextViewгАВеЖНи∞ГзФ®createViewжЦєж≥ХпЉМйАЪињЗз±їзЪДеЃМжХіиЈѓеЊДжЭ•жЮДйА†Viewеѓєи±°гАВеЕЈдљУзЪДеЃЮзО∞ињЗз®ЛжИСдїђеПѓдї•жЭ•зЬЛзЬЛsetContentViewгАВ
setContentView
й¶ЦеЕИжИСдїђжЭ•зЬЛдЄАеєЕandroidзЪДзїУжЮДеЫЊпЉЪ¬†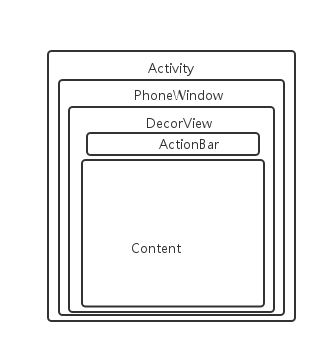
AcitivityзЪДдЄАдЄ™зХМйЭҐдЄ≠жЬАе§Це±ВжШѓPhoneWindowпЉМеЃГйЗМйЭҐжШѓдЄАдЄ™DecorViewгАВеЃГжШѓзХМйЭҐдЄ≠жЙАжЬЙviewзЪДж†єviewгАВеЃГеМЕжЛђдЄ§йГ®еИЖпЉМActionBarеТМContentViewпЉМиАМContentViewе∞±жШѓжИСдїђеє≥еЄЄжО•иІ¶жЬАе§ЪзЪДпЉМsetContentViewиЃЊзљЃзЪДе∞±жШѓеЃГзЪДеЖЕеЃєгАВиАМжИСдїђеЬ®xmlдЄ≠еЃЪдєЙзЪДжЙАжЬЙviewйГљжШѓжШЊз§ЇеЬ®еЃГдЄКйЭҐзЪДгАВ¬†
еЕИжЭ•зЬЛдЄЛPhoneWindowдЄ≠зЪДsetContentViewжЦєж≥ХгАВ
  public void setContentView(int layoutResID) {
        // Note: FEATURE_CONTENT_TRANSITIONS may be set in the process of installing the window
        // decor, when theme attributes and the like are crystalized. Do not check the feature
        // before this happens.
        if (mContentParent == null) {
            installDecor();
        } else if (!hasFeature(FEATURE_CONTENT_TRANSITIONS)) {
            mContentParent.removeAllViews();
        }

        if (hasFeature(FEATURE_CONTENT_TRANSITIONS)) {
            final Scene newScene = Scene.getSceneForLayout(mContentParent, layoutResID,
                    getContext());
            transitionTo(newScene);
        } else {
            mLayoutInflater.inflate(layoutResID, mContentParent);
        }
        final Callback cb = getCallback();
        if (cb != null && !isDestroyed()) {
            cb.onContentChanged();
        }
й¶ЦеЕИи∞ГзФ®зЪДжШѓinstallDecorжЦєж≥ХгАВдїОеРНе≠ЧдЄ≠жИСдїђе∞±еПѓдї•зМЬеИ∞пЉМеЃГеЇФиѓ•е∞±жШѓеК†иљљDecorViewгАВзЬЛдЄЛдї£з†БпЉЪ
private void installDecor() {
        if (mDecor == null) {
            mDecor = generateDecor();
            mDecor.setDescendantFocusability(ViewGroup.FOCUS_AFTER_DESCENDANTS);
            mDecor.setIsRootNamespace(true);
            if (!mInvalidatePanelMenuPosted && mInvalidatePanelMenuFeatures != 0) {
                mDecor.postOnAnimation(mInvalidatePanelMenuRunnable);
            }
        }
        if (mContentParent == null) {
            mContentParent = generateLayout(mDecor);

            // Set up decor part of UI to ignore fitsSystemWindows if appropriate.
            mDecor.makeOptionalFitsSystemWindows();

            final DecorContentParent decorContentParent = (DecorContentParent) mDecor.findViewById(
                    R.id.decor_content_parent);

            if (decorContentParent != null) {
                mDecorContentParent = decorContentParent;
                mDecorContentParent.setWindowCallback(getCallback());
                if (mDecorContentParent.getTitle() == null) {
                    mDecorContentParent.setWindowTitle(mTitle);
                }

                final int localFeatures = getLocalFeatures();
                for (int i = 0; i < FEATURE_MAX; i++) {
                    if ((localFeatures & (1 << i)) != 0) {
                        mDecorContentParent.initFeature(i);
                    }
                }

                mDecorContentParent.setUiOptions(mUiOptions);

                if ((mResourcesSetFlags & FLAG_RESOURCE_SET_ICON) != 0 ||
                        (mIconRes != 0 && !mDecorContentParent.hasIcon())) {
                    mDecorContentParent.setIcon(mIconRes);
                } else if ((mResourcesSetFlags & FLAG_RESOURCE_SET_ICON) == 0 &&
                        mIconRes == 0 && !mDecorContentParent.hasIcon()) {
                    mDecorContentParent.setIcon(
                            getContext().getPackageManager().getDefaultActivityIcon());
                    mResourcesSetFlags |= FLAG_RESOURCE_SET_ICON_FALLBACK;
                }
                if ((mResourcesSetFlags & FLAG_RESOURCE_SET_LOGO) != 0 ||
                        (mLogoRes != 0 && !mDecorContentParent.hasLogo())) {
                    mDecorContentParent.setLogo(mLogoRes);
                }

                // Invalidate if the panel menu hasn"t been created before this.
                // Panel menu invalidation is deferred avoiding application onCreateOptionsMenu
                // being called in the middle of onCreate or similar.
                // A pending invalidation will typically be resolved before the posted message
                // would run normally in order to satisfy instance state restoration.
                PanelFeatureState st = getPanelState(FEATURE_OPTIONS_PANEL, false);
                if (!isDestroyed() && (st == null || st.menu == null)) {
                    invalidatePanelMenu(FEATURE_ACTION_BAR);
                }
            } else {
                mTitleView = (TextView)findViewById(R.id.title);
                if (mTitleView != null) {
                    mTitleView.setLayoutDirection(mDecor.getLayoutDirection());
                    if ((getLocalFeatures() & (1 << FEATURE_NO_TITLE)) != 0) {
                        View titleContainer = findViewById(
                                R.id.title_container);
                        if (titleContainer != null) {
                            titleContainer.setVisibility(View.GONE);
                        } else {
                            mTitleView.setVisibility(View.GONE);
                        }
                        if (mContentParent instanceof FrameLayout) {
                            ((FrameLayout)mContentParent).setForeground(null);
                        }
                    } else {
                        mTitleView.setText(mTitle);
                    }
                }
            }

            if (mDecor.getBackground() == null && mBackgroundFallbackResource != 0) {
                mDecor.setBackgroundFallback(mBackgroundFallbackResource);
            }

            // Only inflate or create a new TransitionManager if the caller hasn"t
            // already set a custom one.
            if (hasFeature(FEATURE_ACTIVITY_TRANSITIONS)) {
                if (mTransitionManager == null) {
                    final int transitionRes = getWindowStyle().getResourceId(
                            R.styleable.Window_windowContentTransitionManager,
                            0);
                    if (transitionRes != 0) {
                        final TransitionInflater inflater = TransitionInflater.from(getContext());
                        mTransitionManager = inflater.inflateTransitionManager(transitionRes,
                                mContentParent);
                    } else {
                        mTransitionManager = new TransitionManager();
                    }
                }

                mEnterTransition = getTransition(mEnterTransition, null,
                        R.styleable.Window_windowEnterTransition);
                mReturnTransition = getTransition(mReturnTransition, USE_DEFAULT_TRANSITION,
                        R.styleable.Window_windowReturnTransition);
                mExitTransition = getTransition(mExitTransition, null,
                        R.styleable.Window_windowExitTransition);
                mReenterTransition = getTransition(mReenterTransition, USE_DEFAULT_TRANSITION,
                        R.styleable.Window_windowReenterTransition);
                mSharedElementEnterTransition = getTransition(mSharedElementEnterTransition, null,
                        R.styleable.Window_windowSharedElementEnterTransition);
                mSharedElementReturnTransition = getTransition(mSharedElementReturnTransition,
                        USE_DEFAULT_TRANSITION,
                        R.styleable.Window_windowSharedElementReturnTransition);
                mSharedElementExitTransition = getTransition(mSharedElementExitTransition, null,
                        R.styleable.Window_windowSharedElementExitTransition);
                mSharedElementReenterTransition = getTransition(mSharedElementReenterTransition,
                        USE_DEFAULT_TRANSITION,
                        R.styleable.Window_windowSharedElementReenterTransition);
                if (mAllowEnterTransitionOverlap == null) {
                    mAllowEnterTransitionOverlap = getWindowStyle().getBoolean(
                            R.styleable.Window_windowAllowEnterTransitionOverlap, true);
                }
                if (mAllowReturnTransitionOverlap == null) {
                    mAllowReturnTransitionOverlap = getWindowStyle().getBoolean(
                            R.styleable.Window_windowAllowReturnTransitionOverlap, true);
                }
                if (mBackgroundFadeDurationMillis < 0) {
                    mBackgroundFadeDurationMillis = getWindowStyle().getInteger(
                            R.styleable.Window_windowTransitionBackgroundFadeDuration,
                            DEFAULT_BACKGROUND_FADE_DURATION_MS);
                }
                if (mSharedElementsUseOverlay == null) {
                    mSharedElementsUseOverlay = getWindowStyle().getBoolean(
                            R.styleable.Window_windowSharedElementsUseOverlay, true);
                }
            }
        }
    }
еПѓдї•зЬЛеИ∞ињЩйЗМдЄНдїЕеИЭеІЛеМЦmContentParentпЉМиАМдЄФеЬ®дєЛеЙНеЕИи∞ГзФ®generateDecor();еИЭеІЛеМЦдЇЖдЄАдЄ™mDecorпЉМmDecorжШѓDecorViewеѓєи±°пЉМдЄЇFrameLayoutзЪДе≠Рз±їгАВеєґйАЪињЗfindViewByIdињЫи°МиОЈеПЦжОІдїґгАВ¬†
generateLayout(mDecor)зМЬжµЛеЇФиѓ•жШѓзФ®жЭ•иОЈеПЦеИ∞дЇЖжИСдїђзЪДContentViewзЪДпЉЫеЕЈдљУжИСдїђжЭ•зЬЛдЄЛжЇРз†БгАВ
generateLayout
protected ViewGroup generateLayout(DecorView decor) {
// Apply data from current theme.
TypedArray a = getWindowStyle();
//...... //дЊЭжНЃдЄїйҐШstyleиЃЊзљЃдЄАе†ЖеАЉињЫи°МиЃЊзљЃ
int layoutResource;
int features = getLocalFeatures();
View in = mLayoutInflater.inflate(layoutResource, null);
decor.addView(in, new ViewGroup.LayoutParams(MATCH_PARENT, MATCH_PARENT));
mContentRoot = (ViewGroup) in;
ViewGroup contentParent = (ViewGroup)findViewById(ID_ANDROID_CONTENT);
if (contentParent == null)
{
throw new RuntimeException("Window couldn"t find content container view");
} //...... //зїІзї≠дЄАе†Же±ЮжАІиЃЊзљЃпЉМеЃМдЇЛињФеЫЮcontentParent
return contentParent;
}
дєЛеЙНжИСдїђиЃЊзљЃзХМйЭҐдЄїйҐШпЉИе¶ВNotitleпЉЙдЄїи¶БжЬЙдЄ§зІНжЦєеЉПпЉМдЄАзІНжШѓеЬ®xmlдЄ≠иЃЊзљЃпЉЪ
android:theme="@android:style/Theme.Black.NoTitleBar"
дЄАзІНжШѓи∞ГзФ®requestFeatureгАВ
requestWindowFeature(Window.FEATURE_NO_TITLE);
зђђдЄАзІНжЦєж≥ХеѓєеЇФзЪДе∞±жШѓgetWindowStyleжЦєж≥ХгАВиАМзђђдЇМзІНе∞±жШѓеЬ®getLocalFeaturesеЃМжИРзЪДгАВињЩе∞±жШѓдЄЇдїАдєИrequestWindowFeatureи¶БеЖЩеЬ®setContentViewжЦєж≥ХдєЛеЙНзЪДеОЯеЫ†гАВ¬†
жО•зЭАйАЪињЗmDecor.findViewByIdдЉ†еЕ•R.id.contentпЉМињФеЫЮmDecorпЉИеЄГе±АпЉЙдЄ≠зЪДidдЄЇcontentзЪДViewпЉМе∞±жШѓжИСдїђеЙНйЭҐиѓізЪДContentViewгАВеПѓдї•зЬЛеИ∞жИСдїђзЪДmDecorжШѓдЄАдЄ™FrameLayoutпЉМзДґеРОдЉЪж†єжНЃthemeеОїйАЙжЛ©з≥їзїЯдЄ≠зЪДеЄГе±АжЦЗдїґпЉМе∞ЖеЄГе±АжЦЗдїґйАЪињЗinflateиљђеМЦдЄЇviewпЉМеК†еЕ•еИ∞mDecorдЄ≠пЉЫињЩдЇЫеЄГе±АжЦЗдїґдЄ≠йГљеМЕеРЂдЄАдЄ™idдЄЇcontentзЪДFrameLayoutпЉМе∞ЖеЕґеЉХзФ®ињФеЫЮзїЩmContentParentгАВ¬†
з≠ЙжИСдїђзЪДmContentParentжЬЙеАЉдЇЖдї•еРОпЉМеЖНжђ°еЫЮеИ∞setContentViewдЄ≠пЉМеЃГдЉЪи∞ГзФ®дї•дЄЛжЦєж≥ХгАВ
mLayoutInflater.inflate(layoutResID, mContentParent);
жО•дЄЛжЭ•йЗНзВєзЬЛinflateжШѓе¶ВдљХеК†иљљеЄГе±АзЪДгАВ
inflate
public View inflate(XmlPullParser parser, ViewGroup root, boolean attachToRoot) {
        synchronized (mConstructorArgs) {
            Trace.traceBegin(Trace.TRACE_TAG_VIEW, "inflate");

            final AttributeSet attrs = Xml.asAttributeSet(parser);
            Context lastContext = (Context)mConstructorArgs[0];
            mConstructorArgs[0] = mContext;
            View result = root;

            try {
                // Look for the root node.
                int type;
                while ((type = parser.next()) != XmlPullParser.START_TAG &&
                        type != XmlPullParser.END_DOCUMENT) {
                    // Empty
                }

                if (type != XmlPullParser.START_TAG) {
                    throw new InflateException(parser.getPositionDescription()
                            + ": No start tag found!");
                }

                final String name = parser.getName();

                if (DEBUG) {
                    System.out.println("**************************");
                    System.out.println("Creating root view: "
                            + name);
                    System.out.println("**************************");
                }

                if (TAG_MERGE.equals(name)) {
                    if (root == null || !attachToRoot) {
                        throw new InflateException("<merge /> can be used only with a valid "
                                + "ViewGroup root and attachToRoot=true");
                    }

                    rInflate(parser, root, attrs, false, false);
                } else {
                    // Temp is the root view that was found in the xml
                    final View temp = createViewFromTag(root, name, attrs, false);

                    ViewGroup.LayoutParams params = null;

                    if (root != null) {
                        if (DEBUG) {
                            System.out.println("Creating params from root: " +
                                    root);
                        }
                        // Create layout params that match root, if supplied
                        params = root.generateLayoutParams(attrs);
                        if (!attachToRoot) {
                            // Set the layout params for temp if we are not
                            // attaching. (If we are, we use addView, below)
                            temp.setLayoutParams(params);
                        }
                    }

                    if (DEBUG) {
                        System.out.println("-----> start inflating children");
                    }
                    // Inflate all children under temp
                    rInflate(parser, temp, attrs, true, true);
                    if (DEBUG) {
                        System.out.println("-----> done inflating children");
                    }

                    // We are supposed to attach all the views we found (int temp)
                    // to root. Do that now.
                    if (root != null && attachToRoot) {
                        root.addView(temp, params);
                    }

                    // Decide whether to return the root that was passed in or the
                    // top view found in xml.
                    if (root == null || !attachToRoot) {
                        result = temp;
                    }
                }

            } catch (XmlPullParserException e) {
                InflateException ex = new InflateException(e.getMessage());
                ex.initCause(e);
                throw ex;
            } catch (IOException e) {
                InflateException ex = new InflateException(
                        parser.getPositionDescription()
                        + ": " + e.getMessage());
                ex.initCause(e);
                throw ex;
            } finally {
                // Don"t retain static reference on context.
                mConstructorArgs[0] = lastContext;
                mConstructorArgs[1] = null;
            }

            Trace.traceEnd(Trace.TRACE_TAG_VIEW);

            return result;
        }
    }
дї£з†БеЊИйХњпЉМдЄїи¶БеИЖдЄЇдї•дЄЛеЗ†ж≠•пЉЪ¬†
1.иІ£жЮРXMLзЪДж†єж†Зз≠ЊгАВ¬†
2.е¶ВжЮЬжШѓmergeпЉМи∞ГзФ®rInflateињЫи°МиІ£жЮРгАВеЃГдЉЪжККmergeжЙАжЬЙе≠РviewжЈїеК†еИ∞ж†єж†Зз≠ЊдЄ≠гАВ¬†
3.е¶ВжЮЬжШѓжЩЃйАЪж†Зз≠ЊпЉМи∞ГзФ®createViewFromTagињЫи°МиІ£жЮРгАВ¬†
4.и∞ГзФ®rInflateиІ£жЮРtempж†єеЕГзі†дЄЛзЪДе≠РviewгАВеєґжЈїеК†еИ∞tempдЄ≠гАВ¬†
жЬАеРОињФеЫЮrootгАВ¬†
зЬЛдЄЛcreateViewFromTagжШѓе¶ВдљХеК†иљљж†Зз≠ЊзЪДгАВ
View createViewFromTag(View parent, String name, AttributeSet attrs, boolean inheritContext) {
        if (name.equals("view")) {
            name = attrs.getAttributeValue(null, "class");
        }

        Context viewContext;
        if (parent != null && inheritContext) {
            viewContext = parent.getContext();
        } else {
            viewContext = mContext;
        }

        // Apply a theme wrapper, if requested.
        final TypedArray ta = viewContext.obtainStyledAttributes(attrs, ATTRS_THEME);
        final int themeResId = ta.getResourceId(0, 0);
        if (themeResId != 0) {
            viewContext = new ContextThemeWrapper(viewContext, themeResId);
        }
        ta.recycle();

        if (name.equals(TAG_1995)) {
            // Let"s party like it"s 1995!
            return new BlinkLayout(viewContext, attrs);
        }

        if (DEBUG) System.out.println("******** Creating view: " + name);

        try {
            View view;
            if (mFactory2 != null) {
                view = mFactory2.onCreateView(parent, name, viewContext, attrs);
            } else if (mFactory != null) {
                view = mFactory.onCreateView(name, viewContext, attrs);
            } else {
                view = null;
            }

            if (view == null && mPrivateFactory != null) {
                view = mPrivateFactory.onCreateView(parent, name, viewContext, attrs);
            }

            if (view == null) {
                final Object lastContext = mConstructorArgs[0];
                mConstructorArgs[0] = viewContext;
                try {
                    if (-1 == name.indexOf(".")) {
                        view = onCreateView(parent, name, attrs);
                    } else {
                        view = createView(name, null, attrs);
                    }
                } finally {
                    mConstructorArgs[0] = lastContext;
                }
            }

            if (DEBUG) System.out.println("Created view is: " + view);
            return view;

        } catch (InflateException e) {
            throw e;

        } catch (ClassNotFoundException e) {
            InflateException ie = new InflateException(attrs.getPositionDescription()
                    + ": Error inflating class " + name);
            ie.initCause(e);
            throw ie;

        } catch (Exception e) {
            InflateException ie = new InflateException(attrs.getPositionDescription()
                    + ": Error inflating class " + name);
            ie.initCause(e);
            throw ie;
        }
    }
дЄКйЭҐињЩдЄ™жЦєж≥ХдЄ≠пЉМе¶ВжЮЬдЉ†ињЗжЭ•зЪДеРНе≠Чж≤°жЬЙвАЬ.вАЭпЉМдЉЪиЃ§дЄЇжШѓдЄАдЄ™еЖЕзљЃviewгАВдЉЪи∞ГзФ®onCreateViewжЭ•иІ£жЮРињЩдЄ™ViewгАВPhoneLayoutInflaterзЪДonCreateViewе∞±жШѓдЄЇеЖЕзљЃзЪДViewеК†дЄКеЙНзЉАпЉМе¶Вandroid.widgetз≠ЙгАВзДґеРОеЖНи∞ГзФ®createView()жЭ•ињЫи°МviewзЪДжЮДйА†гАВ
public final View createView(String name, String prefix, AttributeSet attrs)
throws ClassNotFoundException, InflateException {
Constructor<? extends View> constructor = sConstructorMap.get(name);
Class<? extends View> clazz = null;
try {
Trace.traceBegin(Trace.TRACE_TAG_VIEW, name);
//constructorжШѓдїОзЉУе≠ШдЄ≠еПЦеЗЇзЪДжЮДйА†еЗљжХ∞
if (constructor == null) {
// Class not found in the cache, see if it"s real, and try to add it
//е¶ВжЮЬprefixдЄНдЄЇз©Їе∞±жЮДйА†viewиЈѓеЊДеєґеК†иљљ
clazz = mContext.getClassLoader().loadClass(
prefix != null ? (prefix + name) : name).asSubclass(View.class);
if (mFilter != null && clazz != null) {
boolean allowed = mFilter.onLoadClass(clazz);
if (!allowed) {
failNotAllowed(name, prefix, attrs);
}
}
constructor = clazz.getConstructor(mConstructorSignature);
sConstructorMap.put(name, constructor);
} else {
// If we have a filter, apply it to cached constructor
if (mFilter != null) {
// Have we seen this name before?
Boolean allowedState = mFilterMap.get(name);
if (allowedState == null) {
// New class -- remember whether it is allowed
//йАЪињЗеПНе∞ДжЮДйА†view
clazz = mContext.getClassLoader().loadClass(
prefix != null ? (prefix + name) : name).asSubclass(View.class);
boolean allowed = clazz != null && mFilter.onLoadClass(clazz);
mFilterMap.put(name, allowed);
if (!allowed) {
failNotAllowed(name, prefix, attrs);
}
} else if (allowedState.equals(Boolean.FALSE)) {
failNotAllowed(name, prefix, attrs);
}
}
}
Object[] args = mConstructorArgs;
args[1] = attrs;
constructor.setAccessible(true);
final View view = constructor.newInstance(args);
if (view instanceof ViewStub) {
// Use the same context when inflating ViewStub later.
final ViewStub viewStub = (ViewStub) view;
viewStub.setLayoutInflater(cloneInContext((Context) args[0]));
}
return view;
} catch (NoSuchMethodException e) {
InflateException ie = new InflateException(attrs.getPositionDescription()
+ ": Error inflating class "
+ (prefix != null ? (prefix + name) : name));
ie.initCause(e);
throw ie;
} catch (ClassCastException e) {
// If loaded class is not a View subclass
InflateException ie = new InflateException(attrs.getPositionDescription()
+ ": Class is not a View "
+ (prefix != null ? (prefix + name) : name));
ie.initCause(e);
throw ie;
} catch (ClassNotFoundException e) {
// If loadClass fails, we should propagate the exception.
throw e;
} catch (Exception e) {
InflateException ie = new InflateException(attrs.getPositionDescription()
+ ": Error inflating class "
+ (clazz == null ? "<unknown>" : clazz.getName()));
ie.initCause(e);
throw ie;
} finally {
Trace.traceEnd(Trace.TRACE_TAG_VIEW);
}
}
еПИжШѓдЄАе§Іе†Ждї£з†БпЉМдљЖеЃГеЕґеЃЮе∞±жШѓдљњзФ®viewзЪДеЃМжХіиЈѓеЊДе∞Жз±їеК†иљљеИ∞иЩЪжЛЯжЬЇдЄ≠пЉМйАЪињЗжЮДйА†еЗљжХ∞жЭ•еИЫеїЇviewеѓєи±°пЉМињЩдЄ™ињЗз®ЛжШѓйАЪињЗеПНе∞ДгАВжЬАеРОињФеЫЮviewгАВињЩдЄ™е∞±иІ£жЮРдЇЖеНХдЄ™viewгАВйВ£е¶ВжЮЬжШѓдЄАж£µж†СпЉМеИЩдЇ§зїЩrInflateжЭ•е§ДзРЖгАВзЬЛдЄЛдї£з†БпЉЪ
void rInflate(XmlPullParser parser, View parent, final AttributeSet attrs,
boolean finishInflate, boolean inheritContext) throws XmlPullParserException,
IOException {
final int depth = parser.getDepth();
int type;
while (((type = parser.next()) != XmlPullParser.END_TAG ||
parser.getDepth() > depth) && type != XmlPullParser.END_DOCUMENT) {
if (type != XmlPullParser.START_TAG) {
continue;
}
final String name = parser.getName();
if (TAG_REQUEST_FOCUS.equals(name)) {
parseRequestFocus(parser, parent);
} else if (TAG_TAG.equals(name)) {
parseViewTag(parser, parent, attrs);
} else if (TAG_INCLUDE.equals(name)) {
if (parser.getDepth() == 0) {
throw new InflateException("<include /> cannot be the root element");
}
parseInclude(parser, parent, attrs, inheritContext);
} else if (TAG_MERGE.equals(name)) {
throw new InflateException("<merge /> must be the root element");
} else {
final View view = createViewFromTag(parent, name, attrs, inheritContext);
final ViewGroup viewGroup = (ViewGroup) parent;
final ViewGroup.LayoutParams params = viewGroup.generateLayoutParams(attrs);
rInflate(parser, view, attrs, true, true);
viewGroup.addView(view, params);
}
}
if (finishInflate) parent.onFinishInflate();
}
/**
* Parses a <code><request-focus></code> element and requests focus on
* the containing View.
*/
private void parseRequestFocus(XmlPullParser parser, View view)
throws XmlPullParserException, IOException {
int type;
view.requestFocus();
final int currentDepth = parser.getDepth();
while (((type = parser.next()) != XmlPullParser.END_TAG ||
parser.getDepth() > currentDepth) && type != XmlPullParser.END_DOCUMENT) {
// Empty
}
}
жЩЃеЄМйЗСйАЪињЗжЈ±еЇ¶дЉШеЕИйБНеОЖжЭ•жЮДйА†иІЖеЫЊж†СгАВжѓПиІ£жЮРдЄАдЄ™viewе∞±дЉЪйАТељТи∞ГзФ®rInflateгАВviewзЪДзїУжЮДдЄАе±ВеМЕдЄАе±ВпЉМеЕґеЃЮе∞±жШѓж†ЗеЗЖзЪДзїДеРИиЃЊиЃ°ж®°еЉПеЃЮзО∞зЪДгАВжХідЄ™иІЖеЫЊжЮДеїЇеЃМеРОе∞±дЉЪеЬ®onResumeдєЛеРОпЉМеЖЕеЃєе∞±дЉЪеЗЇзО∞еЬ®зХМйЭҐдЄ≠гАВ¬†
еИ∞ж≠§пЉМLayoutInflaterеК†иљљViewзЪДињЗз®Ле∞±еИЖжЮРеЃМдЇЖгАВињШжШѓжѓФиЊГзЃАеНХжШУжЗВзЪДгАВ
еЄГе±АеК†иљљдЉШеМЦ
йАЪињЗдЄКйЭҐзЪДеИЖжЮРпЉМжИСдїђеПѓдї•жПРеЗЇеЗ†зВєеЄЄзФ®зЪДеЄГе±АдЉШеМЦжЙЛжЃµпЉЪ¬†
1.е∞љйЗПдљњзФ®зЫЄеѓєеЄГе±АпЉМеЗПе∞СдЄНењЕи¶Бе±ВзЇІзїУжЮДгАВ¬†
2.дљњзФ®mergeе±ЮжАІгАВдљњзФ®еЃГеПѓдї•жЬЙжХИзЪДе∞ЖжЯРдЇЫзђ¶еРИжЭ°дїґзЪДе§ЪдљЩзЪДе±ВзЇІдЉШеМЦжОЙпЉМдљњзФ®mergeж†Зз≠ЊињШжШѓжЬЙдЄАдЇЫйЩРеИґзЪДпЉМеЕЈдљУжШѓпЉЪmergeеП™иГљзФ®еЬ®еЄГе±АXMLжЦЗдїґзЪДж†єеЕГзі†пЉЫдљњзФ®mergeжЭ•inflateдЄАдЄ™еЄГе±АжЧґпЉМењЕй°їжМЗеЃЪдЄАдЄ™ViewGroupдљЬдЄЇеЕґзИґеЕГзі†пЉМеєґдЄФи¶БиЃЊзљЃinflateзЪДattachToRootеПВжХ∞дЄЇtrueгАВпЉЫдЄНиГљеЬ®ViewStubдЄ≠дљњзФ®mergeж†Зз≠ЊгАВ¬†
3.дљњзФ®ViewStubгАВдЄАдЄ™иљїйЗПзЇІзЪДй°µйЭҐпЉМжИСдїђйАЪеЄЄдљњзФ®еЃГжЭ•еБЪйҐДеК†иљље§ДзРЖпЉМжЭ•жФєеЦДй°µйЭҐеК†иљљйАЯеЇ¶еТМжПРйЂШжµБзХЕжАІпЉМViewStubжЬђиЇЂдЄНдЉЪеН†зФ®е±ВзЇІпЉМеЃГжЬАзїИдЉЪ襀еЃГжМЗеЃЪзЪДе±ВзЇІеПЦдї£гАВViewStubдєЯжШѓжЬЙдЄАдЇЫзЉЇзВєпЉМи≠ђе¶ВпЉЪViewStubеП™иГљInflateдЄАжђ°пЉМдєЛеРОViewStubеѓєи±°дЉЪ襀皁䪯穯гАВVIewStubдЄ≠дЄНиГљеµМе•Чmergeж†Зз≠ЊгАВ¬†
4.дљњзФ®includeгАВињЩдЄ™ж†Зз≠ЊжШѓдЄЇдЇЖеЄГе±АйЗНзФ®гАВ¬†
ељУзДґињШжЬЙеЊИе§ЪдЉШеМЦжЙЛжЃµеТМеЈ•еЕЈеПѓдї•дљњзФ®пЉМеЬ®ж≠§дЄНдЄАдЄАзљЧеИЧгАВеЕ≥дЇОеЄГе±АињШжШѓжЬЙеЊИе§ІзЪДе≠¶йЧЃи¶БеОїжЈ±еЕ•з†Фз©ґзЪДгАВ