

жң¬йЎ№зӣ®жҳҜйҖҡеҠӣеҹәйҮ‘зҡ„е•Ҷдёҡзә§йЎ№зӣ®пјҢеЈ°жҳҺпјҡеңЁжӯӨд»…з”ЁдәҺдәӨжөҒеӯҰд№ гҖӮиҜҘйЎ№зӣ®дё»иҰҒжңүдёүдёӘдё»иҰҒеҠҹиғҪжЁЎеқ—пјҡ1гҖҒеҹәйҮ‘жЁЎеқ—пјҡеҢ…жӢ¬еҹәйҮ‘зҡ„жҹҘиҜўгҖҒеұ•зӨәзӯүеҠҹиғҪпјӣ2гҖҒиҙҰжҲ·жЁЎеқ—пјҡеҢ…жӢ¬зҷ»еҪ•гҖҒе……еҖјгҖҒжҸҗзҺ°гҖҒ收и—ҸзӯүеҠҹиғҪпјӣ3гҖҒиҫ…еҠ©жЁЎеқ—пјҡж¶ҲжҒҜдёӯеҝғгҖҒеё®еҠ©гҖҒж„Ҹи§ҒеҸҚйҰҲзӯүгҖӮ
йЎ№зӣ®иҝҗиЎҢйҰ–е…ҲдјҡжңүдёҖдёӘй—ӘеұҸйЎөпјҢ然еҗҺиҝӣе…Ҙзҡ„жҳҜдёҖдёӘж–°жүӢеј•еҜјйЎөпјҲеҸӘжҳҫзӨәдёҖж¬ЎпјүпјҢеҸҜд»Ҙеҗ‘еҸіж»‘еҠЁпјҢе…ұ4йЎөеӣҫзүҮпјҢеҪ“ж»‘еҲ°жңҖеҗҺдёҖеј ж—¶пјҢеӣҫзүҮдёӯдјҡжңүдёҖдёӘиҝӣе…Ҙзҡ„жҢүй’®пјҢзӮ№еҮ»иҝҷдёӘжҢүй’®иҝӣеҸҜд»Ҙиҝӣе…ҘеҲ°Appзҡ„дё»йЎөгҖӮВ
дё»йЎөдёӯпјҡдёӢйқўжҳҜ4дёӘеҜјиҲӘпјҢж №жҚ®з”ЁжҲ·зӮ№еҮ»зҡ„дёҚеҗҢпјҢдјҡеҲҮжҚўиҮідёҚеҗҢзҡ„з•ҢйқўгҖӮ
okпјҢжҲ‘们зҺ°еңЁејҖе§ӢжқҘеҲҶдә«дёҖдёӢиҝҷдёӘиҪҜ件зҡ„е®һзҺ°иҝҮзЁӢгҖӮж–°жүӢеј•еҜјйЎөзҡ„иҜқеҫҲз®ҖеҚ•пјҢеҫҲеӨҡдәәйғҪеҒҡиҝҮгҖӮжҖ»д№Ӣе°ұжҳҜдҪҝз”ЁдёҖдёӘviewPagerжқҘе®һзҺ°пјҢдҪҝз”ЁдёҖдёӘpagerAdapterжқҘеЎ«е……viewpagerзҡ„еҶ…е®№пјҢеҰӮжһңзӣҙжҺҘ继жүҝpagerAdapterиҝҷдёӘжҠҪиұЎзұ»пјҢйңҖиҰҒйҮҚеҶҷgetCount()гҖҒisViewFromObject()гҖҒdestroyItem()гҖҒinstantiateItem()зӯү4дёӘж–№жі•жүҚеҸҜд»ҘдёәviewpagerеЎ«е……еҶ…е®№гҖӮжҲ‘д»ҘеүҚзҡ„еҚҡе®ўдёӯиҜҰз»Ҷд»Ӣз»ҚдәҶж–°жүӢеј•еҜјйЎөзҡ„ејҖеҸ‘пјҢдј йҖҒй—Ёпјҡhttp://blog.csdn.net/sdksdk0/article/details/50043843В В В В зӮ№еҮ»жү“ејҖй“ҫжҺҘгҖӮжүҖд»ҘиҝҷйҮҢе°ұдёҚеҶҚйҮҚеӨҚеҶҷдәҶгҖӮ
дёӢйқўжқҘеҲҶдә«дёҖдёӘиҝҷдёӘдё»з•Ңйқўзҡ„и®ҫи®ЎпјҢйҰ–е…ҲдҪҝз”Ёзҡ„жҳҜдёҖдёӘйқһеёёз»Ҹе…ёзҡ„ж–№жі•пјҡTabHostгҖӮTabHostе…Ғи®ёе°ҶеӨҡдёӘжҺ§д»¶ж”ҫеңЁеҗҢдёҖдёӘеҢәеҹҹеҶ…пјҢ然еҗҺйҖҡиҝҮзӮ№еҮ»жҢүй’®жқҘжӣҝжҚўпјҢиҝҷж ·е°ұдёҚз”Ёи°ғз”ЁFragmentManagerжқҘиҝӣиЎҢжӣҝжҚўзҡ„ж“ҚдҪңгҖӮ
дёӢйқўжқҘзңӢдёҖдёӢиҝҷдёӘдё»з•Ңйқўзҡ„еёғеұҖж–Ү件пјҡ
<?xml version="1.0" encoding="utf-8"?>
<RelativeLayout xmlns:android="http://schemas.android.com/apk/res/android"
    android:layout_width="match_parent"
    android:layout_height="match_parent">

    <TabHost
        android:id="@android:id/tabhost"
        android:layout_width="match_parent"
        android:layout_height="match_parent"
        android:visibility="visible">

        <RelativeLayout
            android:id="@+id/content_view"
            android:layout_width="match_parent"
            android:layout_height="match_parent">

            <FrameLayout
                android:id="@android:id/tabcontent"
                android:layout_width="match_parent"
                android:layout_height="match_parent"
                android:layout_above="@+id/bottom_view">

                <fragment
                    android:id="@+id/jijin_view"
                    android:name="com.zhilinghui.fund.fragment.JijinFragment"
                    android:layout_width="match_parent"
                    android:layout_height="match_parent" />

                <fragment
                    android:id="@+id/member_view"
                    android:name="com.zhilinghui.fund.fragment.MemberFragment"
                    android:layout_width="match_parent"
                    android:layout_height="match_parent" />
                <RelativeLayout
                    android:id="@+id/fs_view"
                    android:layout_width="match_parent"
                    android:layout_height="match_parent">

                    <fragment
                        android:name="com.zhilinghui.fund.fragment.FSFragment"
                        android:layout_width="match_parent"
                        android:layout_height="match_parent" />
                </RelativeLayout>

                <fragment
                    android:id="@+id/settings_view"
                    android:name="com.zhilinghui.fund.fragment.SettingsFragment"
                    android:layout_width="match_parent"
                    android:layout_height="match_parent" />
            </FrameLayout>

            <RelativeLayout
                android:id="@+id/bottom_view"
                android:layout_width="match_parent"
                android:layout_height="wrap_content"
                android:layout_alignParentBottom="true"
                android:background="@drawable/tab_bar_bg"
                android:gravity="center_vertical">

                <TabWidget
                    android:id="@android:id/tabs"
                    android:layout_width="match_parent"
                    android:layout_height="wrap_content" />

                <ImageView
                    android:id="@+id/tab_selected"
                    android:layout_width="wrap_content"
                    android:layout_height="wrap_content"
                    android:adjustViewBounds="true"
                    android:background="@drawable/tab_scroll"
                    android:contentDescription="@null"
                    android:visibility="gone" />

                <ImageView
                    android:id="@+id/notice_logo"
                    android:layout_width="wrap_content"
                    android:layout_height="wrap_content"
                    android:layout_alignParentRight="true"
                    android:layout_marginRight="12dp"
                    android:layout_marginTop="10dp"
                    android:adjustViewBounds="true"
                    android:background="@drawable/notice_logo"
                    android:contentDescription="@null"
                    android:visibility="gone" />
            </RelativeLayout>
        </RelativeLayout>
    </TabHost>

    <RelativeLayout
        android:id="@+id/index_view"
        android:layout_width="match_parent"
        android:layout_height="match_parent"
        android:background="@color/transparent"
        android:orientation="vertical">

        <android.support.v4.view.ViewPager
            android:id="@+id/viewpager_index"
            android:layout_width="match_parent"
            android:layout_height="match_parent" />

        <com.zhilinghui.fund.widget.PageControlView
            android:id="@+id/pageControlView_index"
            android:layout_width="wrap_content"
            android:layout_height="wrap_content"
            android:layout_alignParentBottom="true"
            android:layout_centerHorizontal="true"
            android:layout_marginBottom="30dp" />
    </RelativeLayout>
еңЁActivityдёӯиҰҒжүҫеҲ°иҝҷдәӣжҢүй’®пјҡ
setContentView(R.layout.a_main);
bottom_view = (RelativeLayout) findViewById(R.id.bottom_view);

mTabHost = (TabHost) findViewById(android.R.id.tabhost);
mTabs = (TabWidget) findViewById(android.R.id.tabs);
mTabs.setDividerDrawable(null);
д»ҺдёҠйқўзҡ„еёғеұҖж–Ү件дёӯпјҢжҲ‘们еҸҜд»ҘзңӢеҲ°пјҢиҝҷдёӘTabHostйҮҢйқўжҳҜеҠ дәҶеӣҫзүҮе’Ңж–Үеӯ—зҡ„пјҢиҝҷж ·зңӢиө·жқҘдјҡжӣҙеҠ зҫҺи§ӮдёҖзӮ№пјҢж·»еҠ еӣҫзүҮзҡ„ж–№жі•еҰӮдёӢпјҡ
tab01 = (LinearLayout) LayoutInflater.from(this).inflate(R.layout.item_tab_view, null);
tab01.setBackgroundResource(R.drawable.tab_jijin_drawable);
tab02 = (LinearLayout) LayoutInflater.from(this).inflate(R.layout.item_tab_view, null);
tab02.setBackgroundResource(R.drawable.tab_member_drawable);
tab03 = (LinearLayout) LayoutInflater.from(this).inflate(R.layout.item_tab_view, null);
tab03.setBackgroundResource(R.drawable.tab_fs_drawable);
tab04 = (LinearLayout) LayoutInflater.from(this).inflate(R.layout.item_tab_view, null);
tab04.setBackgroundResource(R.drawable.tab_settings_drawable);
mTabHost.addTab(mTabHost.newTabSpec("0")
.setIndicator(tab01)
.setContent(R.id.jijin_view));
mTabHost.addTab(mTabHost.newTabSpec("1")
.setIndicator(tab02)
.setContent(R.id.member_view));
mTabHost.addTab(mTabHost.newTabSpec("2")
.setIndicator(tab03)
.setContent(R.id.fs_view));
mTabHost.addTab(mTabHost.newTabSpec("3")
.setIndicator(tab04)
.setContent(R.id.settings_view));
mTabHost.setCurrentTab(0); //и®ҫеҪ“еүҚ Tab дёә 0
ж·»еҠ зӮ№еҮ»дәӢ件пјҡ
mTabHost.setOnTabChangedListener(mOnTabChangeListener);
и®ҫзҪ®йҖӮй…ҚеҷЁпјҡ
// еҜјиҲӘж ҸйҖӮй…ҚеҷЁ
adapter = new NavigatePagerAdapter(this, ids, mIndexOverListener, page_control);
viewpager.setAdapter(adapter);
viewpager.setOnPageChangeListener(mOnPageChangeListener);
пјҲеӣ дёәжҲ‘иҷҡжӢҹжңәзҡ„еҲҶиҫЁзҺҮжІЎи®ҫзҪ®еҘҪпјҢиІҢдјјеӣҫзүҮжңүзӮ№еӨұзңҹдәҶпјү
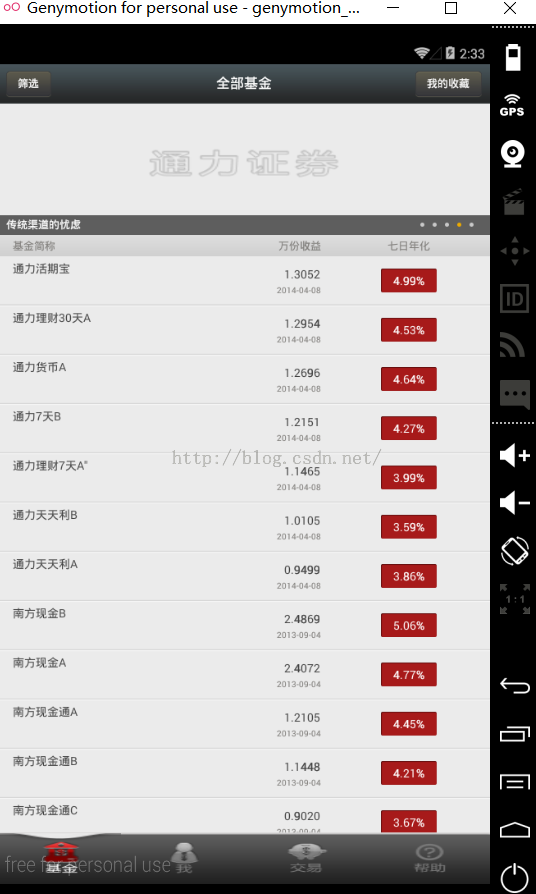
еңЁз¬¬дёҖйЎөдёӯдёҠйқўйӮЈдёӘеҸҜд»Ҙж»‘еҠЁзҡ„иҮӘ然д№ҹжҳҜдёҖдёӘviewpagerдәҶпјҢдёӢйқўе°ұжҳҜдёҖдёӘlistview第дёҖдёӘйЎөйқўиҝҳе…·жңүдёӢеҲ—еҲ·ж–°пјҲеҢ…жӢ¬дёҠдёӢз®ӯеӨҙе’Ңж—¶й—ҙпјүе’ҢеҠ иҪҪжӣҙеӨҡзҡ„еҠҹиғҪгҖӮеҹәйҮ‘жҳҜжңүдёҖдёӘеҗҺеҸ°зҡ„пјҢд»ҺжңҚеҠЎеҷЁдј иҫ“ж•°жҚ®жҳҫзӨәеңЁиҝҷдёӘиҪ®ж’ӯжқЎдёҠйқўгҖӮдёӢйқўзҡ„ж•°жҚ®жқЎзӣ®д№ҹжҳҜдёҖж ·пјҢеӣ дёәиҝҷйҮҢжІЎжңүиҝҮеӨҡзҡ„еӣҫзүҮпјҢжүҖд»ҘдёҚйңҖиҰҒи®ҫзҪ®еӣҫзүҮзј“еӯҳпјҲиҖҢжҹҗдәӣйЎ№зӣ®зҡ„listviewжқЎзӣ®дёӯжңүеӣҫзүҮзҡ„иҜқпјҢжҲ‘们е°ұеә”иҜҘиҰҒиҖғиҷ‘еўһеҠ еӣҫзүҮзј“еӯҳеҠҹиғҪдәҶпјҢд»ҺиҖҢйҒҝе…ҚеӨӘиҖ—з”ЁжҲ·жөҒйҮҸжҲ–еҶ…еӯҳжәўеҮәзӯүй—®йўҳпјүгҖӮеҪ“жҲ‘们зӮ№еҮ»иҝҷдёӘеҹәйҮ‘иҝӣеҺ»зҡ„ж—¶еҖҷпјҢдҫӢеҰӮ第дёҖдёӘвҖңжҙ»жңҹйҖҡеҠӣе®қ",е°ұдјҡи·іиҪ¬еҲ°еҸҰдёҖдёӘз•ҢйқўпјҢиҝҷйҮҢиҜҰз»Ҷзҡ„жҸҸиҝ°дәҶиҜҘеҹәйҮ‘зҡ„дҝЎжҒҜпјҢдҫӢеҰӮеҹәйҮ‘з»ҸзҗҶгҖҒеҹәйҮ‘д»Јз ҒгҖҒ收зӣҠзҺҮгҖҒеҗҢзұ»жҺ’еҗҚзӯүеҶ…е®№пјҢ然еҗҺиҝҳдјҡеҠ дёҠдёҖдёӘжҠҳзәҝеӣҫпјҢд»ҺиҖҢжӣҙеҠ жё…жҷ°зҡ„жҸҸиҝ°иҝҷдёӘйЎ№зӣ®пјҢз»ҷз”ЁжҲ·еёҰжқҘжӣҙеҘҪзҡ„дҪ“йӘҢгҖӮиҝҳжңүе°ұжҳҜеҪ“ж•°жҚ®дёҺеҗҺеҸ°дј иҫ“зҡ„ж—¶еҖҷпјҢеңЁиҝҷдёӘз•ҢйқўиҝҳдјҡжңүдёҖдёӘеңҶеңҲеңЁиҪ¬еҠЁпјҢиӢҘзҪ‘з»ңж— жі•иҝһжҺҘпјҢеҲҷдјҡжңүдёҖдёӘжҲ‘们иҮӘе®ҡд№үеҘҪдәҶзҡ„жҸҗзӨәз•ҢйқўпјҢиҜҙзҪ‘з»ңж— жі•иҝһжҺҘгҖӮпјҲеңЁиҝҷйҮҢдёҚжҸҗдҫӣе…¬еҸёзҡ„еҗҺеҸ°жҺҘеҸЈпјҢжүҖд»ҘиҝҷйҮҢзҡ„ж•°жҚ®иҷҡжӢҹеҢ–дәҶжҳҫзӨәпјүгҖӮ
@Override
public void onRefresh() {
    mController.execute(new UIAsyncTask(getFavHandler, mDatabaseAdapter, BaseHandlerUI.REQUEST_GET_FAV));
}

@Override
public void onLoadMore() {
    onLoad();
}

private void onLoad() {
    mListView.stopRefresh();
    mListView.stopLoadMore();
}
@SuppressLint("SetJavaScriptEnabled")
private void loadUrl() {
showProgressDialog(context, context.getString(R.string.dlg_loading));
thread = new Thread(new Runnable() {
@SuppressWarnings("deprecation")
@Override
public void run() {
webview.getSettings().setJavaScriptEnabled(true);
// webview.getSettings().setPluginsEnabled(true);
webview.getSettings().setSupportZoom(true);
webview.getSettings().setBuiltInZoomControls(true);
//еҠ иҪҪurlеүҚпјҢи®ҫзҪ®еӣҫзүҮйҳ»еЎһ
webview.getSettings().setBlockNetworkImage(true);
webview.loadUrl(bean.url);
MyWebViewClient myWebView = new MyWebViewClient();
webview.setWebViewClient(myWebView);
}
});
thread.start();
}
е…ЁйғЁеҹәйҮ‘listviewзҡ„йҖӮй…Қпјҡ
@SuppressLint("ResourceAsColor")
public class Text_Adapter
extends BaseAdapter {
List<FundTitleBean> items = new ArrayList<FundTitleBean>();
private LayoutInflater mInflater;
private OnClickListener mOnClick;
Context context;
private boolean left = true;
public Text_Adapter(Context context, List<FundTitleBean> items,
OnClickListener mOnClick, boolean left) {
super();
this.context = context;
this.mInflater = LayoutInflater.from(context);
this.items = items;
this.mOnClick = mOnClick;
this.left = left;
}
@Override
public int getCount() {
return items.size();
}
@Override
public Object getItem(int position) {
return position;
}
@Override
public long getItemId(int position) {
return position;
}
@Override
public View getView(int position, View convertView, ViewGroup parent) {
ViewHolder holder; // ViewHolder жҳҜеҶ…йғЁзұ», еҸӘжңүдёҖдёӘжҲҗе‘ҳ(name) TextView
if (convertView == null) {
holder = new ViewHolder();
convertView = mInflater.inflate(R.layout.item_list_txt_view, null);
holder.name = (TextView) convertView
.findViewById(R.id.name); // иҝҷйҮҢзҡ„ name жҳҜдёҖдёӘ TextView
convertView.setTag(holder);
} else {
holder = (ViewHolder) convertView.getTag(); //getTag иҝ”еӣһ: дёҖдёӘ Object еј•з”Ё
}
holder.name.setOnClickListener(mOnClick);
holder.name.setTag(position);
holder.name.setText(items.get(position).name);
if (items.get(position).isSelected) {
if (left) {
convertView.setBackgroundResource(R.drawable.choose_s_left);
} else {
convertView.setBackgroundResource(R.drawable.choose_s_right);
}
} else {
convertView.setBackgroundResource(R.drawable.choose_list_selector);
}
return convertView;
}
private class ViewHolder {
TextView name;
}
}
ж— зҪ‘з»ңж—¶зҡ„й”ҷиҜҜжҸҗзӨәActivityд»Јз Ғпјҡ
public void initView() {
    title = (TextView) findViewById(R.id.title_txt);
    title.setText(getString(R.string.dlg_net_err));
    left_btn = (TextView) findViewById(R.id.left_btn);
    left_btn.setVisibility(View.VISIBLE);
    left_btn.setOnClickListener(this);
    left_btn.setVisibility(View.VISIBLE);
    right_btn = (TextView) findViewById(R.id.right_btn);
    right_btn.setVisibility(View.GONE);
}
иҜҙеҲ°иҝҷйҮҢпјҢиҝҳйңҖиҰҒеҲҶдә«дёҖдёӘзҹҘиҜҶе°ұжҳҜе…ідәҺApplicationзҡ„дҪҝз”ЁпјҡеңЁеҫҲеӨҡеӨ§еһӢйЎ№зӣ®дёӯйғҪдјҡжңү
Applicationе’ҢActovotu,ServiceдёҖж ·жҳҜandroidжЎҶжһ¶зҡ„дёҖдёӘзі»з»ҹ组件пјҢеҪ“androidзЁӢеәҸеҗҜеҠЁж—¶зі»з»ҹдјҡеҲӣе»әдёҖдёӘ applicationеҜ№иұЎпјҢз”ЁжқҘ
* еӯҳеӮЁзі»з»ҹзҡ„дёҖдәӣдҝЎжҒҜгҖӮйҖҡеёёжҲ‘们жҳҜдёҚйңҖиҰҒжҢҮе®ҡдёҖдёӘApplicationзҡ„пјҢиҝҷж—¶зі»з»ҹдјҡиҮӘеҠЁеё®жҲ‘们еҲӣе»әпјҢеҰӮжһңйңҖиҰҒеҲӣе»әиҮӘе·ұ зҡ„ApplicationпјҢд№ҹеҫҲз®Җ
* еҚ•еҲӣе»әдёҖдёӘзұ»з»§жүҝ Application并еңЁmanifestзҡ„applicationж ҮзӯҫдёӯиҝӣиЎҢжіЁеҶҢ(еҸӘйңҖиҰҒз»ҷApplicationж ҮзӯҫеўһеҠ дёӘnameеұһжҖ§жҠҠиҮӘе·ұ
* зҡ„ Applicationзҡ„еҗҚеӯ—е®ҡе…ҘеҚіеҸҜ)гҖӮ
* androidзі»з»ҹдјҡдёәжҜҸдёӘзЁӢеәҸиҝҗиЎҢж—¶еҲӣе»әдёҖдёӘApplicationзұ»зҡ„еҜ№иұЎдё”д»…еҲӣе»әдёҖдёӘпјҢжүҖд»ҘApplicationеҸҜд»ҘиҜҙжҳҜеҚ•дҫӢ (singleton)жЁЎејҸзҡ„дёҖдёӘзұ».дё”
* applicationеҜ№иұЎзҡ„з”ҹе‘Ҫе‘ЁжңҹжҳҜж•ҙдёӘзЁӢеәҸдёӯжңҖй•ҝзҡ„пјҢе®ғзҡ„з”ҹе‘Ҫе‘Ёжңҹе°ұзӯүдәҺиҝҷдёӘзЁӢеәҸзҡ„з”ҹе‘Ҫе‘ЁжңҹгҖӮеӣ дёәе®ғжҳҜе…ЁеұҖ зҡ„еҚ•дҫӢзҡ„пјҢжүҖд»ҘеңЁдёҚеҗҢзҡ„Activity,Serviceдёӯ
* иҺ·еҫ—зҡ„еҜ№иұЎйғҪжҳҜеҗҢдёҖдёӘеҜ№иұЎгҖӮжүҖд»ҘйҖҡиҝҮApplicationжқҘиҝӣиЎҢдёҖдәӣпјҢж•°жҚ®дј йҖ’пјҢж•°жҚ®е…ұдә« зӯү,ж•°жҚ®зј“еӯҳзӯүж“ҚдҪңгҖӮ
* <p/>
* дәҢ.зЁӢеәҸзҡ„е…ҘеҸЈ
* AndroidдҪҝз”ЁGoogle Dalvik VMпјҢзӣёеҜ№дәҺдј з»ҹJava VMиҖҢиЁҖжңүзқҖеҫҲеӨ§зҡ„дёҚеҗҢпјҢеңЁSunзҡ„JavaдҪ“зі»дёӯе…ҘеҸЈзӮ№е’Ңж ҮеҮҶcиҜӯиЁҖдёҖж ·жҳҜmain()пјҢ
* иҖҢжҜҸдёӘAndroidзЁӢеәҸйғҪеҢ…еҗ«зқҖдёҖдёӘApplicationе®һдҫӢпјҢдёҖдёӘApplicationе®һдҫӢдёӯжңүеӨҡдёӘActivityгҖҒ ServiceгҖҒContentProviderжҲ–
* Broadcast ReceiverгҖӮ
* е…¶е®һеңЁandroid.app.ApplicationиҝҷдёӘеҢ…зҡ„onCreateжүҚжҳҜзңҹжӯЈзҡ„Androidе…ҘеҸЈзӮ№пјҢеҸӘдёҚиҝҮеӨ§еӨҡж•°ејҖеҸ‘иҖ…ж— йңҖйҮҚеҶҷиҜҘзұ»гҖӮ
* <p/>
* 第дёҖжӯҘгҖҒеҶҷдёҖдёӘе…ЁеұҖзҡ„еҚ•дҫӢжЁЎејҸзҡ„MyApplication继жүҝиҮӘApplication йҮҚеҶҷonCreate
* 第дәҢжӯҘгҖҒй…ҚзҪ®е…ЁеұҖзҡ„Context
* <application
android:name="com.zhilinghui.fund.app.GFFApp"></application>
okпјҢд»ҠеӨ©дё»иҰҒжҳҜеҲҶдә«дәҶдёҖдёӢиҝҷдёӘе•Ҷдёҡзә§еҹәйҮ‘йЎ№зӣ®зҡ„еҜјиҲӘи®ҫзҪ®е’Ң第дёҖдёӘз•ҢйқўпјҲдё»з•Ңйқўпјүзҡ„и®ҫи®ЎдёҺеҠҹиғҪд»Ӣз»ҚгҖӮдёӢдёҖж¬Ўе°ҶеҲҶдә«вҖқдёӘдәәдёӯеҝғвҖңгҖҒвҖқдәӨжҳ“з•Ңйқў"гҖҒвҖңеё®еҠ©дёӯеҝғвҖқзҡ„и®ҫи®ЎдёҺе®һзҺ°пјҢеҪ“然пјҢеңЁдёӢдёҖзҜҮеҚҡе®ўдёӯжҲ‘дјҡиҙҙеҮәиҝҷдёӘйЎ№зӣ®зҡ„жәҗз Ғе“ҰпјҒд»ҠеӨ©зҡ„е°ұжҡӮдёҚжҸҗдҫӣжәҗз ҒпјҢж¬ўиҝҺе…іжіЁпјҒ