Much of the essence of building a program is in fact the debugging of the specification. - Fred Brooks, The Mythical Man-Month 作者
請注意本章內容銜接後一章,請與後一章一起完成。
初入門像Rails這樣的功能豐富的開發框架,難處就像雞生蛋、蛋生雞的問題:要了解運作的原理,你必須了解其中的元件,但是如果個別學習其中的元件,又將耗費許多的時間而見樹不見林。因此,為了能夠讓各位讀者能夠儘快建構出一個基本的應用程式,有個大局觀。我們將從一個CRUD程式開始。所謂的CRUD即為Create、Read、Update、Delete等四項基本資料庫操作,本章將示範如何做出這個基本的應用程式,以及幾項Rails常用功能。細節的原理說明則待Part 2後續章節。
Rails的MVC元件
我們在第一章Ruby on Rails簡介有介紹了什麼是MVC架構,而在Rails中分成幾個不同元件來對應:
- ActiveRecord是Rails的Model元件
- ActionPack包含了ActionDispatch、ActionController和ActionView,分別是Rails的Routing、Controller和View元件

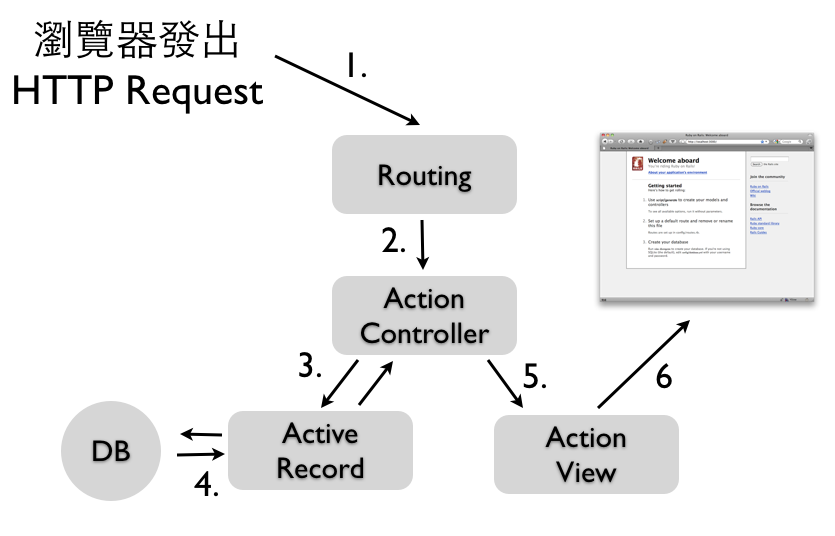
這張圖示中的執行步驟是:
- 瀏覽器發出HTTP request請求給Rails
- 路由(Routing)根據規則決定派往哪一個Controller的Action
- 負責處理的Controller Action操作Model資料
- Model存取資料庫或資料處理
- Controller Action將得到的資料餵給View樣板
- 回傳最後的HTML成品給瀏覽器
其中,路由主要是根據HTTP Method方法(GET、POST或是PATCH、DELETE等)以及網址來決定派往到哪一個Controller的Action。例如,我們在「Rails起步走」一章中的get "welcome/say_hello" => "welcome#say"意思就是,將GET welcome/say_hello的這個HTTP request請求,派往到welcome controller的say action。
認識ActiveRecord操作資料庫
ActiveRecord是Rails的ORM(Object-relational mapping)元件,負責與資料庫溝通,讓你可以使用物件導向語法來操作關聯式資料庫,它的對應概念如下:
- 將資料庫表格(table)對應到一個類別(class)
- 類別方法就是操作這個表格(table),例如新增資料、多筆資料更新或多筆資料刪除
- 資料表中的一筆資料(row)對應到一個物件(object)
- 物件方法就是操作這筆資料,例如更新或刪除這筆資料
- 資料表的欄位(column)就是物件的屬性(object attribute)
所以說資料庫裡面的資料表,我們用一個Model類別表示。而其中的一筆資料,就是一個Model物件。
不了解關聯式資料庫的讀者,推薦閱讀MySQL 超新手入門從第0章至第5章CRUD與資料維護。
ActiveRecord 這個名稱的由來是它使用了 Martin Fowler 的Active Record設計模式。
第三章「Rails起步走」我們提到了Scaffold鷹架功能,有經驗的Rails程式設計師雖然不用鷹架產生程式碼,不過還是會使用Rails的generator功能來分別產生Model和Controller檔案。這裡讓我們來產生一個Model:
$ rails g model event name:string description:text is_public:boolean capacity:integer
這些指令必須要在Rails專案目錄下執行,承第三章也就是demo目錄下。
接著執行以下指令就會建立資料表(如果是使用SQLite3資料庫話,會產生db/development.sqlite3這個檔案):
$ bin/rake db:migrate
接著,讓我們使用rails console(可以簡寫為rails c) 進入主控台模式做練習:
# 新增
> event = Event.new
> event.name = "Ruby course"
> event.description = "fooobarrr"
> event.capacity = 20
> event.save # 儲存進資料庫,讀者可以觀察另一個指令視窗
> event.id # 輸出主鍵 1,在 Rails 中的主鍵皆為自動遞增的整數 ID

> event = Event.new( :name => "another ruby course", :capacity => 30)
> event.save
> event.id # 輸出主鍵 2,這是第二筆資料

# 查詢
> event = Event.where( :capacity => 20 ).first
> events = Event.where( ["capacity >= ?", 20 ] ).limit(3).order("id desc")

# 更新
> e = Event.find(1) # 找到主鍵為 1 的資料
> e.name # 輸出 Ruby course
> e.update( :name => "abc", :is_public => false )

# 刪除
> e.destroy
和irb一樣,要離開rails console請輸入exit。如果輸入的程式亂掉沒作用時,直接Ctrl+Z離開也沒關係。
對資料庫好奇的朋友,可以安裝DB Browser for SQlite這套工具,實際打開db/development.sqlite3這個檔案觀察看看。
認識Migration建立資料表
Rails使用了Migration資料庫遷移機制來定義資料庫結構(Schema),檔案位於db/migrate/目錄下。它的目的在於:
- 讓資料庫的修改也可以納入版本控制系統,所有的變更都透過撰寫Migration檔案執行
- 方便應用程式更新升級,例如讓軟體從第三版更新到第五版,資料庫更新只需要執行
rake db:migrate - 跨資料庫通用,不需修改程式就可以用在SQLite3、MySQL、Postgres等不同資料庫
在上一節產生Model程式時,Rails就會自動幫你產生對應的Migration檔案,也就是如db/migrate/20110519123430_create_events.rb的檔案。Rails會用時間戳章來命名檔案,所以每次產生檔名都不同,這樣可以避免多人開發時的衝突。其內容如下:
# db/migrate/20110519123430_create_events.rb
class CreateEvents < ActiveRecord::Migration
  def change
    create_table :events do |t|
      t.string :name
      t.text :description
      t.boolean :is_public
      t.integer :capacity

      t.timestamps
    end
  end
end
其中的create_table區塊就是定義資料表結構的程式。上一節中我們已經執行過bin/rake db:migrate來建立此資料表。
Migration檔案不需要和Model一一對應,像我們來新增一個Migration檔案來新增一個資料庫欄位,請執行:
$ rails g migration add_status_to_events
如此就會產生一個空的 migration 檔案在 db/migrate 目錄下。Migration 有提供 API 讓我們可以變更資料庫結構。例如,我們可以新增一個欄位。輸入rails g migration add_status_to_events然後編輯這個Migration檔案:
# db/migrate/20110519123819_add_status_to_events.rb
class AddStatusToEvents < ActiveRecord::Migration
  def change
    add_column :events, :status, :string
  end
end
接著執行bin/rake db:migrate就會在events表格中新增一個status的欄位,欄位型別是string。Rails會記錄你已經對資料庫操作過哪些Migrations,像此例中就只會跑這個Migration而已,就算你多執行幾次bin/rake db:migrate也只會對資料庫操作一次。
Rails透過資料庫中的schema_migrations這張table來記錄已經跑過哪些Migrations。
認識ActiveRecord資料驗證(Validation)
ActiveRecord的資料驗證(Validation)功能,可以幫助我們檢查資料的正確性。如果驗證失敗,就會無法存進資料庫。
編輯app/models/event.rb加入
class Event < ActiveRecord::Base
    validates_presence_of :name
end
其中的validates_presence_of宣告了name這個屬性是必填。我們按Ctrl+Z離開主控台重新進入,或是輸入 reload!,這樣才會重新載入。
> e = Event.new
> e.save # 回傳 false
> e.errors.full_messages # 列出驗證失敗的原因
> e.name = "ihower"
> e.save
> e.errors.full_messages # 儲存成功,變回空陣列 []
呼叫save時,ActiveRecord就會驗證資料的正確性。而這裡因為沒有填入name,所以回傳false表示儲存失敗。
實做基本的CRUD應用程式
有了Event model,將下來讓我們實作出完整的CRUD使用者介面流程吧,這包含了列表頁面、新增頁面、編輯頁面以及個別資料頁面。
外卡路由
我們在「Rails起步走」一章分別為welcome/say_hello和welcome設定路由,也就如何將網址對應到Controller和Action。但是如果每個路徑都需要一條條設定會太麻煩了。這一章我們使用一種外卡路由的設定,編輯config/routes.rb在最後插入一行:
  # ....
  match ":controller(/:action(/:id(.:format)))", :via => :all
end
外卡路由很容易理解,它會將/foo/bar這樣的網址自動對應到Controller foo的bar Action、如果是/foo這樣的網址,則預設對應到index action。我們再下一章中我們會再改用另一種稱作RESTful路由方式。
列出所有資料
執行rails g controller events,首先編輯app/controllers/events_controller.rb加入
def index
  @events = Event.all
end
Event.all會抓出所有的資料,回傳一個陣列給實例變數(instance variables)指派給@events。在Rails會讓Action裡的實例變數(也就是有@開頭的變數)通通傳到View樣板裡面可以使用。這個Action預設使用的樣板是app/views/events/目錄下與Action同名的檔案,也就是接下來要編輯的app/views/events/index.html.erb,內容如下:
<ul>
<% @events.each do |event| %>
  <li>
 	  <%= event.name %>
  <%= link_to "Show", :controller => "events", :action => "show", :id => event %>
  <%= link_to "Edit", :controller => "events", :action => "edit", :id => event %>
  <%= link_to "Delete", :controller => "events", :action => "destroy", :id => event %>
  </li>
<% end %>
</ul>
<%= link_to "New Event", :controller => "events", :action => "new" %>
這個View迭代了@events陣列並顯示內容跟超連結,有幾件值得注意的事情:
<%和<%=不太一樣,前者只執行不輸出,像用來迭代的each和end這兩行就不需要輸出。而後者<%= 裡的結果會輸出給瀏覽器。
link_to建立超連結到一個特定的位置,這裡為瀏覽、編輯和刪除都提供了超連結。
連往http://localhost:3000/events就會看到這一頁。目前還沒有任何資料,讓我們繼續實作點擊New Event超連結之後的動作。
新增資料
建立一篇新的活動需要兩個Actions。第一個是new Action,它用來實例化一個空的Event物件,編輯app/controllers/events_controller.rb加入
def new
  @event = Event.new
end
這個app/views/events/new.html.erb會顯示空的Event給使用者:
<%= form_for @event, :url => { :controller => "events", :action => "create" } do |f| %>
    <%= f.label :name, "Name" %>
    <%= f.text_field :name %>

    <%= f.label :description, "Description" %>
    <%= f.text_area :description %>

    <%= f.submit "Create" %>
<% end %>
這個form_for的程式碼區塊(Code block)被用來建立HTML表單。在區塊中,你可以使用各種函式來建構表單。例如f.text_field :name建立出一個文字輸入框,並填入@event的name屬性資料。但這個表單只能基於這個Model有的屬性(在這個例子是name跟description)。Rails偏好使用form_for而不是讓你手寫表單HTML,這是因為程式碼可以更加簡潔,而且可以明確地連結在Model物件上。
form_for區塊也很聰明,New Event的表單跟Edit Event的表單,其中的送出網址跟按鈕文字會不同的(根據@event的不同,前者是新建的,後者是已經建立過的)。
如果你需要建立任意欄位的HTML表單,而不綁在某一個Model上,你可以使用
form_tag函式。它也提供了建構表單的函式而不需要綁在Model實例上。我們會在Action View: Helpers一章介紹。
當一個使用者點擊表單的Create按鈕時,瀏覽器就會送出資料到Controller的create Action。也是一樣編輯app/controllers/events_controller.rb加入:
def create
  @event = Event.new(params[:event])
  @event.save

  redirect_to :action => :index
end
create Action會透過從表單傳進來的資料,也就是Rails提供的params參數(這是一個Hash),來實例化一個新的@event物件。成功儲存之後,便將使用者重導(redirect)至index Action顯示活動列表。
讓我們來實際測試看看,在瀏覽器中實際按下表單的Create按鈕後,出現了ActiveModel::ForbiddenAttributesError in EventsController#create的錯誤訊息,這是因為Rails會檢查使用者傳進來的參數必須經過一個過濾的安全步驟,這個機制叫做Strong Parameters,讓我們回頭修改app/controllers/events_controller.rb
def create
  @event = Event.new(event_params)
  @event.save

  redirect_to :action => :index
end

private

def event_params
  params.require(:event).permit(:name, :description)
end
我們新加了一個event_params方法,其中透過require和permit將params這個Hash過濾出params[:event][:name]和params[:event][:description]。
private以下的所有方法都會變成private方法,所以記得放在檔案的最底下。
再次測試看看,應該就可以順利新增資料了。
顯示個別資料
當你在index頁面點擊show的活動連結,就會前往http://localhost:3000/events/show/1這個網址。Rails會呼叫show action並設定params[:id]為1。以下是show Action:
編輯app/controllers/events_controller.rb加入
def show
  @event = Event.find(params[:id])
end
這個show Action用find方法從資料庫中找出該篇活動。找到資料之後,Rails用show.html.erb樣板顯示出來。新增app/views/events/show.html.erb,內容如下:
<%= @event.name %>
<%= simple_format(@event.description) %>

<p><%= link_to "Back to index", :controller => "events", :action => "index" %></p>
其中simple_format是一個內建的View Helper,它的作用是可以將換行字元
置換成<br />,有基本的HTML換行效果。
編輯資料
如同建立新活動,編輯活動也有兩個步驟。第一個是請求特定一篇活動的edit頁面。這會呼叫Controller的edit Action,編輯app/controllers/events_controller.rb加入
def edit
  @event = Event.find(params[:id])
end
找到要編輯的活動之後,Rails接著顯示edit.html.erb頁面,新增app/views/events/edit.html.erb檔案,內容如下:
<%= form_for @event, :url => { :controller => "events", :action => "update", :id => @event } do |f| %>
    <%= f.label :name, "Name" %>
    <%= f.text_field :name %>

    <%= f.label :description, "Description" %>
    <%= f.text_area :description %>

    <%= f.submit "Update" %>
<% end %>
這裡跟new Action很像,只是送出表單後,是前往Controller的update Action:
def update
  @event = Event.find(params[:id])
  @event.update(event_params)

  redirect_to :action => :show, :id => @event
end
在update Action裡,Rails一樣透過params[:id]參數找到要編輯的資料。接著update方法會根據表單傳進來的參數修改到資料上,這裡我們沿用event_params這個方法過濾使用者傳進來的資料。如果一切正常,使用者會被導向到活動的show頁面。
刪除資料
最後,點擊Destroy超連結會前往destroy Action,編輯app/controllers/events_controller.rb加入
def destroy
  @event = Event.find(params[:id])
  @event.destroy

  redirect_to :action => :index
end
destroy方法會刪除對應的資料庫資料。完成之後,將使用者導向index頁面。
Rails的程式風格非常注重變數命名的單數複數,像上述的index Action中是用
@events複數命名,代表這是一個群集陣列。其他則是用@event單數命名。
認識版型(Layout)
Layout可以用來包裹樣板,讓不同樣板共用相同的HTML開頭和結尾部分。當Rails要顯示一個樣板給瀏覽器時,它會將樣板的HTML放到Layout的HTML之中。預設的Layout檔案是app/views/layouts/application.html.erb,其中yield就是會被替換成樣板的地方。所有的樣版預設都會套這個Layout。我們會再 Action View一章中介紹如何更換不同Layout。
現在,讓我們修改Layout中的<title>:
<!DOCTYPE html>
<html>
<head>
  <title><%= @page_title || "Event application" %></title>
  <%= stylesheet_link_tag    "application", media: "all", "data-turbolinks-track" => true %>
  <%= javascript_include_tag "application", "data-turbolinks-track" => true %>
  <%= csrf_meta_tags %>
</head>
<body>

<%= yield %>

</body>
</html>
如此我們可以在show Action中設定@page_title的值:
def show
  @event = Event.find(params[:id])
  @page_title = @event.name
end
這樣的話,進去show頁面的title就會是活動名稱。其他頁面因為沒有設定@page_title,就會是”Event application”。
認識局部樣板(Partial Template)
利用局部樣板(Partial)機制,我們可以將重複的樣板獨立出一個單獨的檔案,來讓其他樣板共享引用。例如new.html.erb和edit.html.erb都有以下相同的樣板程式:
<%= f.label :name, "Name" %>
<%= f.text_field :name %>

<%= f.label :description, "Description" %>
<%= f.text_area :description %>
一般來說,新增和編輯時的表單欄位都是相同的,所以讓我們將這段樣板程式獨立出一個局部樣板,這樣要修改欄位的時候,只要修改一個檔案即可。局部樣板的命名都是底線_開頭,新增一個檔案叫做_form.html.erb,內容就如上。如此new.html.erb就可以變成:
<%= form_for @event, :url => { :controller => "events", :action => "create" } do |f| %>
    <%= render :partial => "form", :locals => { :f => f } %>
    <%= f.submit "Create" %>
<% end %>
而edit.html.erb則是:
<%= form_for @event, :url => { :controller => "events", :action => "update", :id => @event } do |f| %>
    <%= render :partial => "form", :locals => { :f => f } %>
    <%= f.submit "Update" %>
<% end %>
透過<%= render :partial => "form", :locals => { :f => f } %>會引用_form.html.erb這個局部樣板,並將變數f傳遞進去變成區域變數。
before_action方法
透過before_action,我們可以將Controller中重複的程式獨立出來。
在events_controller.rb上方新增
before_action :set_event, :only => [ :show, :edit, :update, :destroy]
在下方private後面新增一個方法如下:
def set_event
  @event = Event.find(params[:id])
end
Controller中的公開(public)方法都是Action,也就是可以讓瀏覽器呼叫使用的動作。使用
protected或private可以避免內部方法被當做Action使用。
刪除show、edit、update、destroy方法中的
@event = Event.find(params[:id])
加入資料驗證
我們在資料驗證一節中,已經加入了name的必填驗證,因此當使用者送出沒有name的表單,就會無法儲存進資料庫。我們希望目前的程式能夠在驗證失敗後,提示使用者儲存失敗,並讓使用者有機會可以修改再送出。
修改app/controllers/events_controller.rb的create和update Action
def create
  @event = Event.new(event_params)
  if @event.save
    redirect_to :action => :index
  else
    render :action => :new
  end
end
如果活動因為驗證錯誤而儲存失敗,這裡會回傳給使用者帶有錯誤訊息的new Action,好讓使用者可以修正問題再試一次。實際上,render :action => "new"會回傳new Action所使用的樣板,而不是執行new action這個方法。如果改成使用redirect_to會讓瀏覽器重新導向到new Action,但是如此一來@event就被重新建立而失去使用者剛輸入的資料。
def update
  if @event.update(event_params)
    redirect_to :action => :show, :id => @event
  else
    render :action => :edit
  end
end
更新時也是一樣,如果驗證有任何問題,它會顯示edit頁面好讓使用者可以修正資料。
而為了可以在儲存失敗時顯示錯誤訊息,接著編輯_form.html.erb中加入
<% if @event.errors.any? %>
      <ul>
      <% @event.errors.full_messages.each do |msg| %>
        <li><%= msg %></li>
      <% end %>
      </ul>
<% end %>
認識Flash訊息
請在app/views/layouts/application.html.erb Layout檔案之中,yield之前加入:
<p style="color: green"><%= flash[:notice] %></p>
<p style="color: red"><%= flash[:alert] %></p>
接著讓我們回到app/controllers/events_controller.rb,在create Action中加入
flash[:notice] = "event was successfully created"
在update Action中加入
flash[:notice] = "event was successfully updated"
在destroy Action中加入
flash[:alert] = "event was successfully deleted"
「event was successfully created」訊息會被儲存在Rails的特殊flash變數中,好讓訊息可以被帶到另一個 action,它提供使用者一些有用的資訊。在這個create Action中,使用者並沒有真的看到任何頁面,因為它馬上就被導向到新的活動頁面。而這個flash變數就帶著訊息到下一個Action,好讓使用者可以在show Action頁面看到 「event was successfully created.」這個訊息。
分頁外掛
上述的程式用Event.all一次抓出所有活動,這在資料量一大的時候非常浪費效能和記憶體。通常會用分頁機制來限制抓取資料的筆數。
編輯Gemfile加入以下程式,這個檔案設定了此應用程式使用哪些套件。這裡我們使用kaminari這個分頁套件:
gem "kaminari"
執行bundle install就會安裝。裝好後需要重新啟動伺服器才會載入。
修改app/controllers/events_controller.rb的index Action如下
def index
  @events = Event.page(params[:page]).per(5)
end
編輯app/views/events/index.html.erb,加入
<%= paginate @events %>

