

дёҖ. Intentзҡ„д»Ӣз»Қ
- AndroidдёӯжҸҗдҫӣдәҶIntentжңәеҲ¶жқҘеҚҸеҠ©еә”з”Ёй—ҙзҡ„дәӨдә’дёҺйҖҡи®ҜпјҢжҲ–иҖ…йҮҮз”ЁжӣҙеҮҶзЎ®зҡ„иҜҙжі•жҳҜпјҢIntentдёҚд»…еҸҜз”ЁдәҺеә”з”ЁзЁӢеәҸд№Ӣй—ҙпјҢд№ҹеҸҜз”ЁдәҺеә”з”ЁзЁӢеәҸеҶ…йғЁзҡ„activity, serviceе’Ңbroadcast receiverд№Ӣй—ҙзҡ„дәӨдә’гҖӮ
- IntentжҳҜдёҖз§ҚиҝҗиЎҢж—¶з»‘е®ҡпјҲruntime binding)жңәеҲ¶пјҢе®ғиғҪеңЁзЁӢеәҸиҝҗиЎҢзҡ„иҝҮзЁӢдёӯиҝһжҺҘдёӨдёӘдёҚеҗҢзҡ„组件гҖӮйҖҡиҝҮIntentпјҢдҪ зҡ„зЁӢеәҸеҸҜд»Ҙеҗ‘AndroidиЎЁиҫҫжҹҗз§ҚиҜ·жұӮжҲ–иҖ…ж„Ҹж„ҝпјҢAndroidдјҡж №жҚ®ж„Ҹж„ҝзҡ„еҶ…е®№йҖүжӢ©йҖӮеҪ“зҡ„组件жқҘе“Қеә”гҖӮ
Intentзҡ„дёӯж–Үж„ҸжҖқжҳҜвҖңж„ҸеӣҫпјҢж„Ҹеҗ‘вҖқпјҢеңЁAndroidдёӯжҸҗдҫӣдәҶIntentжңәеҲ¶жқҘеҚҸеҠ©еә”з”Ёй—ҙзҡ„дәӨдә’дёҺйҖҡи®ҜпјҢIntentиҙҹиҙЈеҜ№еә”з”ЁдёӯдёҖж¬Ўж“ҚдҪңзҡ„еҠЁдҪңгҖҒеҠЁдҪңж¶үеҸҠж•°жҚ®гҖҒйҷ„еҠ ж•°жҚ®иҝӣиЎҢжҸҸиҝ°пјҢAndroidеҲҷж №жҚ®жӯӨIntentзҡ„жҸҸиҝ°пјҢиҙҹиҙЈжүҫеҲ°еҜ№еә”зҡ„组件пјҢе°Ҷ Intentдј йҖ’з»ҷи°ғз”Ёзҡ„组件пјҢ并е®ҢжҲҗ组件зҡ„и°ғз”ЁгҖӮIntentдёҚд»…еҸҜз”ЁдәҺеә”з”ЁзЁӢеәҸд№Ӣй—ҙпјҢд№ҹеҸҜз”ЁдәҺеә”з”ЁзЁӢеәҸеҶ…йғЁзҡ„Activity/Serviceд№Ӣй—ҙзҡ„дәӨдә’гҖӮеӣ жӯӨпјҢеҸҜд»Ҙе°ҶIntentзҗҶи§ЈдёәдёҚеҗҢ组件д№Ӣй—ҙйҖҡдҝЎзҡ„вҖңеӘ’д»ӢвҖқдё“й—ЁжҸҗдҫӣ组件дә’зӣёи°ғз”Ёзҡ„зӣёе…ідҝЎжҒҜпјҢиө·зқҖдёҖдёӘеӘ’дҪ“дёӯд»Ӣзҡ„дҪңз”ЁпјҢдё“й—ЁжҸҗдҫӣ组件дә’зӣёи°ғз”Ёзҡ„зӣёе…ідҝЎжҒҜпјҢе®һзҺ°и°ғз”ЁиҖ…дёҺиў«и°ғз”ЁиҖ…д№Ӣй—ҙзҡ„и§ЈиҖҰгҖӮ
Intent жҳҜдёҖдёӘе°ҶиҰҒжү§иЎҢзҡ„еҠЁдҪңзҡ„жҠҪиұЎзҡ„жҸҸиҝ°пјҢдёҖиҲ¬жқҘиҜҙжҳҜдҪңдёәеҸӮж•°жқҘдҪҝз”ЁпјҢз”ұIntentжқҘеҚҸеҠ©е®ҢжҲҗandroidеҗ„дёӘ组件д№Ӣй—ҙзҡ„йҖҡи®ҜгҖӮжҜ”еҰӮиҜҙи°ғз”Ё startActivity()жқҘеҗҜеҠЁдёҖдёӘactivityпјҢжҲ–иҖ…з”ұbroadcaseIntent()жқҘдј йҖ’з»ҷжүҖжңүж„ҹе…ҙи¶Јзҡ„ BroadcaseReceiver, еҶҚжҲ–иҖ…з”ұstartService()/bindservice()жқҘеҗҜеҠЁдёҖдёӘеҗҺеҸ°зҡ„serviceгҖӮжүҖд»ҘеҸҜд»ҘзңӢеҮәжқҘпјҢintentдё»иҰҒжҳҜз”ЁжқҘеҗҜеҠЁе…¶д»–зҡ„ activity жҲ–иҖ…serviceпјҢжүҖд»ҘеҸҜд»Ҙе°ҶintentзҗҶи§ЈжҲҗactivityд№Ӣй—ҙзҡ„зІҳеҗҲеүӮгҖӮ
дё»иҰҒз”ЁйҖ”
IntentжҳҜдёҖз§Қж¶ҲжҒҜдј йҖ’жңәеҲ¶пјҢе®ғеҸҜд»ҘеңЁеә”з”ЁзЁӢеәҸеҶ…дҪҝз”ЁпјҢд№ҹеҸҜд»ҘеңЁеә”з”ЁзЁӢеәҸй—ҙдҪҝз”ЁпјҢдё»иҰҒз”ЁйҖ”еҲҶдёәпјҡ
1.дҪҝз”Ёзұ»еҗҚжҳҫзӨәзҡ„еҗҜеҠЁдёҖдёӘзү№е®ҡзҡ„ActivityжҲ–Service
2.еҗҜеҠЁActivityжҲ–ServiceжқҘжү§иЎҢдёҖдёӘеҠЁдҪңзҡ„Intent,йҖҡеёёйңҖиҰҒдҪҝз”Ёзү№е®ҡзҡ„ж•°жҚ®пјҢжҲ–иҖ…еҜ№зү№е®ҡзҡ„ж•°жҚ®жү§иЎҢеҠЁдҪң
3.е№ҝж’ӯжҹҗдёӘдәӢ件已з»ҸеҸ‘з”ҹ
activityгҖҒserviceе’Ңbroadcast receiverд№Ӣй—ҙжҳҜйҖҡиҝҮIntentиҝӣиЎҢйҖҡдҝЎзҡ„пјҢиҖҢеҸҰеӨ–дёҖдёӘ组件Content Providerжң¬иә«е°ұжҳҜдёҖз§ҚйҖҡдҝЎжңәеҲ¶пјҢдёҚйңҖиҰҒйҖҡиҝҮIntentгҖӮжҲ‘们жқҘзңӢдёӢйқўиҝҷдёӘеӣҫе°ұзҹҘйҒ“дәҶпјҡ
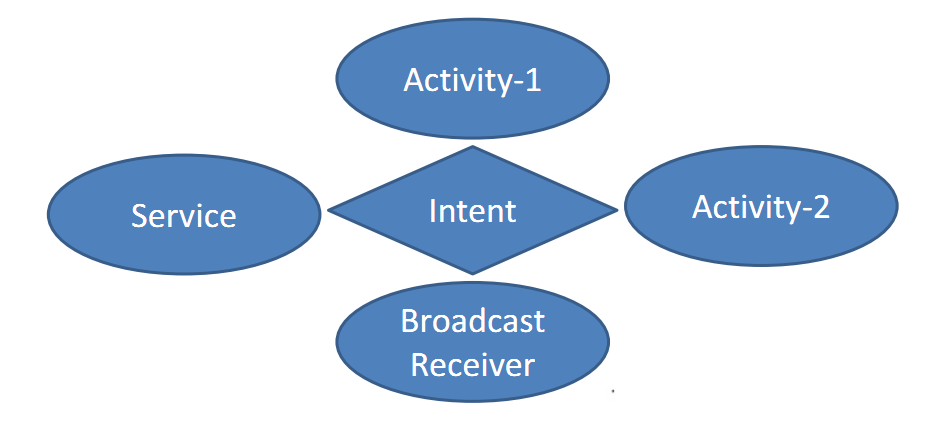
еҰӮжһңActivity1йңҖиҰҒе’ҢActivity2иҝӣиЎҢиҒ”зі»пјҢдәҢиҖ…дёҚйңҖиҰҒзӣҙжҺҘиҒ”зі»пјҢиҖҢжҳҜйҖҡиҝҮIntentдҪңдёәжЎҘжўҒгҖӮйҖҡдҝ—жқҘи®ІпјҢIntnetзұ»дјјдәҺдёӯд»ӢгҖҒеӘ’е©Ҷзҡ„и§’иүІгҖӮ
IntentжңҖеёёи§Ғзҡ„дёҖдёӘз”Ёжі•жҳҜжҳҫзӨәзҡ„(йҖҡиҝҮжҢҮе®ҡиҰҒиЈ…иҪҪзҡ„зұ»)жҲ–йҡҗејҸзҡ„(йҖҡиҝҮиҜ·жұӮеҜ№дёҖжқЎж•°жҚ®жү§иЎҢжҹҗдёӘеҠЁдҪң)еҗҜеҠЁж–°зҡ„activityпјҢеңЁеҗҺдёҖз§Қжғ…еҶөдёӢпјҢеҠЁдҪңдёҚдёҖе®ҡз”ұи°ғз”Ёеә”з”ЁзЁӢеәҸдёӯзҡ„Activtyжү§иЎҢгҖӮ
Intentд№ҹеҸҜд»ҘеңЁзі»з»ҹиҢғеӣҙеҶ…еҸ‘йҖҒе№ҝж’ӯж¶ҲжҒҜгҖӮеә”з”ЁзЁӢеәҸеҸҜд»ҘжіЁеҶҢдёҖдёӘBroadcast ReceiverжқҘзӣ‘еҗ¬зӣёеә”иҝҷдәӣе№ҝж’ӯзҡ„IntentгҖӮAndroidе°ұжҳҜйҖҡиҝҮе№ҝж’ӯIntentжқҘе…¬еёғзі»з»ҹдәӢ件пјҢжҜ”еҰӮзҪ‘з»ңиҝһжҺҘзҠ¶жҖҒжҲ–иҖ…з”өжұ з”өйҮҸзҡ„ж”№еҸҳгҖӮ
дәҢ. IntenеҗҜеҠЁз»„件зҡ„ж–№жі•
IntentеҸҜд»ҘеҗҜеҠЁдёҖдёӘActivityпјҢд№ҹеҸҜд»ҘеҗҜеҠЁдёҖдёӘServiceпјҢиҝҳеҸҜд»ҘеҸ‘иө·дёҖдёӘе№ҝж’ӯBroadcastsгҖӮе…·дҪ“ж–№жі•еҰӮдёӢпјҡ
еҜ№дәҺеҗ‘иҝҷдёүз§Қ组件еҸ‘йҖҒintentжңүдёҚеҗҢзҡ„жңәеҲ¶пјҡ
дҪҝз”ЁContext.startActivity() жҲ– Activity.startActivityForResult()пјҢдј е…ҘдёҖдёӘintentжқҘеҗҜеҠЁдёҖдёӘactivityгҖӮдҪҝз”Ё Activity.setResult()пјҢдј е…ҘдёҖдёӘintentжқҘд»Һactivityдёӯиҝ”еӣһз»“жһңгҖӮ
е°ҶintentеҜ№иұЎдј з»ҷContext.startService()жқҘеҗҜеҠЁдёҖдёӘserviceжҲ–иҖ…дј ж¶ҲжҒҜз»ҷдёҖдёӘиҝҗиЎҢзҡ„serviceгҖӮе°ҶintentеҜ№иұЎдј з»ҷ Context.bindService()жқҘз»‘е®ҡдёҖдёӘserviceгҖӮ
е°ҶintentеҜ№иұЎдј з»ҷ Context.sendBroadcast()пјҢContext.sendOrderedBroadcast()пјҢжҲ–иҖ…Context.sendStickyBroadcast()зӯүе№ҝж’ӯж–№жі•пјҢеҲҷе®ғд»¬иў«дј з»ҷ broadcast receiverгҖӮ
组件еҗҚз§° | ж–№жі•еҗҚз§° |
| Activity | startActvity( ) startActivityForResult( ) |
| Service | startService( ) bindService( ) |
| Broadcasts | sendBroadcasts( ) sendOrderedBroadcasts( ) sendStickyBroadcasts( ) |
дёү. Intentзҡ„жһ„жҲҗ
Intentз”ұд»ҘдёӢеҗ„дёӘз»„жҲҗйғЁеҲҶпјҡ
- component(组件)пјҡзӣ®зҡ„组件
- actionпјҲеҠЁдҪңпјүпјҡз”ЁжқҘиЎЁзҺ°ж„Ҹеӣҫзҡ„иЎҢеҠЁ
- categoryпјҲзұ»еҲ«пјүпјҡз”ЁжқҘиЎЁзҺ°еҠЁдҪңзҡ„зұ»еҲ«
- dataпјҲж•°жҚ®пјүпјҡиЎЁзӨәдёҺеҠЁдҪңиҰҒж“Қзәөзҡ„ж•°жҚ®
- typeпјҲж•°жҚ®зұ»еһӢпјүпјҡеҜ№дәҺdataиҢғдҫӢзҡ„жҸҸеҶҷ
- extrasпјҲжү©еұ•дҝЎжҒҜпјүпјҡжү©еұ•дҝЎжҒҜ
- FlagsпјҲж Үеҝ—дҪҚпјүпјҡжңҹжңӣиҝҷдёӘж„Ҹеӣҫзҡ„иҝҗиЎҢжЁЎејҸ
1гҖҒcomponent(组件)пјҡзӣ®зҡ„组件
жҢҮе®ҡIntentзҡ„зҡ„зӣ®ж Ү组件зҡ„зұ»еҗҚз§°гҖӮйҖҡеёё Androidдјҡж №жҚ®Intent дёӯеҢ…еҗ«зҡ„е…¶е®ғеұһжҖ§зҡ„дҝЎжҒҜпјҢжҜ”еҰӮactionгҖҒdata/typeгҖҒcategoryиҝӣиЎҢжҹҘжүҫпјҢжңҖз»ҲжүҫеҲ°дёҖдёӘдёҺд№ӢеҢ№й…Қзҡ„зӣ®ж Ү组件гҖӮдҪҶжҳҜпјҢеҰӮжһң componentиҝҷдёӘеұһжҖ§жңүжҢҮе®ҡзҡ„иҜқпјҢе°ҶзӣҙжҺҘдҪҝз”Ёе®ғжҢҮе®ҡзҡ„组件пјҢиҖҢдёҚеҶҚжү§иЎҢдёҠиҝ°жҹҘжүҫиҝҮзЁӢгҖӮжҢҮе®ҡдәҶиҝҷдёӘеұһжҖ§д»ҘеҗҺпјҢIntentзҡ„е…¶е®ғжүҖжңүеұһжҖ§йғҪжҳҜеҸҜйҖүзҡ„гҖӮ
дҫӢеҰӮпјҢеҗҜеҠЁз¬¬дәҢдёӘActivityж—¶пјҢжҲ‘们еҸҜд»Ҙиҝҷж ·жқҘеҶҷпјҡ
button1.setOnClickListener(new OnClickListener() {
@Override
public void onClick(View v) {
//еҲӣе»әдёҖдёӘж„ҸеӣҫеҜ№иұЎ
Intent intent = new Intent();
//еҲӣе»ә组件пјҢйҖҡиҝҮ组件жқҘе“Қеә”
ComponentName component = new ComponentName(MainActivity.this, SecondActivity.class);
intent.setComponent(component);
startActivity(intent);
}
});
еҰӮжһңеҶҷзҡ„з®ҖеҚ•дёҖзӮ№пјҢзӣ‘еҗ¬дәӢ件onClick()ж–№жі•йҮҢеҸҜд»Ҙиҝҷж ·еҶҷпјҡ
Intent intent = new Intent();
//setClassеҮҪж•°зҡ„第дёҖдёӘеҸӮж•°жҳҜдёҖдёӘContextеҜ№иұЎ
//ContextжҳҜдёҖдёӘзұ»пјҢActivityжҳҜContextзұ»зҡ„еӯҗзұ»пјҢд№ҹе°ұжҳҜиҜҙпјҢжүҖжңүзҡ„ActivityеҜ№иұЎпјҢйғҪеҸҜд»Ҙеҗ‘дёҠиҪ¬еһӢдёәContextеҜ№иұЎ
//setClassеҮҪж•°зҡ„第дәҢдёӘеҸӮж•°жҳҜдёҖдёӘClassеҜ№иұЎпјҢеңЁеҪ“еүҚеңәжҷҜдёӢпјҢеә”иҜҘдј е…ҘйңҖиҰҒиў«еҗҜеҠЁзҡ„Activityзұ»зҡ„classеҜ№иұЎ
intent.setClass(MainActivity.this, SecondActivity.class);
startActivity(intent);
еҶҚз®ҖеҚ•дёҖзӮ№пјҢеҸҜд»Ҙиҝҷж ·еҶҷпјҡпјҲеҪ“然пјҢд№ҹжҳҜжңҖеёёи§Ғзҡ„еҶҷжі•пјү
Intent intent = new Intent(MainActivity.this,SecondActivity.class);
startActivity(intent);
2гҖҒActionпјҲеҠЁдҪңпјүпјҡз”ЁжқҘиЎЁзҺ°ж„Ҹеӣҫзҡ„иЎҢеҠЁ
еҪ“ж—Ҙеёёз”ҹжҙ»дёӯпјҢжҸҸиҝ°дёҖдёӘж„Ҹж„ҝжҲ–ж„ҝжңӣзҡ„ж—¶еҖҷпјҢжҖ»жҳҜжңүдёҖдёӘеҠЁиҜҚеңЁе…¶дёӯгҖӮжҜ”еҰӮпјҡжҲ‘жғівҖңеҒҡвҖқдёүдёӘдҝҜеҚ§ж’‘пјӣжҲ‘иҰҒвҖңеҶҷвҖқдёҖе°Ғжғ…д№ҰпјҢзӯүзӯүгҖӮеңЁIntentдёӯпјҢActionе°ұжҳҜжҸҸиҝ°еҒҡгҖҒеҶҷзӯүеҠЁдҪңзҡ„пјҢеҪ“дҪ жҢҮжҳҺдәҶдёҖдёӘActionпјҢжү§иЎҢиҖ…е°ұдјҡдҫқз…§иҝҷдёӘеҠЁдҪңзҡ„жҢҮзӨәпјҢжҺҘеҸ—зӣёе…іиҫ“е…ҘпјҢиЎЁзҺ°еҜ№еә”иЎҢдёәпјҢдә§з”ҹз¬ҰеҗҲзҡ„иҫ“еҮәгҖӮеңЁIntentзұ»дёӯпјҢе®ҡд№үдәҶдёҖжү№йҮҸзҡ„еҠЁдҪңпјҢжҜ”еҰӮACTION_VIEWпјҢACTION_PICKзӯүпјҢ еҹәжң¬ж¶өзӣ–дәҶеёёз”ЁеҠЁдҪңгҖӮеҠ зҡ„еҠЁдҪңи¶ҠеӨҡпјҢи¶ҠзІҫзЎ®гҖӮ
ж ҮеҮҶзҡ„Activity Actions
ACTION_MAINВ В В В В В В В В В В В В В В В В В В В В В В В В В В В дҪңдёәдёҖдёӘдё»иҰҒзҡ„иҝӣе…ҘеҸЈпјҢиҖҢ并дёҚжңҹжңӣеҺ»жҺҘеҸ—ж•°жҚ®
ACTION_VIEWВ В В В В В В В В В В В В В В В В В В В В В В В В В В В еҗ‘з”ЁжҲ·еҺ»жҳҫзӨәж•°жҚ®
ACTION_ATTACH_DATAВ В В В В В В В В В В В В В з”ЁдәҺжҢҮе®ҡдёҖдәӣж•°жҚ®еә”иҜҘйҷ„еұһдәҺдёҖдәӣе…¶д»–зҡ„ең°ж–№пјҢдҫӢеҰӮпјҢеӣҫзүҮж•°жҚ®еә”иҜҘйҷ„еұһдәҺиҒ”зі»дәә
ACTION_EDITВ В В В В В В В В В В В В В В В В В В В В В В В В В В В В и®ҝй—®е·Із»ҷзҡ„ж•°жҚ®пјҢжҸҗдҫӣжҳҺзЎ®зҡ„еҸҜзј–иҫ‘
ACTION_PICKВ В В В В В В В В В В В В В В В В В В В В В В В В В В В В д»Һж•°жҚ®дёӯйҖүжӢ©дёҖдёӘеӯҗйЎ№зӣ®пјҢ并иҝ”еӣһдҪ жүҖйҖүдёӯзҡ„йЎ№зӣ®
ACTION_CHOOSERВ В В В В В В В В В В В В В В В В В В В В жҳҫзӨәдёҖдёӘactivityйҖүжӢ©еҷЁпјҢе…Ғи®ёз”ЁжҲ·еңЁиҝӣзЁӢд№ӢеүҚйҖүжӢ©д»–们жғіиҰҒзҡ„
ACTION_GET_CONTENTВ В В В В В В В В В В В В В е…Ғи®ёз”ЁжҲ·йҖүжӢ©зү№ж®Ҡз§Қзұ»зҡ„ж•°жҚ®пјҢ并иҝ”еӣһпјҲзү№ж®Ҡз§Қзұ»зҡ„ж•°жҚ®пјҡз…§дёҖеј зӣёзүҮжҲ–еҪ•дёҖж®өйҹіпјү
ACTION_DIALВ В В В В В В В В В В В В В В В В В В В В В В В В В В В В В жӢЁжү“дёҖдёӘжҢҮе®ҡзҡ„еҸ·з ҒпјҢжҳҫзӨәдёҖдёӘеёҰжңүеҸ·з Ғзҡ„з”ЁжҲ·з•ҢйқўпјҢе…Ғи®ёз”ЁжҲ·еҺ»еҗҜеҠЁе‘јеҸ«
ACTION_CALLВ В В В В В В В В В В В В В В В В В В В В В В В В В В В В ж №жҚ®жҢҮе®ҡзҡ„ж•°жҚ®жү§иЎҢдёҖж¬Ўе‘јеҸ«
пјҲACTION_CALLеңЁеә”з”ЁдёӯеҗҜеҠЁдёҖж¬Ўе‘јеҸ«жңүзјәйҷ·пјҢеӨҡж•°еә”з”ЁACTION_DIALпјҢACTION_CALLдёҚиғҪз”ЁеңЁзҙ§жҖҘе‘јеҸ«дёҠпјҢзҙ§жҖҘе‘јеҸ«еҸҜд»Ҙз”ЁACTION_DIALжқҘе®һзҺ°пјү
ACTION_SENDВ В В В В В В В В В В В В В В В В В В В В В В В В В В В дј йҖ’ж•°жҚ®пјҢиў«дј йҖҒзҡ„ж•°жҚ®жІЎжңүжҢҮе®ҡпјҢжҺҘ收зҡ„actionиҜ·жұӮз”ЁжҲ·еҸ‘ж•°жҚ®
ACTION_SENDTOВ В В В В В В В В В В В В В В В В В В В В В В В еҸ‘йҖҒдёҖдёӘдҝЎжҒҜеҲ°жҢҮе®ҡзҡ„жҹҗдәә
ACTION_ANSWERВ В В В В В В В В В В В В В В В В В В В В В В еӨ„зҗҶдёҖдёӘжү“иҝӣз”өиҜқе‘јеҸ«
ACTION_INSERTВ В В В В В В В В В В В В В В В В В В В В В В В В жҸ’е…ҘдёҖжқЎз©әйЎ№зӣ®еҲ°е·Із»ҷзҡ„е®№еҷЁ
ACTION_DELETEВ В В В В В В В В В В В В В В В В В В В В В В В В д»Һе®№еҷЁдёӯеҲ йҷӨе·Із»ҷзҡ„ж•°жҚ®
ACTION_RUNВ В В В В В В В В В В В В В В В В В В В В В В В В В В В В В иҝҗиЎҢж•°жҚ®пјҢж— и®әжҖҺд№Ҳ
ACTION_SYNCВ В В В В В В В В В В В В В В В В В В В В В В В В В В В еҗҢжӯҘжү§иЎҢдёҖдёӘж•°жҚ®
ACTION_PICK_ACTIVITYВ В В В В В В В В В В В В дёәе·ІзҹҘзҡ„IntentйҖүжӢ©дёҖдёӘActivityпјҢиҝ”еӣһеҲ«йҖүдёӯзҡ„зұ»
ACTION_SEARCHВ В В В В В В В В В В В В В В В В В В В В В В В жү§иЎҢдёҖж¬Ўжҗңзҙў
ACTION_WEB_SEARCHВ В В В В В В В В В В В В В В жү§иЎҢдёҖж¬Ўwebжҗңзҙў
ACTION_FACTORY_TESTВ В В В В В В В В В В В В е·ҘеңәжөӢиҜ•зҡ„дё»иҰҒиҝӣе…ҘзӮ№пјҢ
ж ҮеҮҶзҡ„е№ҝж’ӯActions
ACTION_TIME_TICKВ В В В В В В В В В В В В В В В В В еҪ“еүҚж—¶й—ҙж”№еҸҳпјҢжҜҸеҲҶй’ҹйғҪеҸ‘йҖҒпјҢдёҚиғҪйҖҡиҝҮ组件声жҳҺжқҘжҺҘ收пјҢеҸӘжңүйҖҡиҝҮContext.registerReceiver()ж–№жі•жқҘжіЁеҶҢ
ACTION_TIME_CHANGEDВ В В В В В В В В В В ж—¶й—ҙиў«и®ҫзҪ®
ACTION_TIMEZONE_CHANGEDВ В ж—¶й—ҙеҢәж”№еҸҳ
ACTION_BOOT_COMPLETEDВ В В В В В зі»з»ҹе®ҢжҲҗеҗҜеҠЁеҗҺпјҢдёҖж¬Ўе№ҝж’ӯ
ACTION_PACKAGE_ADDEDВ В В В В В В В дёҖдёӘж–°еә”з”ЁеҢ…е·Із»Ҹе®үиЈ…еңЁи®ҫеӨҮдёҠпјҢж•°жҚ®еҢ…жӢ¬еҢ…еҗҚпјҲжңҖж–°е®үиЈ…зҡ„еҢ…зЁӢеәҸдёҚиғҪжҺҘ收еҲ°иҝҷдёӘе№ҝж’ӯпјү
ACTION_PACKAGE_CHANGEDВ В В дёҖдёӘе·ІеӯҳеңЁзҡ„еә”з”ЁзЁӢеәҸеҢ…е·Із»Ҹж”№еҸҳпјҢеҢ…жӢ¬еҢ…еҗҚ
ACTION_PACKAGE_REMOVEDВ В дёҖдёӘе·ІеӯҳеңЁзҡ„еә”з”ЁзЁӢеәҸеҢ…е·Із»Ҹд»Һи®ҫеӨҮдёҠ移йҷӨпјҢеҢ…жӢ¬еҢ…еҗҚпјҲжӯЈеңЁиў«е®үиЈ…зҡ„еҢ…зЁӢеәҸдёҚиғҪжҺҘ收еҲ°иҝҷдёӘе№ҝж’ӯпјү
ACTION_PACKAGE_RESTARTED з”ЁжҲ·йҮҚж–°ејҖе§ӢдёҖдёӘеҢ…пјҢеҢ…зҡ„жүҖжңүиҝӣзЁӢе°Ҷиў«жқҖжӯ»пјҢжүҖжңүдёҺе…¶иҒ”зі»зҡ„иҝҗиЎҢж—¶й—ҙзҠ¶жҖҒеә”иҜҘ被移йҷӨпјҢеҢ…жӢ¬еҢ…еҗҚпјҲйҮҚж–°ејҖе§ӢеҢ…зЁӢеәҸдёҚиғҪжҺҘ收еҲ°иҝҷдёӘе№ҝж’ӯпјү
ACTION_PACKAGE_DATA_CLEARED з”ЁжҲ·е·Із»Ҹжё…жҘҡдёҖдёӘеҢ…зҡ„ж•°жҚ®пјҢеҢ…жӢ¬еҢ…еҗҚпјҲжё…йҷӨеҢ…зЁӢеәҸдёҚиғҪжҺҘ收еҲ°иҝҷдёӘе№ҝж’ӯпјү
ACTION_BATTERY_CHANGED з”өжұ зҡ„е……з”өзҠ¶жҖҒгҖҒз”өиҚ·зә§еҲ«ж”№еҸҳпјҢдёҚиғҪйҖҡиҝҮз»„е»әеЈ°жҳҺжҺҘ收иҝҷдёӘе№ҝж’ӯпјҢеҸӘжңүйҖҡиҝҮContext.registerReceiver()жіЁеҶҢ
ACTION_UID_REMOVED дёҖдёӘз”ЁжҲ·IDе·Із»Ҹд»Һзі»з»ҹдёӯ移йҷӨ
3гҖҒcategoryпјҲзұ»еҲ«пјүпјҡз”ЁжқҘиЎЁзҺ°еҠЁдҪңзҡ„зұ»еҲ«
Intentдёӯзҡ„CategoryеұһжҖ§жҳҜдёҖдёӘжү§иЎҢеҠЁдҪңActionзҡ„йҷ„еҠ дҝЎжҒҜгҖӮжҜ”еҰӮпјҡCATEGORY_HOMEеҲҷиЎЁзӨәж”ҫеӣһеҲ°Homeз•ҢйқўпјҢALTERNATIVE_CATEGORYиЎЁзӨәеҪ“еүҚзҡ„IntentжҳҜдёҖзі»еҲ—зҡ„еҸҜйҖүеҠЁдҪңдёӯзҡ„дёҖдёӘгҖӮ
жҢҮе®ҡActionиҢғеӣҙ,иҝҷдёӘйҖүйЎ№жҢҮе®ҡдәҶе°ҶиҰҒжү§иЎҢзҡ„иҝҷдёӘactionзҡ„е…¶д»–дёҖдәӣйўқеӨ–зҡ„зәҰжқҹгҖӮжңүж—¶йҖҡиҝҮActionпјҢй…ҚеҗҲData жҲ–TypeпјҢеҫҲеӨҡж—¶еҖҷеҸҜд»ҘеҮҶзЎ®зҡ„иЎЁиҫҫеҮәдёҖдёӘе®Ңж•ҙзҡ„ж„ҸеӣҫдәҶпјҢдҪҶд№ҹдјҡйңҖиҰҒеҠ дёҖдәӣзәҰжқҹеңЁйҮҢйқўжүҚиғҪеӨҹжӣҙзІҫеҮҶгҖӮжҜ”еҰӮпјҢеҰӮжһңдҪ иҷҪ然еҫҲе–ңж¬ўеҒҡдҝҜеҚ§ж’‘пјҢдҪҶдёҖж¬ЎеҒҡдёүдёӘиҝҳеҸӘжҳҜеңЁзү№ж®Ҡзҡ„ж—¶еҖҷжүҚдјҡеҸ‘з”ҹпјҢйӮЈд№ҲдҪ еҸҜиғҪиЎЁиҫҫиҜҙпјҡжҜҸж¬Ўеҗғж’‘дәҶзҡ„ж—¶еҖҷ ,жҲ‘йғҪжғіеҒҡдёүдёӘдҝҜеҚ§ж’‘гҖӮеҗғж’‘дәҶпјҢиҝҷе°ұеҜ№еә”зқҖIntentзҡ„Categoryзҡ„иҢғз•ҙпјҢе®ғз»ҷжүҖеҸ‘з”ҹзҡ„ж„Ҹеӣҫйҷ„еҠ дёҖдёӘзәҰжқҹгҖӮеңЁAndroidдёӯпјҢдёҖдёӘе®һдҫӢжҳҜ:жүҖжңүеә”з”Ёзҡ„дё»ActivityпјҲеҚ•зӢ¬еҗҜеҠЁж—¶еҖҷпјҢ第дёҖдёӘиҝҗиЎҢзҡ„йӮЈдёӘActivity...пјүпјҢйғҪйңҖиҰҒдёҖдёӘCategoryдёә CATEGORY_LAUNCHERпјҢActionдёәACTION_MAINзҡ„IntentгҖӮ
еңЁиҮӘе®ҡд№үеҠЁдҪңж—¶пјҢдҪҝз”Ёactivity组件时пјҢеҝ…йЎ»ж·»еҠ дёҖдёӘй»ҳи®Өзҡ„зұ»еҲ«
е…·дҪ“зҡ„е®һзҺ°дёәпјҡ
<intent-filter>

               <action android:name="com.example.action.MY_ACTION"/>

               <category android:name="android.intent.category.DEFAULT"/>

</intent-filter>
еҰӮжһңжңүеӨҡдёӘ组件被еҢ№й…ҚжҲҗеҠҹпјҢе°ұдјҡд»ҘеҜ№иҜқжЎҶеҲ—иЎЁзҡ„ж–№ејҸи®©з”ЁжҲ·иҝӣиЎҢйҖүжӢ©гҖӮ
жҜҸдёӘIntentдёӯеҸӘиғҪжҢҮе®ҡдёҖдёӘactionпјҢдҪҶеҚҙиғҪжҢҮе®ҡеӨҡдёӘcategoryпјӣзұ»еҲ«и¶ҠеӨҡпјҢеҠЁдҪңи¶Ҡе…·дҪ“пјҢж„Ҹеӣҫи¶ҠжҳҺзЎ®пјҲзұ»дјјдәҺзӣёдәІж—¶пјҢз»ҷеҜ№ж–№жҸҗдәҶеҫҲеӨҡиҰҒжұӮпјүгҖӮ
иҮӘе®ҡд№үзұ»еҲ«пјҡ еңЁIntentж·»еҠ зұ»еҲ«еҸҜд»Ҙж·»еҠ еӨҡдёӘзұ»еҲ«пјҢйӮЈе°ұиҰҒжұӮиў«еҢ№й…Қзҡ„组件еҝ…йЎ»еҗҢж—¶ж»Ўи¶іиҝҷеӨҡдёӘзұ»еҲ«пјҢжүҚиғҪеҢ№й…ҚжҲҗеҠҹгҖӮж“ҚдҪңActivityзҡ„ж—¶еҖҷпјҢеҰӮжһңжІЎжңүзұ»еҲ«пјҢйЎ»еҠ дёҠй»ҳи®Өзұ»еҲ«
| Constant | Meaning |
|---|---|
CATEGORY_BROWSABLE | The target activity can be safely invoked by the browser to display data referenced by a link вҖ” for example, an image or an e-mail message. |
CATEGORY_GADGET | The activity can be embedded inside of another activity that hosts gadgets. |
CATEGORY_HOME | The activity displays the home screen, the first screen the user sees when the device is turned on or when the HOME key is pressed. |
CATEGORY_LAUNCHER | The activity can be the initial activity of a task and is listed in the top-level application launcher. |
CATEGORY_PREFERENCE | The target activity is a preference panel. |
4гҖҒdataпјҲж•°жҚ®пјүпјҡиЎЁзӨәдёҺеҠЁдҪңиҰҒж“Қзәөзҡ„ж•°жҚ® =
- DataеұһжҖ§жҳҜAndroidиҰҒи®ҝй—®зҡ„ж•°жҚ®пјҢе’Ңactionе’ҢCategoryеЈ°жҳҺж–№ејҸзӣёеҗҢпјҢд№ҹжҳҜеңЁ<intent-filter>дёӯгҖӮ
- еӨҡдёӘ组件еҢ№й…ҚжҲҗеҠҹжҳҫзӨәдјҳе…Ҳзә§й«ҳзҡ„пјӣ зӣёеҗҢжҳҫзӨәеҲ—иЎЁгҖӮ
DataжҳҜз”ЁдёҖдёӘuriеҜ№иұЎжқҘиЎЁзӨәзҡ„пјҢuriд»ЈиЎЁж•°жҚ®зҡ„ең°еқҖпјҢеұһдәҺдёҖз§Қж ҮиҜҶз¬ҰгҖӮйҖҡеёёжғ…еҶөдёӢпјҢжҲ‘们дҪҝз”Ёaction+dataеұһжҖ§зҡ„з»„еҗҲжқҘжҸҸиҝ°дёҖдёӘж„ҸеӣҫпјҡеҒҡд»Җд№Ҳ
дҪҝз”ЁйҡҗејҸIntentпјҢжҲ‘们дёҚд»…еҸҜд»ҘеҗҜеҠЁиҮӘе·ұзЁӢеәҸеҶ…зҡ„жҙ»еҠЁпјҢиҝҳеҸҜд»ҘеҗҜеҠЁе…¶д»–зЁӢеәҸзҡ„жҙ»еҠЁпјҢиҝҷдҪҝеҫ—AndroidеӨҡдёӘеә”з”ЁзЁӢеәҸд№Ӣй—ҙзҡ„еҠҹиғҪе…ұдә«жҲҗдёәдәҶеҸҜиғҪгҖӮжҜ”еҰӮеә”з”ЁзЁӢеәҸдёӯйңҖиҰҒеұ•зӨәдёҖдёӘзҪ‘йЎөпјҢжІЎжңүеҝ…иҰҒиҮӘе·ұеҺ»е®һзҺ°дёҖдёӘжөҸи§ҲеҷЁпјҲдәӢе®һдёҠд№ҹдёҚеӨӘеҸҜиғҪпјүпјҢиҖҢжҳҜеҸӘйңҖиҰҒжқЎз”Ёзі»з»ҹзҡ„жөҸи§ҲеҷЁжқҘжү“ејҖиҝҷдёӘзҪ‘йЎөе°ұиЎҢдәҶгҖӮ
- еҪ“IntentеҢ№й…ҚжҲҗеҠҹзҡ„组件жңүеӨҡдёӘж—¶пјҢжҳҫзӨәдјҳе…Ҳзә§й«ҳзҡ„组件пјҢеҰӮжһңдјҳе…Ҳзә§зӣёеҗҢпјҢжҳҫзӨәеҲ—иЎЁи®©з”ЁжҲ·иҮӘе·ұйҖүжӢ©
- дјҳе…Ҳзә§д»Һ-1000иҮі1000пјҢ并且其дёӯдёҖдёӘеҝ…йЎ»дёәиҙҹзҡ„жүҚжңүж•Ҳ
жіЁпјҡзі»з»ҹй»ҳи®Өзҡ„жөҸи§ҲеҷЁе№¶жІЎжңүеҒҡеҮәдјҳе…Ҳзә§еЈ°жҳҺпјҢе…¶дјҳе…Ҳзә§й»ҳи®ӨдёәжӯЈж•°гҖӮ
DataеұһжҖ§зҡ„еЈ°жҳҺдёӯиҰҒжҢҮе®ҡи®ҝй—®ж•°жҚ®зҡ„Uriе’ҢMIMEзұ»еһӢгҖӮеҸҜд»ҘеңЁе…ғзҙ дёӯйҖҡиҝҮдёҖдәӣеұһжҖ§жқҘи®ҫзҪ®пјҡ
android:schemeгҖҒandroid:pathгҖҒ android:portгҖҒandroid:mimeTypeгҖҒandroid:hostзӯүпјҢйҖҡиҝҮиҝҷдәӣеұһжҖ§жқҘеҜ№еә”дёҖдёӘе…ёеһӢзҡ„Uriж јејҸ scheme://host:port/pathгҖӮдҫӢеҰӮпјҡhttp://www.google.comгҖӮ
5гҖҒtypeпјҲж•°жҚ®зұ»еһӢпјүпјҡеҜ№дәҺdataиҢғдҫӢзҡ„жҸҸеҶҷ
еҰӮжһңIntentеҜ№иұЎдёӯж—ўеҢ…еҗ«UriеҸҲеҢ…еҗ«TypeпјҢйӮЈд№ҲпјҢеңЁ<intent-filter>дёӯд№ҹеҝ…йЎ»дәҢиҖ…йғҪеҢ…еҗ«жүҚиғҪйҖҡиҝҮжөӢиҜ•гҖӮ
TypeеұһжҖ§з”ЁдәҺжҳҺзЎ®жҢҮе®ҡDataеұһжҖ§зҡ„ж•°жҚ®зұ»еһӢжҲ–MIMEзұ»еһӢпјҢдҪҶжҳҜйҖҡеёёжқҘиҜҙпјҢеҪ“IntentдёҚжҢҮе®ҡDataеұһжҖ§ж—¶пјҢTypeеұһжҖ§жүҚдјҡиө·дҪңз”ЁпјҢеҗҰеҲҷAndroidзі»з»ҹе°Ҷдјҡж №жҚ®DataеұһжҖ§еҖјжқҘеҲҶжһҗж•°жҚ®зҡ„зұ»еһӢпјҢжүҖд»Ҙж— йңҖжҢҮе®ҡTypeеұһжҖ§гҖӮ
dataе’ҢtypeеұһжҖ§дёҖиҲ¬еҸӘйңҖиҰҒдёҖдёӘпјҢйҖҡиҝҮsetDataж–№жі•дјҡжҠҠtypeеұһжҖ§и®ҫзҪ®дёәnullпјҢзӣёеҸҚи®ҫзҪ®setTypeж–№жі•дјҡжҠҠdataи®ҫзҪ®дёәnullпјҢеҰӮжһңжғіиҰҒдёӨдёӘеұһжҖ§еҗҢж—¶и®ҫзҪ®пјҢиҰҒдҪҝз”ЁIntent.setDataAndType()ж–№жі•гҖӮ
6гҖҒextrasпјҲжү©еұ•дҝЎжҒҜпјүпјҡжү©еұ•дҝЎжҒҜ
жҳҜе…¶е®ғжүҖжңүйҷ„еҠ дҝЎжҒҜзҡ„йӣҶеҗҲгҖӮдҪҝз”ЁextrasеҸҜд»Ҙдёә组件жҸҗдҫӣжү©еұ•дҝЎжҒҜпјҢжҜ”еҰӮпјҢеҰӮжһңиҰҒжү§иЎҢвҖңеҸ‘йҖҒз”өеӯҗйӮ®д»¶вҖқиҝҷдёӘеҠЁдҪңпјҢеҸҜд»Ҙе°Ҷз”өеӯҗйӮ®д»¶зҡ„ж ҮйўҳгҖҒжӯЈж–ҮзӯүдҝқеӯҳеңЁextrasйҮҢпјҢдј з»ҷз”өеӯҗйӮ®д»¶еҸ‘йҖҒ组件гҖӮ
7гҖҒFlagsпјҲж Үеҝ—дҪҚпјүпјҡжңҹжңӣиҝҷдёӘж„Ҹеӣҫзҡ„иҝҗиЎҢжЁЎејҸ
дёҖдёӘзЁӢеәҸеҗҜеҠЁеҗҺзі»з»ҹдјҡдёәиҝҷдёӘзЁӢеәҸеҲҶй…ҚдёҖдёӘtaskдҫӣе…¶дҪҝз”ЁпјҢеҸҰеӨ–еҗҢдёҖдёӘtaskйҮҢйқўеҸҜд»ҘжӢҘжңүдёҚеҗҢеә”з”ЁзЁӢеәҸзҡ„activityгҖӮйӮЈд№ҲпјҢеҗҢдёҖдёӘзЁӢеәҸиғҪдёҚиғҪжӢҘжңүеӨҡдёӘtaskпјҹиҝҷе°ұж¶үеҸҠеҲ°еҠ иҪҪactivityзҡ„еҗҜеҠЁжЁЎејҸпјҢиҝҷдёӘйңҖиҰҒеҚ•зӢ¬и®ІдёҖдёӢгҖӮиғҪиҜҶеҲ«пјҢжңүиҫ“е…ҘпјҢж•ҙдёӘIntentеҹәжң¬е°ұе®Ңж•ҙдәҶпјҢдҪҶиҝҳжңүдёҖдәӣйҷ„件зҡ„жҢҮд»ӨпјҢйңҖиҰҒж”ҫеңЁFlagsдёӯеёҰиҝҮеҺ»гҖӮйЎҫеҗҚжҖқд№үпјҢFlagsжҳҜдёҖдёӘж•ҙеҪўж•°пјҢжңүдёҖдәӣеҲ—зҡ„ж Үеҝ— дҪҚжһ„жҲҗпјҢиҝҷдәӣж Үеҝ—пјҢжҳҜз”ЁжқҘжҢҮжҳҺиҝҗиЎҢжЁЎејҸзҡ„гҖӮжҜ”еҰӮпјҢдҪ жңҹжңӣиҝҷдёӘж„Ҹеӣҫзҡ„жү§иЎҢиҖ…пјҢе’ҢдҪ иҝҗиЎҢеңЁдёӨдёӘе®Ңе…ЁдёҚеҗҢзҡ„д»»еҠЎдёӯпјҲжҲ–иҜҙиҝӣзЁӢд№ҹж— еҰЁеҗ§...пјүпјҢе°ұйңҖиҰҒи®ҫзҪ®FLAG_ACTIVITY_NEW_TASKзҡ„ж Үеҝ—дҪҚгҖӮ
жіЁпјҡandroidдёӯдёҖз»„йҖ»иҫ‘дёҠеңЁдёҖиө·зҡ„activityиў«еҸ«еҒҡtaskпјҢиҮӘе·ұи®ӨдёәеҸҜд»ҘзҗҶи§ЈжҲҗдёҖдёӘactivityе Ҷж ҲгҖӮ
Intent зҡ„и§ЈжһҗжңәеҲ¶
зҗҶи§ЈIntentзҡ„е…ій”®д№ӢдёҖжҳҜзҗҶи§Јжё…жҘҡIntentзҡ„дёӨз§Қеҹәжң¬з”Ёжі•пјҡдёҖз§ҚжҳҜжҳҫејҸзҡ„IntentпјҢеҚіеңЁжһ„йҖ IntentеҜ№иұЎж—¶е°ұжҢҮе®ҡжҺҘ收иҖ…пјӣеҸҰдёҖз§ҚжҳҜйҡҗејҸзҡ„IntentпјҢеҚіIntentзҡ„еҸ‘йҖҒиҖ…еңЁжһ„йҖ IntentеҜ№иұЎж—¶пјҢ并дёҚзҹҘйҒ“д№ҹдёҚе…іеҝғжҺҘ收иҖ…жҳҜи°ҒпјҢжңүеҲ©дәҺйҷҚдҪҺеҸ‘йҖҒиҖ…е’ҢжҺҘ收иҖ…д№Ӣй—ҙзҡ„иҖҰеҗҲгҖӮе®ҳж–№е»әи®®дҪҝз”ЁйҡҗејҸIntentгҖӮдёҠиҝ°еұһжҖ§дёӯпјҢcomponentеұһжҖ§дёәзӣҙжҺҘзұ»еһӢпјҢе…¶д»–еқҮдёәй—ҙжҺҘзұ»еһӢгҖӮ
еҜ№дәҺжҳҫејҸIntentпјҢAndroidдёҚйңҖиҰҒеҺ»еҒҡи§ЈжһҗпјҢеӣ дёәзӣ®ж Ү组件已з»ҸеҫҲжҳҺзЎ®пјҢAndroidйңҖиҰҒи§Јжһҗзҡ„жҳҜйӮЈдәӣйҡҗејҸIntentпјҢйҖҡиҝҮи§ЈжһҗпјҢе°Ҷ Intentжҳ е°„з»ҷеҸҜд»ҘеӨ„зҗҶжӯӨIntentзҡ„ActivityгҖҒIntentReceiverжҲ–ServiceгҖӮ
зӣёжҜ”дёҺжҳҫејҸIntentпјҢйҡҗејҸIntnetеҲҷеҗ«и“„дәҶи®ёеӨҡпјҢе®ғ并дёҚжҳҺзЎ®жҢҮеҮәжҲ‘们жғіиҰҒеҗҜеҠЁе“ӘдёҖдёӘжҙ»еҠЁпјҢиҖҢжҳҜжҢҮе®ҡдёҖзі»еҲ—жӣҙдёәжҠҪиұЎзҡ„actionе’ҢcategoryзӯүдҝЎжҒҜпјҢ然еҗҺдәӨз”ұзі»з»ҹеҺ»еҲҶжһҗиҝҷдёӘIntentпјҢ并帮жҲ‘们жүҫеҮәеҗҲйҖӮзҡ„жҙ»еҠЁеҺ»еҗҜеҠЁгҖӮ
Activity дёӯ Intent Filter зҡ„еҢ№й…ҚиҝҮзЁӢ пјҡ
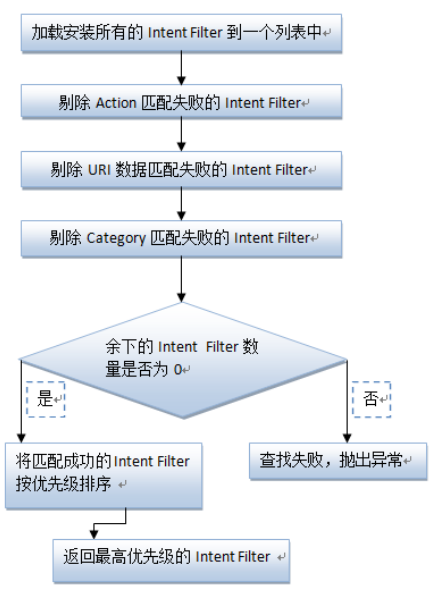
Intent и§ЈжһҗжңәеҲ¶дё»иҰҒжҳҜйҖҡиҝҮжҹҘжүҫе·ІжіЁеҶҢеңЁAndroidManifest.xmlдёӯзҡ„жүҖжңүIntentFilterеҸҠе…¶дёӯе®ҡд№үзҡ„IntentпјҢжңҖз»ҲжүҫеҲ°еҢ№й…Қзҡ„ IntentгҖӮеңЁиҝҷдёӘи§ЈжһҗиҝҮзЁӢдёӯпјҢAndroidжҳҜйҖҡиҝҮIntentзҡ„actionгҖҒtypeгҖҒcategoryиҝҷдёүдёӘеұһжҖ§жқҘиҝӣиЎҢеҲӨж–ӯзҡ„пјҢеҲӨж–ӯж–№жі•еҰӮдёӢпјҡ
- еҰӮжһңIntentжҢҮжҳҺе®ҡдәҶactionпјҢеҲҷзӣ®ж Ү组件зҡ„IntentFilterзҡ„actionеҲ—иЎЁдёӯе°ұеҝ…йЎ»еҢ…еҗ«жңүиҝҷдёӘactionпјҢеҗҰеҲҷдёҚиғҪеҢ№й…Қпјӣ
- еҰӮжһңIntentжІЎжңүжҸҗдҫӣtypeпјҢзі»з»ҹе°Ҷд»Һdataдёӯеҫ—еҲ°ж•°жҚ®зұ»еһӢгҖӮе’ҢactionдёҖж ·пјҢзӣ®ж Ү组件зҡ„ж•°жҚ®зұ»еһӢеҲ—иЎЁдёӯеҝ…йЎ»еҢ…еҗ«Intentзҡ„ж•°жҚ®зұ»еһӢпјҢеҗҰеҲҷдёҚиғҪеҢ№й…ҚгҖӮ
- еҰӮжһңIntentдёӯзҡ„ж•°жҚ®дёҚжҳҜcontent: зұ»еһӢзҡ„URIпјҢиҖҢдё”Intentд№ҹжІЎжңүжҳҺзЎ®жҢҮе®ҡе®ғзҡ„typeпјҢе°Ҷж №жҚ®Intentдёӯж•°жҚ®зҡ„scheme пјҲжҜ”еҰӮ http: жҲ–иҖ…mailto:пјү иҝӣиЎҢеҢ№й…ҚгҖӮеҗҢдёҠпјҢIntent зҡ„schemeеҝ…йЎ»еҮәзҺ°еңЁзӣ®ж Ү组件зҡ„schemeеҲ—иЎЁдёӯгҖӮ
- еҰӮжһңIntentжҢҮе®ҡдәҶдёҖдёӘжҲ–еӨҡдёӘcategoryпјҢиҝҷдәӣзұ»еҲ«еҝ…йЎ»е…ЁйғЁеҮәзҺ°еңЁз»„е»әзҡ„зұ»еҲ«еҲ—иЎЁдёӯгҖӮжҜ”еҰӮIntentдёӯеҢ…еҗ«дәҶдёӨдёӘзұ»еҲ«пјҡLAUNCHER_CATEGORY е’Ң ALTERNATIVE_CATEGORYпјҢи§Јжһҗеҫ—еҲ°зҡ„зӣ®ж Ү组件еҝ…йЎ»иҮіе°‘еҢ…еҗ«иҝҷдёӨдёӘзұ»еҲ«гҖӮ
Intent-Filterзҡ„е®ҡд№ү
дёҖдәӣеұһжҖ§и®ҫзҪ®зҡ„дҫӢеӯҗпјҡ
<action android:name="com.example.project.SHOW_CURRENT" />

<category android:name="android.intent.category.DEFAULT" />

<data android:mimeType="video/mpeg" android:scheme="http" . . . />

<data android:mimeType="image/*" />

<data android:scheme="http" android:type="video/*" />
е®Ңж•ҙзҡ„е®һдҫӢ
<activity android:name="NotesList" android:label="@string/title_notes_list">
            <intent-filter>
                <action android:name="android.intent.action.MAIN" />
                <category android:name="android.intent.category.LAUNCHER" />
            </intent-filter>
            <intent-filter>
                <action android:name="android.intent.action.VIEW" />
                <action android:name="android.intent.action.EDIT" />
                <action android:name="android.intent.action.PICK" />
                <category android:name="android.intent.category.DEFAULT" />
                <data android:mimeType="vnd.android.cursor.dir/vnd.google.note" />
            </intent-filter>
            <intent-filter>
                <action android:name="android.intent.action.GET_CONTENT" />
                <category android:name="android.intent.category.DEFAULT" />
                <data android:mimeType="vnd.android.cursor.item/vnd.google.note" />
            </intent-filter>
        </activity>
Intentзҡ„жһ„йҖ еҮҪж•°
е…¬е…ұжһ„йҖ еҮҪж•°пјҡ
1гҖҒIntent() з©әжһ„йҖ еҮҪж•°
2гҖҒIntent(Intent o) жӢ·иҙқжһ„йҖ еҮҪж•°
3гҖҒIntent(String action) жҢҮе®ҡactionзұ»еһӢзҡ„жһ„йҖ еҮҪж•°
4гҖҒIntent(String action, Uri uri) жҢҮе®ҡActionзұ»еһӢе’ҢUriзҡ„жһ„йҖ еҮҪж•°пјҢURIдё»иҰҒжҳҜз»“еҗҲзЁӢеәҸд№Ӣй—ҙзҡ„ж•°жҚ®е…ұдә«ContentProvider
5гҖҒIntent(Context packageContext, Class<?> cls) дј е…Ҙ组件зҡ„жһ„йҖ еҮҪж•°пјҢд№ҹе°ұжҳҜдёҠж–ҮжҸҗеҲ°зҡ„
6гҖҒIntent(String action, Uri uri, Context packageContext, Class<?> cls) еүҚдёӨз§Қз»“еҗҲдҪ“
Intentжңүе…ӯз§Қжһ„йҖ еҮҪж•°пјҢ3гҖҒ4гҖҒ5жҳҜжңҖеёёз”Ёзҡ„пјҢ并дёҚжҳҜе…¶д»–жІЎз”ЁпјҒ
Intent(String action, Uri uri) зҡ„actionе°ұжҳҜеҜ№еә”еңЁAndroidMainfest.xmlдёӯзҡ„actionиҠӮзӮ№зҡ„nameеұһжҖ§еҖјгҖӮеңЁIntentзұ»дёӯе®ҡд№үдәҶеҫҲеӨҡзҡ„Actionе’ҢCategoryеёёйҮҸгҖӮ
зӨәдҫӢд»Јз ҒдәҢпјҡ
Intent intent = new Intent(Intent.ACTION_EDIT, null);

startActivity(intent);
зӨәдҫӢд»Јз ҒдәҢжҳҜз”ЁдәҶ第еӣӣз§Қжһ„йҖ еҮҪж•°пјҢеҸӘжҳҜuriеҸӮж•°дёәnullгҖӮжү§иЎҢжӯӨд»Јз Ғзҡ„ж—¶еҖҷпјҢзі»з»ҹе°ұдјҡеңЁзЁӢеәҸдё»й…ҚзҪ®ж–Ү件AndroidMainfest.xmlдёӯеҜ»жүҫ
еҜ№еә”зҡ„ActivityпјҢеҰӮжһңеҜ№еә”дёәеӨҡдёӘactivityе…·жңүжӯӨж—¶е°ұдјҡеј№еҮәдёҖдёӘdailogйҖүжӢ©ActivityгҖӮеҰӮжһңжҳҜз”ЁзӨәдҫӢд»Јз ҒдёҖйӮЈз§Қж–№ејҸиҝӣиЎҢеҸ‘йҖҒеҲҷдёҚдјҡжңүиҝҷз§Қжғ…еҶөгҖӮ
еҲ©з”ЁIntentеңЁActivityд№Ӣй—ҙдј йҖ’ж•°жҚ®
еңЁMainдёӯжү§иЎҢеҰӮдёӢд»Јз Ғпјҡ
 Bundle bundle = new Bundle();
bundle.putStringArray("NAMEARR", nameArr);
Intent intent = new Intent(Main.this, CountList.class);
intent.putExtras(bundle);
startActivity(intent);
еңЁCountListдёӯпјҢд»Јз ҒеҰӮдёӢпјҡ
Bundle bundle = this.getIntent().getExtras();
String[] arrName = bundle.getStringArray("NAMEARR");
д»ҘдёҠд»Јз Ғе°ұе®һзҺ°дәҶActivityд№Ӣй—ҙзҡ„ж•°жҚ®дј йҖ’пјҒ
жҖ»з»“иҜҙжҳҺ
иҝҷзҜҮж–Үз« жҳҜжҲ‘еҲҡејҖе§ӢеӯҰд№ Androidж—¶зңӢеҲ°зҡ„пјҢеҪ“ж—¶зҗҶи§Јзҡ„дёҚжҳҜеҫҲж·ұе…ҘпјҢзҺ°еңЁеҶҚеӣһеӨҙзңӢиҝҷзҜҮж–Үз« жҖ»з»“зҡ„еҫҲиҜҰз»ҶпјҢеңЁиҝҷйҮҢдёҺеӨ§е®¶еҲҶдә«гҖӮ
1пјҢи°ғз”ЁwebжөҸи§ҲеҷЁ
<pre name="code" class="java">Uri myBlogUri = Uri.parse("http://kuikui.javaeye.com");
returnIt = new Intent(Intent.ACTION_VIEW, myBlogUri);
2пјҢең°еӣҫ
Uri mapUri = Uri.parse("geo:38.899533,-77.036476");
returnIt = new Intent(Intent.ACTION_VIEW, mapUri);
3пјҢи°ғжӢЁжү“з”өиҜқз•Ңйқў
Uri telUri = Uri.parse("tel:100861");
returnIt = new Intent(Intent.ACTION_DIAL, telUri);
4пјҢзӣҙжҺҘжӢЁжү“з”өиҜқ
Uri callUri = Uri.parse("tel:100861");
returnIt = new Intent(Intent.ACTION_CALL, callUri);
5пјҢеҚёиҪҪ
Uri uninstallUri = Uri.fromParts("package", "xxx", null);
returnIt = new Intent(Intent.ACTION_DELETE, uninstallUri);
6пјҢе®үиЈ…
Uri installUri = Uri.fromParts("package", "xxx", null);
returnIt = new Intent(Intent.ACTION_PACKAGE_ADDED, installUri);
7пјҢж’ӯж”ҫ
Uri playUri = Uri.parse("file:///sdcard/download/everything.mp3");
returnIt = new Intent(Intent.ACTION_VIEW, playUri);
8пјҢи°ғз”ЁеҸ‘йӮ®д»¶
Uri emailUri = Uri.parse("mailto:shenrenkui@gmail.com");
returnIt = new Intent(Intent.ACTION_SENDTO, emailUri);
9пјҢеҸ‘йӮ®д»¶
returnIt = new Intent(Intent.ACTION_SEND);
String[] tos = { "shenrenkui@gmail.com" };
String[] ccs = { "shenrenkui@gmail.com" };
returnIt.putExtra(Intent.EXTRA_EMAIL, tos);
returnIt.putExtra(Intent.EXTRA_CC, ccs);
returnIt.putExtra(Intent.EXTRA_TEXT, "body");
returnIt.putExtra(Intent.EXTRA_SUBJECT, "subject");
returnIt.setType("message/rfc882");
Intent.createChooser(returnIt, "Choose Email Client");
10пјҢеҸ‘зҹӯдҝЎ
Uri smsUri = Uri.parse("tel:100861");
returnIt = new Intent(Intent.ACTION_VIEW, smsUri);
returnIt.putExtra("sms_body", "shenrenkui");
returnIt.setType("vnd.android-dir/mms-sms");
11пјҢзӣҙжҺҘеҸ‘йӮ®д»¶
Uri smsToUri = Uri.parse("smsto://100861");
returnIt = new Intent(Intent.ACTION_SENDTO, smsToUri);
returnIt.putExtra("sms_body", "shenrenkui");
12пјҢеҸ‘еҪ©дҝЎ
Uri mmsUri = Uri.parse("content://media/external/images/media/23");
returnIt = new Intent(Intent.ACTION_SEND);
returnIt.putExtra("sms_body", "shenrenkui");
returnIt.putExtra(Intent.EXTRA_STREAM, mmsUri);
returnIt.setType("image/png");
з”ЁиҺ·еҸ–еҲ°зҡ„IntentзӣҙжҺҘи°ғз”ЁstartActivity(returnIt)е°ұokдәҶгҖӮ
Intentз”Ёжі•е®һдҫӢ
1гҖҒжү“ејҖжҢҮе®ҡзҪ‘йЎөпјҡпјҲзӣҙжҺҘеӨҚеҲ¶зҡ„дёҠйқўзҡ„д»Јз Ғпјү
MainActivity.javaдёӯпјҢзӣ‘еҗ¬еҷЁйғЁеҲҶзҡ„ж ёеҝғд»Јз ҒеҰӮдёӢпјҡ
button1.setOnClickListener(new OnClickListener() {
            @Override
            public void onClick(View v) {
                Intent intent = new Intent(Intent.ACTION_VIEW);
                intent.setData(Uri.parse("http://www.baidu.com"));
                startActivity(intent);
            }
        });
第4иЎҢд»Јз ҒпјҡжҢҮе®ҡдәҶIntentзҡ„actionжҳҜ Intent.ACTION_VIEWпјҢиЎЁзӨәжҹҘзңӢзҡ„ж„ҸжҖқпјҢиҝҷжҳҜдёҖдёӘAndroidзі»з»ҹеҶ…зҪ®зҡ„еҠЁдҪңпјӣ
第5иЎҢд»Јз ҒпјҡйҖҡиҝҮUri.parse()ж–№жі•пјҢе°ҶдёҖдёӘзҪ‘еқҖеӯ—з¬ҰдёІи§ЈжһҗжҲҗдёҖдёӘUriеҜ№иұЎпјҢеҶҚи°ғз”Ёintentзҡ„setData()ж–№жі•е°ҶиҝҷдёӘUriеҜ№иұЎдј йҖ’иҝӣеҺ»гҖӮ
2гҖҒжү“з”өиҜқпјҡ
гҖҗж–№ејҸдёҖгҖ‘жү“ејҖжӢЁжү“з”өиҜқзҡ„з•Ңйқўпјҡ
Intent intent = new Intent(Intent.ACTION_DIAL);
intent.setData(Uri.parse("tel:10086"));
startActivity(intent);
иҝҗиЎҢзЁӢеәҸеҗҺпјҢзӮ№еҮ»жҢүй’®пјҢжҳҫзӨәеҰӮдёӢз•Ңйқўпјҡ

гҖҗж–№ејҸдәҢгҖ‘зӣҙжҺҘжӢЁжү“з”өиҜқпјҡ
Intent intent = new Intent(Intent.ACTION_CALL);
intent.setData(Uri.parse("tel:10086"));
startActivity(intent);
иҰҒдҪҝз”ЁиҝҷдёӘеҠҹиғҪеҝ…йЎ»еңЁй…ҚзҪ®ж–Ү件дёӯеҠ е…ҘжқғйҷҗпјҡпјҲеҠ дёҖиЎҢд»Јз Ғпјү
<uses-sdk
    android:minSdkVersion="8"
    android:targetSdkVersion="16" />
<uses-permission android:name="android.permission.CALL_PHONE"/>
3гҖҒеҸ‘йҖҒзҹӯдҝЎпјҡ
гҖҗж–№ејҸдёҖгҖ‘жү“ејҖеҸ‘йҖҒзҹӯдҝЎзҡ„з•Ңйқўпјҡaction+type
Intent intent = new Intent(Intent.ACTION_VIEW);
intent.setType("vnd.android-dir/mms-sms");
intent.putExtra("sms_body", "е…·дҪ“зҹӯдҝЎеҶ…е®№"); //"sms_body"дёәеӣәе®ҡеҶ…е®№
startActivity(intent);
гҖҗж–№ејҸдәҢгҖ‘жү“ејҖеҸ‘зҹӯдҝЎзҡ„з•Ңйқў(еҗҢж—¶жҢҮе®ҡз”өиҜқеҸ·з Ғ)пјҡaction+data
Intent intent = new Intent(Intent.ACTION_SENDTO);
intent.setData(Uri.parse("smsto:18780260012"));
intent.putExtra("sms_body", "е…·дҪ“зҹӯдҝЎеҶ…е®№"); //"sms_body"дёәеӣәе®ҡеҶ…е®№
startActivity(intent);
4гҖҒж’ӯж”ҫжҢҮе®ҡи·Ҝеҫ„йҹід№җпјҡaction+data+type
Intent intent = new Intent(Intent.ACTION_VIEW);
Uri uri = Uri.parse("file:///storage/sdcard0/е№іеҮЎд№Ӣи·Ҝ.mp3"); ////и·Ҝеҫ„д№ҹеҸҜд»ҘеҶҷжҲҗпјҡ"/storage/sdcard0/е№іеҮЎд№Ӣи·Ҝ.mp3"
intent.setDataAndType(uri, "audio/mp3"); //ж–№жі•пјҡIntent android.content.Intent.setDataAndType(Uri data, String type)
startActivity(intent);
5гҖҒеҚёиҪҪзЁӢеәҸпјҡaction+dataпјҲдҫӢеҰӮзӮ№еҮ»жҢүй’®пјҢеҚёиҪҪжҹҗдёӘеә”з”ЁзЁӢеәҸпјҢж №жҚ®еҢ…еҗҚжқҘиҜҶеҲ«пјү
жіЁпјҡж— и®әжҳҜе®үиЈ…иҝҳжҳҜеҚёиҪҪпјҢеә”з”ЁзЁӢеәҸжҳҜж №жҚ®еҢ…еҗҚpackageжқҘиҜҶеҲ«зҡ„гҖӮ
Intent intent = new Intent(Intent.ACTION_DELETE);
Uri data = Uri.parse("package:com.example.smyh006intent01");
intent.setData(data);
startActivity(intent);
6гҖҒе®үиЈ…зЁӢеәҸпјҡaction+data+type
Intent intent = new Intent(Intent.ACTION_VIEW);
Uri data = Uri.fromFile(new File("/storage/sdcard0/AndroidTest/smyh006_Intent01.apk")); //и·Ҝеҫ„дёҚиғҪеҶҷжҲҗпјҡ"file:///storage/sdcard0/В·В·В·"
intent.setDataAndType(data, "application/vnd.android.package-archive"); //Typeзҡ„еӯ—з¬ҰдёІдёәеӣәе®ҡеҶ…е®№
startActivity(intent);
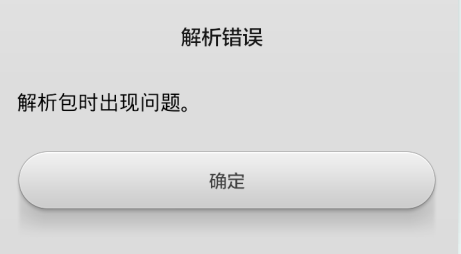
жіЁпјҡ第2иЎҢзҡ„и·Ҝеҫ„дёҚиғҪеҶҷжҲҗпјҡ"file:///storage/sdcard0/В·В·В·"пјҢдёҚ然жҠҘй”ҷеҰӮдёӢпјҡ
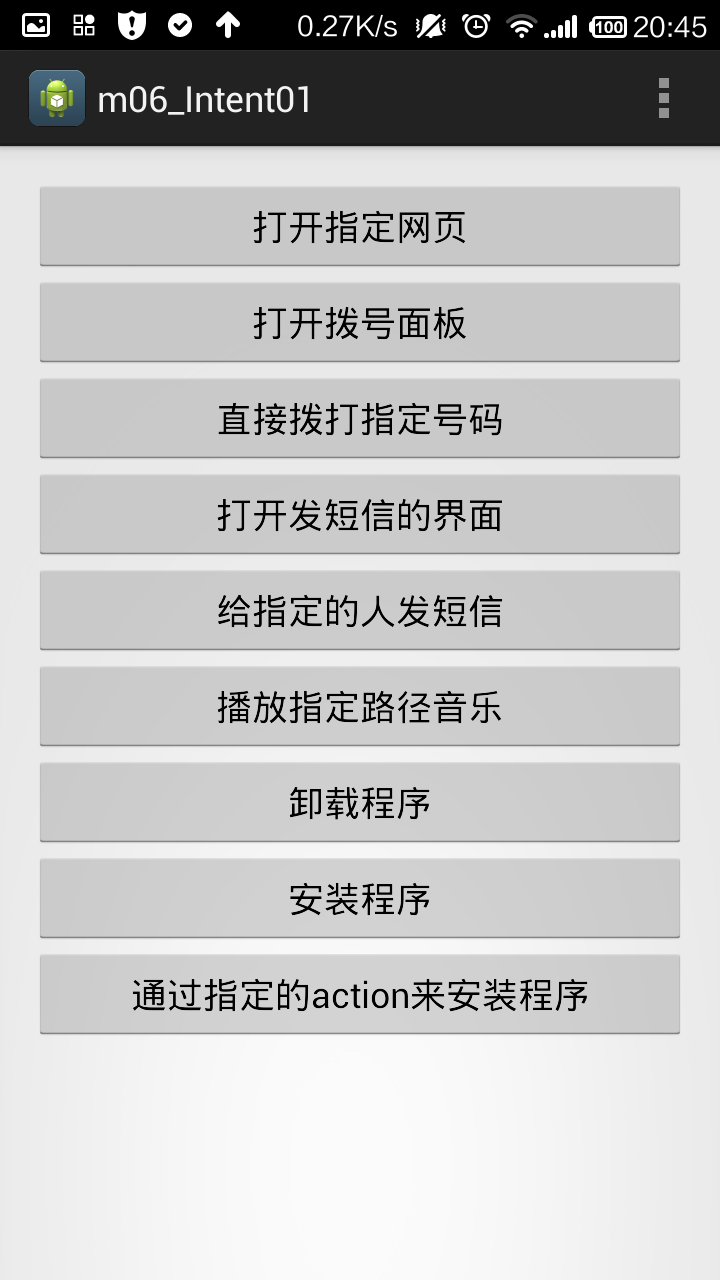
з»јдёҠжүҖиҝ°пјҢе®Ңж•ҙзүҲд»Јз ҒеҰӮдёӢпјҡ
<LinearLayout xmlns:android="http://schemas.android.com/apk/res/android"
xmlns:tools="http://schemas.android.com/tools"
android:layout_width="match_parent"
android:layout_height="match_parent"
android:paddingBottom="@dimen/activity_vertical_margin"
android:paddingLeft="@dimen/activity_horizontal_margin"
android:paddingRight="@dimen/activity_horizontal_margin"
android:paddingTop="@dimen/activity_vertical_margin"
android:orientation="vertical"
tools:context=".MainActivity" >
<Button
android:id="@+id/button1_browsePage"
android:layout_width="match_parent"
android:layout_height="wrap_content"
android:onClick="browsePageClick"
android:text="жү“ејҖжҢҮе®ҡзҪ‘йЎө"/>
<Button
android:id="@+id/button2_openDialPage"
android:layout_width="match_parent"
android:layout_height="wrap_content"
android:onClick="openDialPageClick"
android:text="жү“ејҖжӢЁеҸ·йқўжқҝ"/>
<Button
android:id="@+id/button3_dialPhone"
android:layout_width="match_parent"
android:layout_height="wrap_content"
android:onClick="dialPhoneClick"
android:text="зӣҙжҺҘжӢЁжү“жҢҮе®ҡеҸ·з Ғ"/>
<Button
android:id="@+id/button4_openMsgPage"
android:layout_width="match_parent"
android:layout_height="wrap_content"
android:onClick="openMsgPageClick"
android:text="жү“ејҖеҸ‘зҹӯдҝЎзҡ„з•Ңйқў"/>
<Button
android:id="@+id/button5_sendMsg"
android:layout_width="match_parent"
android:layout_height="wrap_content"
android:onClick="sendMsgClick"
android:text="з»ҷжҢҮе®ҡзҡ„дәәеҸ‘зҹӯдҝЎ"/>
<Button
android:id="@+id/button6_playMusic"
android:layout_width="match_parent"
android:layout_height="wrap_content"
android:onClick="playMusicClick"
android:text="ж’ӯж”ҫжҢҮе®ҡи·Ҝеҫ„йҹід№җ"/>
<Button
android:id="@+id/button7_uninstall"
android:layout_width="match_parent"
android:layout_height="wrap_content"
android:onClick="uninstallClick"
android:text="еҚёиҪҪзЁӢеәҸ"/>
<Button
android:id="@+id/button8_install"
android:layout_width="match_parent"
android:layout_height="wrap_content"
android:onClick="installClick"
android:text="е®үиЈ…зЁӢеәҸ"/>
</LinearLayout>
MainActivity.javaд»Јз ҒеҰӮдёӢпјҡ
package com.example.m06intent01;
import java.io.File;
import android.app.Activity;
import android.content.Intent;
import android.net.Uri;
import android.os.Bundle;
import android.view.Menu;
import android.view.View;
public class MainActivity extends Activity {
@Override
protected void onCreate(Bundle savedInstanceState) {
super.onCreate(savedInstanceState);
setContentView(R.layout.activity_main);
}
//жү“ејҖжҢҮе®ҡзҪ‘йЎө
public void browsePageClick(View view){
Intent intent = new Intent(Intent.ACTION_VIEW);
intent.setData(Uri.parse("http://www.baidu.com/"));
startActivity(intent);
}
//жү“ејҖжӢЁеҸ·йқўжқҝ
public void openDialPageClick(View view){
Intent intent = new Intent(Intent.ACTION_DIAL);
intent.setData(Uri.parse("tel:10086"));
startActivity(intent);
}
//зӣҙжҺҘжӢЁжү“жҢҮе®ҡеҸ·з Ғ
public void dialPhoneClick(View view){
Intent intent = new Intent(Intent.ACTION_CALL);
intent.setData(Uri.parse("tel:10086"));
startActivity(intent);
}
//жү“ејҖеҸ‘зҹӯдҝЎзҡ„з•Ңйқў:action+type
public void openMsgPageClick(View view){
Intent intent = new Intent(Intent.ACTION_VIEW);
intent.setType("vnd.android-dir/mms-sms");
intent.putExtra("sms_body", "е…·дҪ“зҹӯдҝЎеҶ…е®№"); //"sms_body"дёәеӣәе®ҡеҶ…е®№
startActivity(intent);
}
//жү“ејҖеҸ‘зҹӯдҝЎзҡ„з•Ңйқў(жҢҮе®ҡз”өиҜқеҸ·з Ғ):action+data
public void sendMsgClick(View view){
Intent intent = new Intent(Intent.ACTION_SENDTO);
intent.setData(Uri.parse("smsto:18780260012"));
intent.putExtra("sms_body", "е…·дҪ“зҹӯдҝЎеҶ…е®№"); //"sms_body"дёәеӣәе®ҡеҶ…е®№
startActivity(intent);
}
//ж’ӯж”ҫжҢҮе®ҡи·Ҝеҫ„йҹід№җ
public void playMusicClick(View view){
Intent intent = new Intent(Intent.ACTION_VIEW);
Uri uri = Uri.parse("file:///storage/sdcard0/е№іеҮЎд№Ӣи·Ҝ.mp3"); //и·Ҝеҫ„д№ҹеҸҜд»ҘеҶҷжҲҗпјҡ"/storage/sdcard0/е№іеҮЎд№Ӣи·Ҝ.mp3"
intent.setDataAndType(uri, "audio/mp3"); //ж–№жі•пјҡIntent android.content.Intent.setDataAndType(Uri data, String type)
startActivity(intent);
}
//еҚёиҪҪжҹҗдёӘеә”з”ЁзЁӢеәҸпјҢж №жҚ®еҢ…еҗҚжқҘиҜҶеҲ«
public void uninstallClick(View view){
Intent intent = new Intent(Intent.ACTION_DELETE);
Uri data = Uri.parse("package:com.example.smyh006intent01");
intent.setData(data);
startActivity(intent);
}
//е®үиЈ…жҹҗдёӘеә”з”ЁзЁӢеәҸпјҢж №жҚ®apkзҡ„ж–Ү件еҗҚжқҘиҜҶеҲ«
public void installClick(View view){
Intent intent = new Intent(Intent.ACTION_VIEW);
Uri data = Uri.fromFile(new File("/storage/sdcard0/AndroidTest/smyh006_Intent01.apk")); //и·Ҝеҫ„дёҚиғҪеҶҷжҲҗпјҡ"file:///storage/sdcard0/В·В·В·"
intent.setDataAndType(data, "application/vnd.android.package-archive"); //Typeзҡ„еӯ—з¬ҰдёІдёәеӣәе®ҡеҶ…е®№
startActivity(intent);
}
@Override
public boolean onCreateOptionsMenu(Menu menu) {
// Inflate the menu; this adds items to the action bar if it is present.
getMenuInflater().inflate(R.menu.main, menu);
return true;
}
}
1.ж— еҸӮж•°Activityи·іиҪ¬
Intent it = new Intent(Activity.Main.this, Activity2.class);
startActivity(it);
2.еҗ‘дёӢдёҖдёӘActivityдј йҖ’ж•°жҚ®пјҲдҪҝз”ЁBundleе’ҢIntent.putExtrasпјү
Intent it = new Intent(Activity.Main.this, Activity2.class);
Bundle bundle=new Bundle();
bundle.putString("name", "This is from MainActivity!");
it.putExtras(bundle); // it.putExtra(вҖңtestвҖқ, "shujuвҖқ);
startActivity(it); // startActivityForResult(it,REQUEST_CODE);
еҜ№дәҺж•°жҚ®зҡ„иҺ·еҸ–еҸҜд»ҘйҮҮз”Ёпјҡ
Bundle bundle=getIntent().getExtras();
String name=bundle.getString("name");
3.еҗ‘дёҠдёҖдёӘActivityиҝ”еӣһз»“жһңпјҲдҪҝз”ЁsetResultпјҢй’ҲеҜ№startActivityForResult(it,REQUEST_CODE)еҗҜеҠЁзҡ„Activityпјү
        Intent intent=getIntent();
        Bundle bundle2=new Bundle();
        bundle2.putString("name", "This is from ShowMsg!");
        intent.putExtras(bundle2);
        setResult(RESULT_OK, intent);
4.еӣһи°ғдёҠдёҖдёӘActivityзҡ„з»“жһңеӨ„зҗҶеҮҪж•°пјҲonActivityResultпјү
@Override
    protected void onActivityResult(int requestCode, int resultCode, Intent data) {
        // TODO Auto-generated method stub
        super.onActivityResult(requestCode, resultCode, data);
        if (requestCode==REQUEST_CODE){
            if(resultCode==RESULT_CANCELED)
                  setTitle("cancle");
            else if (resultCode==RESULT_OK) {
                 String temp=null;
                 Bundle bundle=data.getExtras();
                 if(bundle!=null)   temp=bundle.getString("name");
                 setTitle(temp);
            }
        }
    }
иҝҗиЎҢеҗҺпјҢдё»з•ҢйқўеҰӮдёӢпјҡ
дёӢйқўжҳҜиҪ¬иҪҪжқҘзҡ„е…¶д»–зҡ„дёҖдәӣIntentз”Ёжі•е®һдҫӢпјҲиҪ¬иҮӘjavaeyeпјү
жҳҫзӨәзҪ‘йЎө
   Uri uri = Uri.parse("http://google.com");
   Intent it = new Intent(Intent.ACTION_VIEW, uri);
   startActivity(it);
жҳҫзӨәең°еӣҫ
Uri uri = Uri.parse("geo:38.899533,-77.036476");
Intent it = new Intent(Intent.ACTION_VIEW, uri);
startActivity(it);
//е…¶д»– geo URI зҜ„дҫӢ
//geo:latitude,longitude
//geo:latitude,longitude?z=zoom
//geo:0,0?q=my+street+address
//geo:0,0?q=business+near+city
//google.streetview:cbll=lat,lng&cbp=1,yaw,,pitch,zoom&mz=mapZoom
и·Ҝеҫ„规еҲ’
   Uri uri = Uri.parse("http://maps.google.com/maps?f=d&saddr=startLat%20startLng&daddr=endLat%20endLng&hl=en");
   Intent it = new Intent(Intent.ACTION_VIEW, uri);
   startActivity(it);
   //where startLat, startLng, endLat, endLng are a long with 6 decimals like: 50.123456
жү“з”өиҜқ
//еҸ«еҮәжӢЁеҸ·зЁӢеәҸ
Uri uri = Uri.parse("tel:0800000123");
Intent it = new Intent(Intent.ACTION_DIAL, uri);
startActivity(it);
//зӣҙжҺҘжү“з”өиҜқеҮәеҺ»
Uri uri = Uri.parse("tel:0800000123");
Intent it = new Intent(Intent.ACTION_CALL, uri);
startActivity(it);
//з”ЁйҖҷеҖӢпјҢиҰҒеңЁ AndroidManifest.xml дёӯпјҢеҠ дёҠ
//<uses-permission id="android.permission.CALL_PHONE" />
дј йҖҒSMS/MMS
//и°ғз”ЁзҹӯдҝЎзЁӢеәҸ
Intent it = new Intent(Intent.ACTION_VIEW, uri);
it.putExtra("sms_body", "The SMS text");
it.setType("vnd.android-dir/mms-sms");
startActivity(it);
//дј йҖҒж¶ҲжҒҜ
Uri uri = Uri.parse("smsto://0800000123");
Intent it = new Intent(Intent.ACTION_SENDTO, uri);
it.putExtra("sms_body", "The SMS text");
startActivity(it);
//дј йҖҒ MMS
Uri uri = Uri.parse("content://media/external/images/media/23");
Intent it = new Intent(Intent.ACTION_SEND);
it.putExtra("sms_body", "some text");
it.putExtra(Intent.EXTRA_STREAM, uri);
it.setType("image/png");
startActivity(it);
дј йҖҒ Email
Uri uri = Uri.parse("mailto:xxx@abc.com");
Intent it = new Intent(Intent.ACTION_SENDTO, uri);
startActivity(it);
Intent it = new Intent(Intent.ACTION_SEND);
it.putExtra(Intent.EXTRA_EMAIL, "me@abc.com");
it.putExtra(Intent.EXTRA_TEXT, "The email body text");
it.setType("text/plain");
startActivity(Intent.createChooser(it, "Choose Email Client"));
Intent it=new Intent(Intent.ACTION_SEND);
String[] tos={"me@abc.com"};
String[] ccs={"you@abc.com"};
it.putExtra(Intent.EXTRA_EMAIL, tos);
it.putExtra(Intent.EXTRA_CC, ccs);
it.putExtra(Intent.EXTRA_TEXT, "The email body text");
it.putExtra(Intent.EXTRA_SUBJECT, "The email subject text");
it.setType("message/rfc822");
startActivity(Intent.createChooser(it, "Choose Email Client"));
//дј йҖҒйҷ„件
Intent it = new Intent(Intent.ACTION_SEND);
it.putExtra(Intent.EXTRA_SUBJECT, "The email subject text");
it.putExtra(Intent.EXTRA_STREAM, "file:///sdcard/mysong.mp3");
sendIntent.setType("audio/mp3");
startActivity(Intent.createChooser(it, "Choose Email Client"));
ж’ӯж”ҫеӨҡеӘ’дҪ“
       Uri uri = Uri.parse("file:///sdcard/song.mp3");
       Intent it = new Intent(Intent.ACTION_VIEW, uri);
       it.setType("audio/mp3");
       startActivity(it);
       Uri uri = Uri.withAppendedPath(MediaStore.Audio.Media.INTERNAL_CONTENT_URI, "1");
       Intent it = new Intent(Intent.ACTION_VIEW, uri);
       startActivity(it);
Market зӣёе…і
//еҜ»жүҫжҹҗдёӘеә”з”Ё
Uri uri = Uri.parse("market://search?q=pname:pkg_name");
Intent it = new Intent(Intent.ACTION_VIEW, uri);
startActivity(it);
//where pkg_name is the full package path for an application
//жҳҫзӨәжҹҗдёӘеә”з”Ёзҡ„зӣёе…ідҝЎжҒҜ
Uri uri = Uri.parse("market://details?id=app_id");
Intent it = new Intent(Intent.ACTION_VIEW, uri);
startActivity(it);
//where app_id is the application ID, find the ID
//by clicking on your application on Market home
//page, and notice the ID from the address bar
Uninstall еә”з”ЁзЁӢеәҸ
Uri uri = Uri.fromParts("package", strPackageName, null);
Intent it = new Intent(Intent.ACTION_DELETE, uri);
startActivity(it);
еҸӮиҖғпјҡ
http://www.cnblogs.com/smyhvae/p/3959204.html