在Android中通过WebView控件,可以实现要加载的页面与Android方法相互调用,我们要实现WebView中的addJavascriptInterface方法,这样html才能调用android方法,在这里我个人觉得有点和DWR相似。
为了让大家容易理解,我写了一个简单的Demo,具体步骤如下:
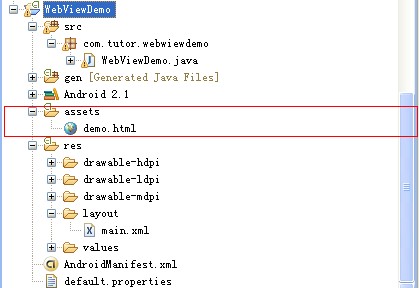
第一步:新建一个Android工程,命名为WebViewDemo(这里我在assets里定义了一个html页面)。
第二步:修改main.xml布局文件,增加了一个WebView控件还有Button控件,代码如下:
<?xml version="1.0" encoding="utf-8"?><LinearLayout xmlns:android="http://schemas.android.com/apk/res/android" android:orientation="vertical" android:layout_width="fill_parent" android:layout_height="fill_parent" > <TextView android:layout_width="fill_parent" android:layout_height="wrap_content" android:text="Welcome to Mr Wei"s Blog." /> <WebView android:id="@+id/webview" android:layout_width="fill_parent" android:layout_height="wrap_content" /> <Button android:id="@+id/button" android:layout_width="fill_parent" android:layout_height="wrap_content" android:text="Change the webview content" /></LinearLayout>
第三步:在assets目录下新建一个demo.html文件,代码如下(这里不知道为何多了mce:这几个东东,这样是对的):
<html> <mce:script language="javascript"><!-- function fillContent(){ document.getElementById("content").innerHTML = "This Content is showed by Android invoke Javascript function."; } // --></mce:script> <body> <p><a onClick="window.demo.startMap()" href="">Start GoogleMap</a></p> <p id="content"></p> <p>A Demo ----Android and Javascript invoke each other.</p> <p>Author:Frankiewei</p> </body></html>
第四步:修改主核心程序WebViewDemo.java,代码如下:
package com.tutor.webwiewdemo;import android.app.Activity;import android.content.ComponentName;import android.content.Intent;import android.os.Bundle;import android.view.View;import android.webkit.WebSettings;import android.webkit.WebView;import android.widget.Button;public class WebViewDemo extends Activity { private WebView mWebView; private Button mButton; public void onCreate(Bundle savedInstanceState) { super.onCreate(savedInstanceState); setContentView(R.layout.main); setupViews(); } //初始化 private void setupViews() { mWebView = (WebView) findViewById(R.id.webview); WebSettings mWebSettings = mWebView.getSettings(); //加上这句话才能使用javascript方法 mWebSettings.setJavaScriptEnabled(true); //增加接口方法,让html页面调用 mWebView.addJavascriptInterface(new Object() { //这里我定义了一个打开地图应用的方法 public void startMap() { Intent mIntent = new Intent(); ComponentName component = new ComponentName( "com.google.android.apps.maps", "com.google.android.maps.MapsActivity"); mIntent.setComponent(component); startActivity(mIntent); } }, "demo"); //加载页面 mWebView.loadUrl("file:///android_asset/demo.html"); mButton = (Button) findViewById(R.id.button); //给button添加事件响应,执行JavaScript的fillContent()方法 mButton.setOnClickListener(new Button.OnClickListener() { public void onClick(View v) { mWebView.loadUrl("javascript:fillContent()"); } }); }}
第五步:运行上述工程,查看效果。
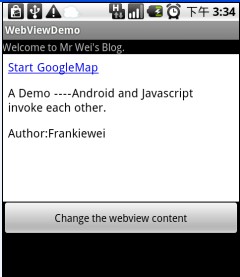
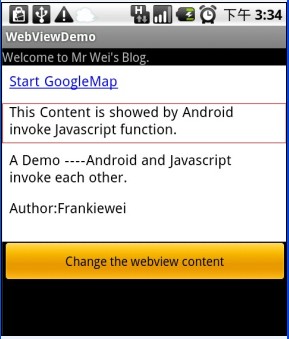
首界面 点击按钮时,html内容改变
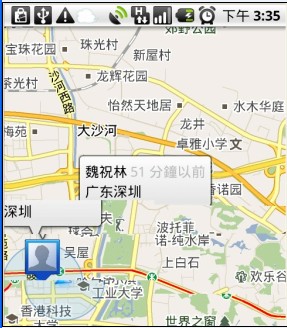
点击html的startGoogleMap启动地图应用