еүҚйқўе·Із»ҸеҶҷдәҶдёҖзҜҮе…ідәҺreactJS组件з”ҹе‘Ҫе‘Ёжңҹзҡ„еҚҡж–ҮпјҢжӯӨзҜҮеҚҡж–ҮжҳҜдёҖдёӘиЎҘе……пјҢеўһеҠ дәҶдёҖдәӣдҫӢеӯҗпјҢжңүеҠ©дәҺжӣҙеҘҪзҡ„зҗҶи§ЈreactJS组件гҖӮВ
еҲқе§ӢеҢ–йҳ¶ж®өиғҪеӨҹдҪҝз”Ёзҡ„й’©еӯҗеҮҪж•°(жҢүз…§и§ҰеҸ‘йЎәеәҸ)пјҡВ
getDefaultProps(иҺ·еҸ–е®һдҫӢзҡ„й»ҳи®ӨеұһжҖ§)вҖ”вҖ”вҖ”вҖ”еҸӘжңү第дёҖж¬Ўе®һдҫӢзҡ„ж—¶еҖҷи°ғз”ЁпјҢе®һдҫӢд№Ӣй—ҙе…ұдә«еј•з”Ё(еұһжҖ§)В
getInitialState(иҺ·еҸ–е®һдҫӢзҡ„еҲқе§ӢзҠ¶жҖҒ)вҖ”вҖ”вҖ”вҖ”еҲқе§ӢеҢ–жҜҸдёӘе®һдҫӢзү№жңүзҡ„зҠ¶жҖҒВ
еҝ…йЎ»иҝ”еӣһдёҖдёӘObjectжҲ–иҖ…жҳҜNullВ
componentWillMount(组件еҚіе°Ҷиў«жёІжҹ“еҲ°йЎөйқў)вҖ”вҖ”renderд№ӢеүҚжңҖеҗҺдёҖж¬Ўдҝ®ж”№зҠ¶жҖҒзҡ„жңәдјҡВ
render(组件еңЁrenderдёӯз”ҹжҲҗиҷҡжӢҹзҡ„DOMиҠӮзӮ№,еҚіJSX,жңҖеҗҺз”ұReactз”ҹжҲҗзңҹе®һзҡ„DOMиҠӮзӮ№)вҖ”вҖ”еҸӘиғҪи®ҝй—®this.propsе’Ңthis.state,дёҚеә”еҶҚи®ҝй—®е…¶е®ғдҝЎжҒҜпјҢеҸӘжңүдёҖдёӘйЎ¶еұӮ组件пјҢдҪҶжҳҜеҸҜд»Ҙжңүеӯҗ组件пјҢдёҚе…Ғи®ёдҝ®ж”№зҠ¶жҖҒе’ҢDOMиҫ“еҮәгҖӮВ
еҰӮжһңrenderйңҖиҰҒдҝ®ж”№зҠ¶жҖҒе’ҢDOMиҫ“еҮәпјҢйӮЈд№Ҳrenderе°ұдёҚиғҪеңЁжңҚеҠЎз«ҜдҪҝз”ЁгҖӮ并且пјҢеҰӮжһңеңЁrenderдёӯдҝ®ж”№зҠ¶жҖҒе’ҢDOMиҫ“еҮәпјҢдјҡдҪҝеҫ—д»Јз ҒйҖ»иҫ‘еҸҳеҫ—еӨҚжқӮгҖӮжүҖд»ҘпјҢиҰҒе°ҪеҸҜиғҪйҒҝе…Қиҝҷж ·еҒҡгҖӮВ
componentDidMount(组件被渲жҹ“еҲ°йЎөйқўд№ӢеҗҺ)вҖ”вҖ”жҲҗеҠҹrender并渲жҹ“е®ҢжҲҗзңҹе®һDOMд№ӢеҗҺи§ҰеҸ‘пјҢеҸҜд»Ҙдҝ®ж”№DOM
<!DOCTYPE html>
<html lang="en">
<head>
<meta charset="UTF-8">
<meta name="Keywords" content="е…ій”®иҜҚдёҖпјҢе…ій”®иҜҚдәҢ">
<meta name="Description" content="зҪ‘з«ҷжҸҸиҝ°еҶ…е®№">
<meta name="Author" content="еҲҳиүі">
<title></title>
</head>
<body>
<div id = "example"></div>
<div id = "example2"></div>
</body>
</html>
<script src="build/jquery-1.11.2.min.js"></script>
<script src="build/react.js"></script>
<script src="build/react-dom.js"></script>
<script src="build/browser.min.js"></script>
<script type="text/babel">
var MyComponent = React.createClass({
getDefaultProps: function(){
console.log("иҺ·еҸ–е®һдҫӢзҡ„й»ҳи®ӨеұһжҖ§");
return{name: "Yvette"};
},
getInitialState: function () {
console.log("иҺ·еҸ–е®һдҫӢзҡ„еҲқе§ӢзҠ¶жҖҒ");
return{will:true};
},
componentWillMount: function () {
console.log("组件еҚіе°Ҷиў«жёІжҹ“еҲ°йЎөйқў");
},
handleClick: function(event){
this.setState({will: !this.state.will});
},
componentDidMount: function(){
console.log("aaaa");
if(this.state.will){
$(this.refs.example).append("е•Ұе•Ұе•Ұ");
}else{
$(this.refs.example).append("йғҒй—·");
}
},
render: function(){
console.log("render");
return(
<div>
<p ref = "example" onClick = {this.handleClick}>{this.props.name}жңӘжқҘ{this.state.will ? "дјҡ" : "дёҚдјҡ"}жӣҙеҘҪпјҒ</p>
</div>
)
}
});
ReactDOM.render(<MyComponent/>,document.querySelector("#example"));
ReactDOM.render(<MyComponent/>,document.querySelector("#example2"));
</script>
 В
В
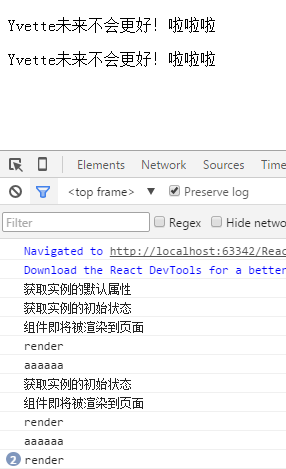
д»ҺиҝҗиЎҢз»“жһңеҸҜд»ҘзңӢеҮә:В
1гҖҒиҺ·еҸ–й»ҳи®ӨеұһжҖ§(getDefaultProps)еҸӘдјҡеңЁз¬¬дёҖж¬Ўе®һдҫӢеҢ–组件时иҝҗиЎҢдёҖж¬Ў,еҗҺйқўдёҚдјҡеҶҚиҝҗиЎҢпјҢВ
2гҖҒиҺ·еҸ–еҲқе§ӢзҠ¶жҖҒ(getInitialState)е’ҢcomponentWillMount,render,componentDidMountеңЁжҜҸж¬Ўе®һдҫӢеҢ–组件时,йғҪдјҡиҝӣе…Ҙ.В
3гҖҒзӮ№еҮ»еҲҮжҚўж—¶,еҸӘдјҡи§ҰеҸ‘renderеҮҪж•°пјҢеӣ жӯӨжҲ‘们еҶҷеңЁcomponentDidMountеҮҪж•°дёӯзҡ„зҠ¶жҖҒеҲӨж–ӯдёҚдјҡеҶҚиў«жү§иЎҢ.
иҝҗиЎҢдёӯйҳ¶ж®өиғҪеӨҹдҪҝз”Ёзҡ„й’©еӯҗеҮҪж•°(жҢүз…§и§ҰеҸ‘йЎәеәҸ)пјҡВ
componentWillReceiveProps(组件еҝ«иҰҒжҺҘ收еҲ°еұһжҖ§ж—¶и§ҰеҸ‘)вҖ”вҖ”зҲ¶з»„件дҝ®ж”№еұһжҖ§и§ҰеҸ‘,еҸҜд»Ҙдҝ®ж”№ж–°еұһжҖ§гҖҒдҝ®ж”№зҠ¶жҖҒгҖӮВ
еңЁдҝ®ж”№еҸ‘з”ҹд№ӢеүҚеҮәеҸ‘гҖӮеңЁеұһжҖ§зңҹжӯЈжҜ”дј йҖҒеҲ°з»„件д№ӢеүҚ,еҜ№е…¶иҝӣиЎҢеӨ„зҗҶгҖӮВ
shouldComponentUpdate(组件жҺҘ收еҲ°ж–°зҠ¶жҖҒж—¶пјҢжҳҜеҗҰйңҖиҰҒжӣҙж–°пјҢиҝ”еӣһfalse,Reactе°ұдёҚдјҡжӣҙж–°пјҢеҸҜд»ҘжҸҗй«ҳжҖ§иғҪ)В
componentWillUpdate(组件еҚіе°Ҷжӣҙж–°еҲ°йЎөйқў)вҖ”вҖ”дёҚиғҪдҝ®ж”№еұһжҖ§е’ҢзҠ¶жҖҒ,дјҡеҜјиҮҙжӯ»еҫӘзҺҜВ
renderвҖ”вҖ”еҸӘиғҪи®ҝй—®this.propsе’Ңthis.state,дёҚеә”еҶҚи®ҝй—®е…¶е®ғдҝЎжҒҜпјҢеҸӘжңүдёҖдёӘйЎ¶еұӮ组件пјҢдҪҶжҳҜеҸҜд»Ҙжңүеӯҗ组件пјҢдёҚе…Ғи®ёдҝ®ж”№зҠ¶жҖҒе’ҢDOMиҫ“еҮәгҖӮВ
componentDidUpdate(еңЁз»„件жӣҙж–°еҲ°йЎөйқўд№ӢеҗҺи°ғз”Ё)вҖ”вҖ”еҸҜд»Ҙдҝ®ж”№DOM
<body>
<div id = "example"></div>
<div id = "example2"></div>
</body>
</html>
<script src="build/jquery-1.11.2.min.js"></script>
<script src="build/react.js"></script>
<script src="build/react-dom.js"></script>
<script src="build/browser.min.js"></script>
<script type="text/babel">
var MyComponent = React.createClass({
getDefaultProps: function(){
console.log("иҺ·еҸ–е®һдҫӢзҡ„й»ҳи®ӨеұһжҖ§");
return{name: "Yvette"};
},
getInitialState: function () {
console.log("иҺ·еҸ–е®һдҫӢзҡ„еҲқе§ӢзҠ¶жҖҒ");
return{will:true};
},
componentWillMount: function () {
console.log("组件еҚіе°Ҷиў«жёІжҹ“еҲ°йЎөйқў");
},
handleClick: function(event){
this.setState({will: !this.state.will});
},
componentDidMount: function(){
console.log("组件被渲жҹ“еҲ°йЎөйқўд№ӢеҗҺ");
$(this.refs.example).append("е•Ұе•Ұе•Ұ");
},
render: function(){
console.log("render")
return(
<div>
<p ref = "example" onClick = {this.handleClick}>{this.props.name}жңӘжқҘ{this.state.will ? "дјҡ" : "дёҚдјҡ"}жӣҙеҘҪпјҒ</p>
</div>
);
},
componentWillReceiveProps: function(){
console.log("组件еҝ«иҰҒжҺҘ收еҲ°еұһжҖ§");
},
shouldComponentUpdate: function(){
console.log("жҳҜеҗҰйңҖиҰҒжӣҙж–°");
return false;
},
componentWillUpdate: function(){
console.log("组件еҚіе°Ҷиў«жӣҙж–°");
},
componentDidUpdate: function(){
console.log("组件жӣҙж–°иў«жёІжҹ“еҲ°йЎөйқў");
}
});
ReactDOM.render(<MyComponent/>,document.querySelector("#example"));
ReactDOM.render(<MyComponent/>,document.querySelector("#example2"));
</script>
иҝҗиЎҢз»“жһңеҰӮдёӢпјҡВ 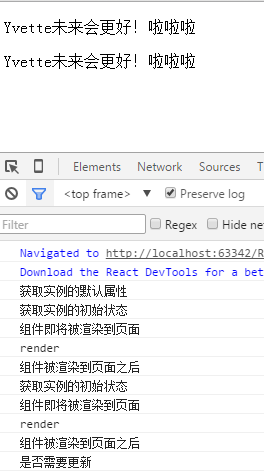 В
В
д»ҺиҝҗиЎҢз»“жһңеҸҜд»ҘзңӢеҮә:В
1гҖҒеңЁиҝҗиЎҢиҝҮзЁӢдёӯ,组件зҡ„зҠ¶жҖҒеҸ‘з”ҹж”№еҸҳж—¶пјҢйҰ–е…Ҳиҝӣе…ҘshouldComponentUpdateеҮҪж•°пјҢеҚіз»„件жҳҜеҗҰйңҖиҰҒжӣҙж–°,еҰӮжһңиҝ”еӣһfalse,иЎЁзӨәж— йңҖжӣҙж–°,зӣҙжҺҘиҝ”еӣһгҖӮ
<body>
<div id = "example"></div>
<div id = "example2"></div>
</body>
</html>
<script src="build/jquery-1.11.2.min.js"></script>
<script src="build/react.js"></script>
<script src="build/react-dom.js"></script>
<script src="build/browser.min.js"></script>
<script type="text/babel">
var MyComponent = React.createClass({
getDefaultProps: function(){
console.log("иҺ·еҸ–е®һдҫӢзҡ„й»ҳи®ӨеұһжҖ§");
return{name: "Yvette"};
},
getInitialState: function () {
console.log("иҺ·еҸ–е®һдҫӢзҡ„еҲқе§ӢзҠ¶жҖҒ");
return{will:true};
},
componentWillMount: function () {
console.log("组件еҚіе°Ҷиў«жёІжҹ“еҲ°йЎөйқў");
},
handleClick: function(event){
this.setState({will: !this.state.will});
},
componentDidMount: function(){
console.log("组件被渲жҹ“еҲ°йЎөйқўд№ӢеҗҺ");
//$(this.refs.example).append("е•Ұе•Ұе•Ұ");
},
render: function(){
console.log("render")
return(
<div>
<p ref = "example" onClick = {this.handleClick}>{this.props.name}жңӘжқҘ{this.state.will ? "дјҡ" : "дёҚдјҡ"}жӣҙеҘҪпјҒ</p>
<span ref = "more">е•Ұе•Ұе•Ұ</span>
</div>
);
},
componentWillReceiveProps: function(){
console.log("组件еҝ«иҰҒжҺҘ收еҲ°еұһжҖ§");
},
shouldComponentUpdate: function(){
console.log("жҳҜеҗҰйңҖиҰҒжӣҙж–°");
return true;
},
componentWillUpdate: function(){
console.log("组件еҚіе°Ҷиў«жӣҙж–°");
$(this.refs.example).css({"background": "#ccc","line-height":"30px"});
//this.setState({will: !this.state.will});//еҜјиҮҙдёҖдёӘжӯ»еҫӘзҺҜ
},
componentDidUpdate: function(){
console.log("组件жӣҙж–°иў«жёІжҹ“еҲ°йЎөйқў");
if(this.state.will){
$(this.refs.more).html("е•Ұе•Ұе•Ұ");
}
else{
$(this.refs.more).html("йғҒй—·");
}
}
});
ReactDOM.render(<MyComponent/>,document.querySelector("#example"));
ReactDOM.render(<MyComponent/>,document.querySelector("#example2"));
</script>
 В
В
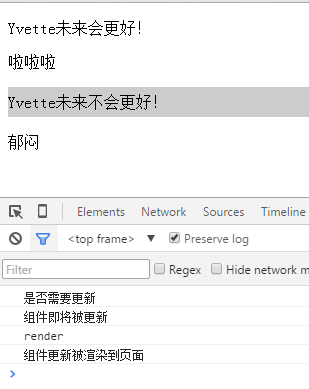
д»ҺиҝҗиЎҢз»“жһңеҸҜд»ҘзңӢеҮәй’©еӯҗеҮҪж•°зҡ„и§ҰеҸ‘йЎәеәҸпјҡ
1гҖҒshouldComponentUpdate,еҝ…йЎ»иҝ”еӣһtrueжҲ–false,еҰӮжһңиҝ”еӣһfalse,зӣҙжҺҘиҝ”еӣһпјҢдёҚдјҡеҶҚи§ҰеҸ‘еҗҺйқўзҡ„й’©еӯҗеҮҪж•°гҖӮ
2гҖҒcomponentWillUpdateе’ҢcomponentDidUpdateдёӯйғҪеҸҜд»Ҙж“ҚдҪңDOMе…ғзҙ ,еӣ дёәеҪ“еүҚеңЁиҝҗиЎҢиҝҮзЁӢдёӯ,组件已з»Ҹиў«жёІжҹ“еҲ°дәҶйЎөйқўгҖӮдҪҶжҳҜжңҖеҗҺжҳҜеңЁcomponentDidUpdateдёӯиҝӣиЎҢдҝ®ж”№гҖӮ
й”ҖжҜҒдёӯйҳ¶ж®өиғҪеӨҹдҪҝз”Ёзҡ„й’©еӯҗеҮҪж•°(жҢүз…§и§ҰеҸ‘йЎәеәҸ)пјҡВ
componentWillUnmount(еңЁй”ҖжҜҒж“ҚдҪңжү§иЎҢд№ӢеүҚи§ҰеҸ‘)вҖ”вҖ”еңЁз»„件зңҹжӯЈиў«й”ҖжҜҒеүҚи°ғз”ЁпјҢеңЁеҲ йҷӨ组件д№ӢеүҚиҝӣиЎҢжё…зҗҶж“ҚдҪңпјҢеҰӮи®Ўж—¶еҷЁе’ҢдәӢ件зӣ‘еҗ¬еҷЁгҖӮ
<body>
    <div id = "example"></div>
</body>
</html>
<script src="build/react.js"></script>
<script src="build/react-dom.js"></script>
<script src="build/browser.min.js"></script>
<script type="text/babel">
    var style = {
        color: "red",
        border: "1px solid #000"
    };
    var HelloWorld = React.createClass({
        render: function(){
            return <p>Hello, {this.props.name ? this.props.name : "World"}</p>;
        },
        componentWillUnmount: function(){
            console.log("I will unmount");
        }
    });
    var HelloUniverse = React.createClass({
        getInitialState: function(){
            return {name: "Yvette"};
        },
        handleChange: function (event) {
            if(event.target.value == "123"){
                React.unmountComponentAtNode(document.querySelector("#example"))
                return;
            }
            this.setState({name: event.target.value});
        },
        render: function(){
            return(
                <div>
                    <HelloWorld name = {this.state.name}></HelloWorld>
                    <br/>
                    <input type = "text" onChange = {this.handleChange} />
                </div>
            );
        }
    });
    ReactDOM.render(<div style = {style}><HelloUniverse></HelloUniverse></div>,document.querySelector("#example"));
</script>
еҪ“иҫ“е…Ҙз»“жһңдёә123ж—¶пјҢи§ҰеҸ‘componentWillUnmountй’©еӯҗеҮҪж•°гҖӮ